There are multiple ways to find a specific asset:
You can use the search bar in the Dashboard, Explore, or Devices page to find the assets by their name.
To get more information on the asset, click on the asset name.
On the Asset tab, you can see on the map where your asset currently is located.
- Under Status (1), you can find the information of the Globehopper, like the position/events/ paired sensors and mileage
- Under Events (1), you can find the events you have set with triggers
- Under Asset Data (1), you can set and find metadata
- Under Documents (1), you can upload files and look into uploaded files (here you can find the pictures of the mounted device on the asset)
- Under Reports (1), you can find pre-defined reports for your account
- Under Manage Asset (1), you can find your asset name, the type of your asset (which you can change here, device pairing, and delete the asset
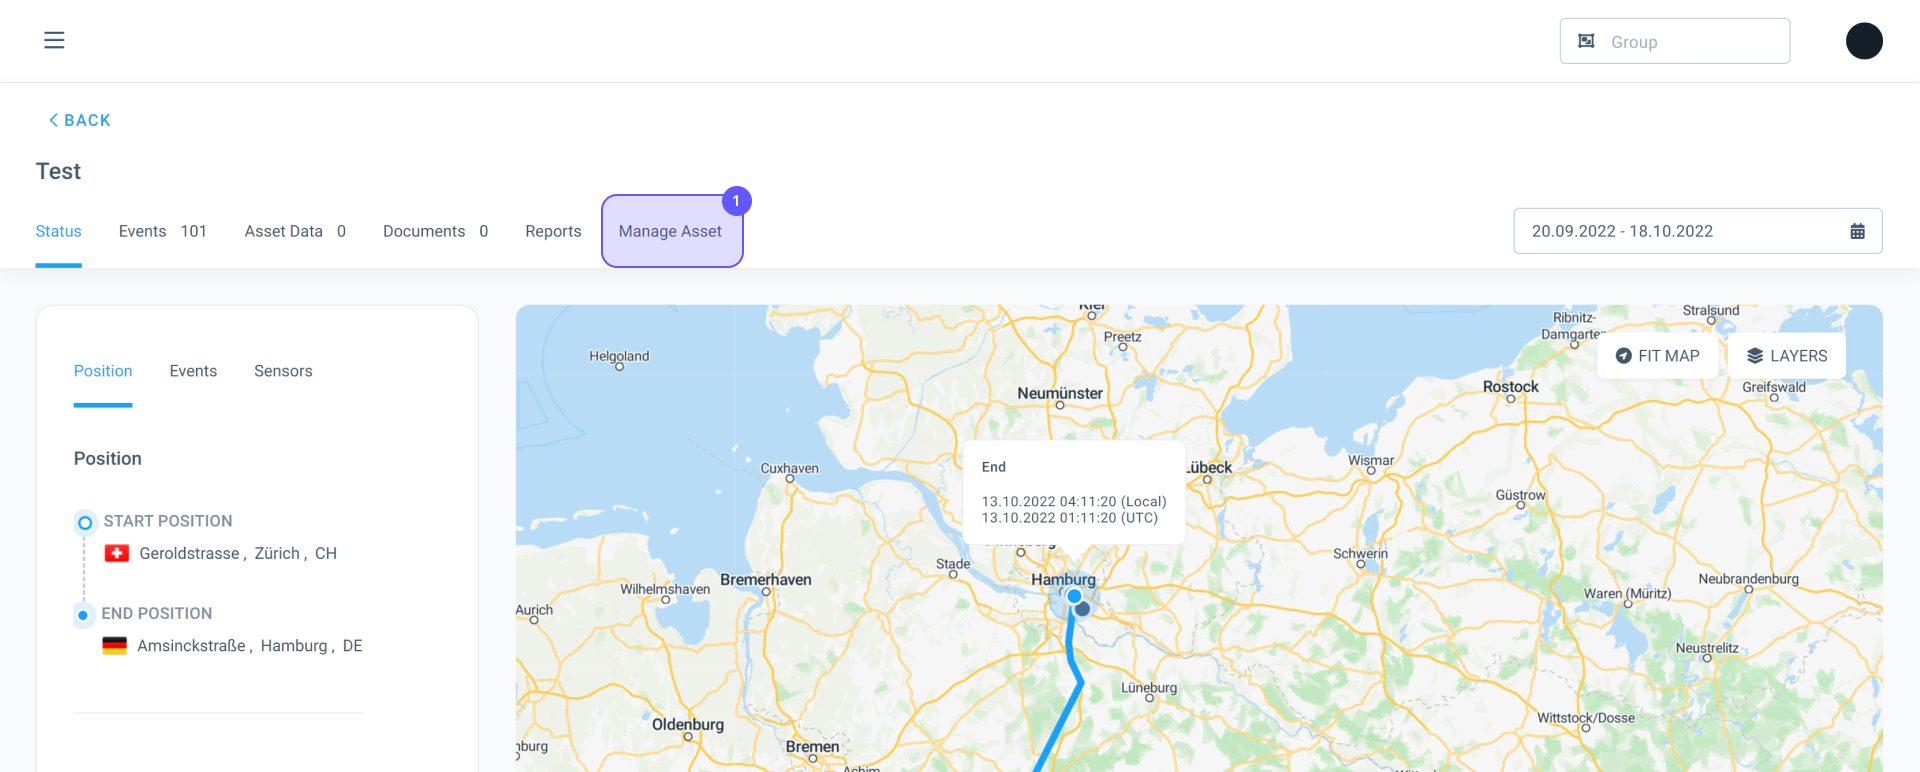
- Under Position (2), you can find the start and end position of your chosen time
- Under Events (2), you can find events of your asset
- Under Sensors (2), you can find the connected sensors

You can use the search bar in the Dashboard, Explore, or Devices page to find the assets by their name. To get more information on the asset, click on the asset name. On the asset page, you can see on the map where your asset currently is located.
Option 1:
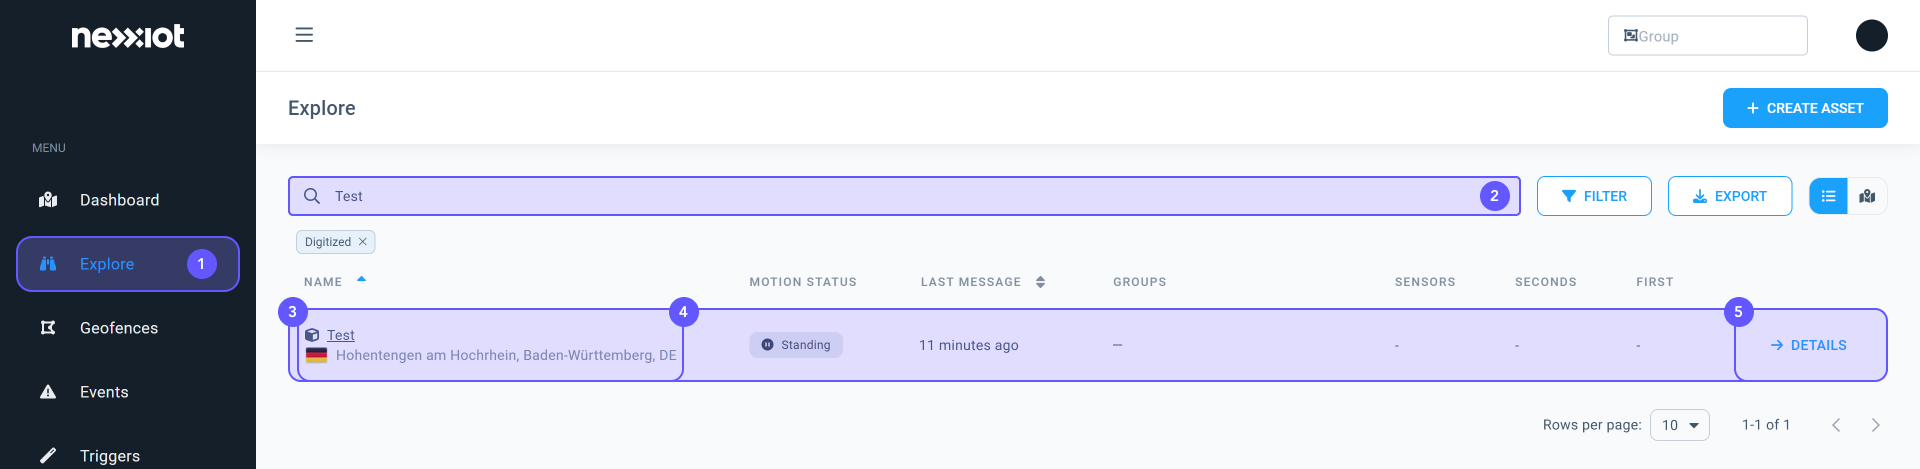
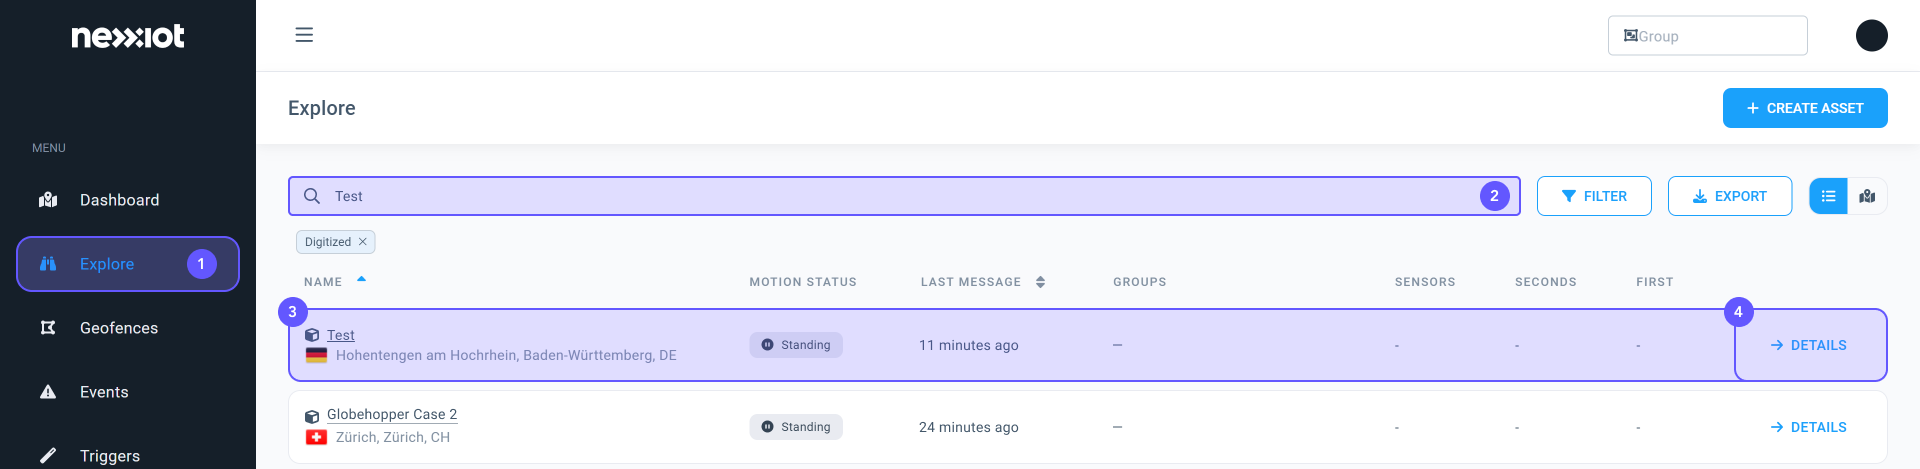
- Navigate to the Explore (1) page
- Write the name of the asset in the search bar (2); the asset column (3) will be shown directly under the search bar
- Click on the name (4) or DETAILS (5)
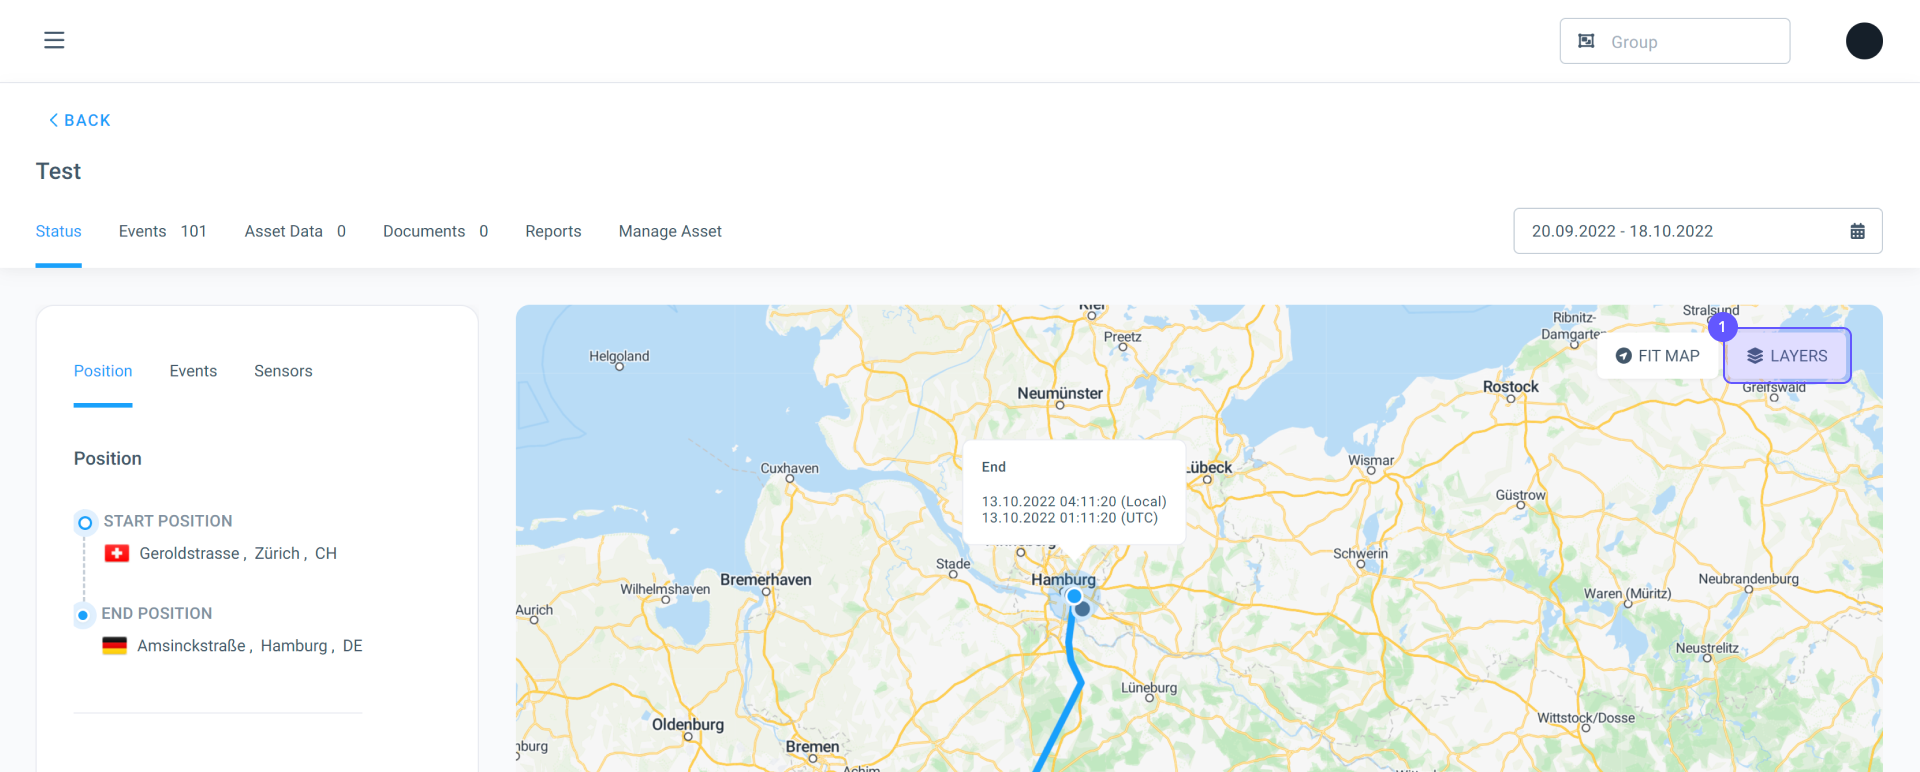
- In the new asset window on the map, you will find the location of your asset (1)
- Use the date field (2) to select the date range you are looking for (3)
- The map will now reflect where your asset was during your selected date range

Option 2:
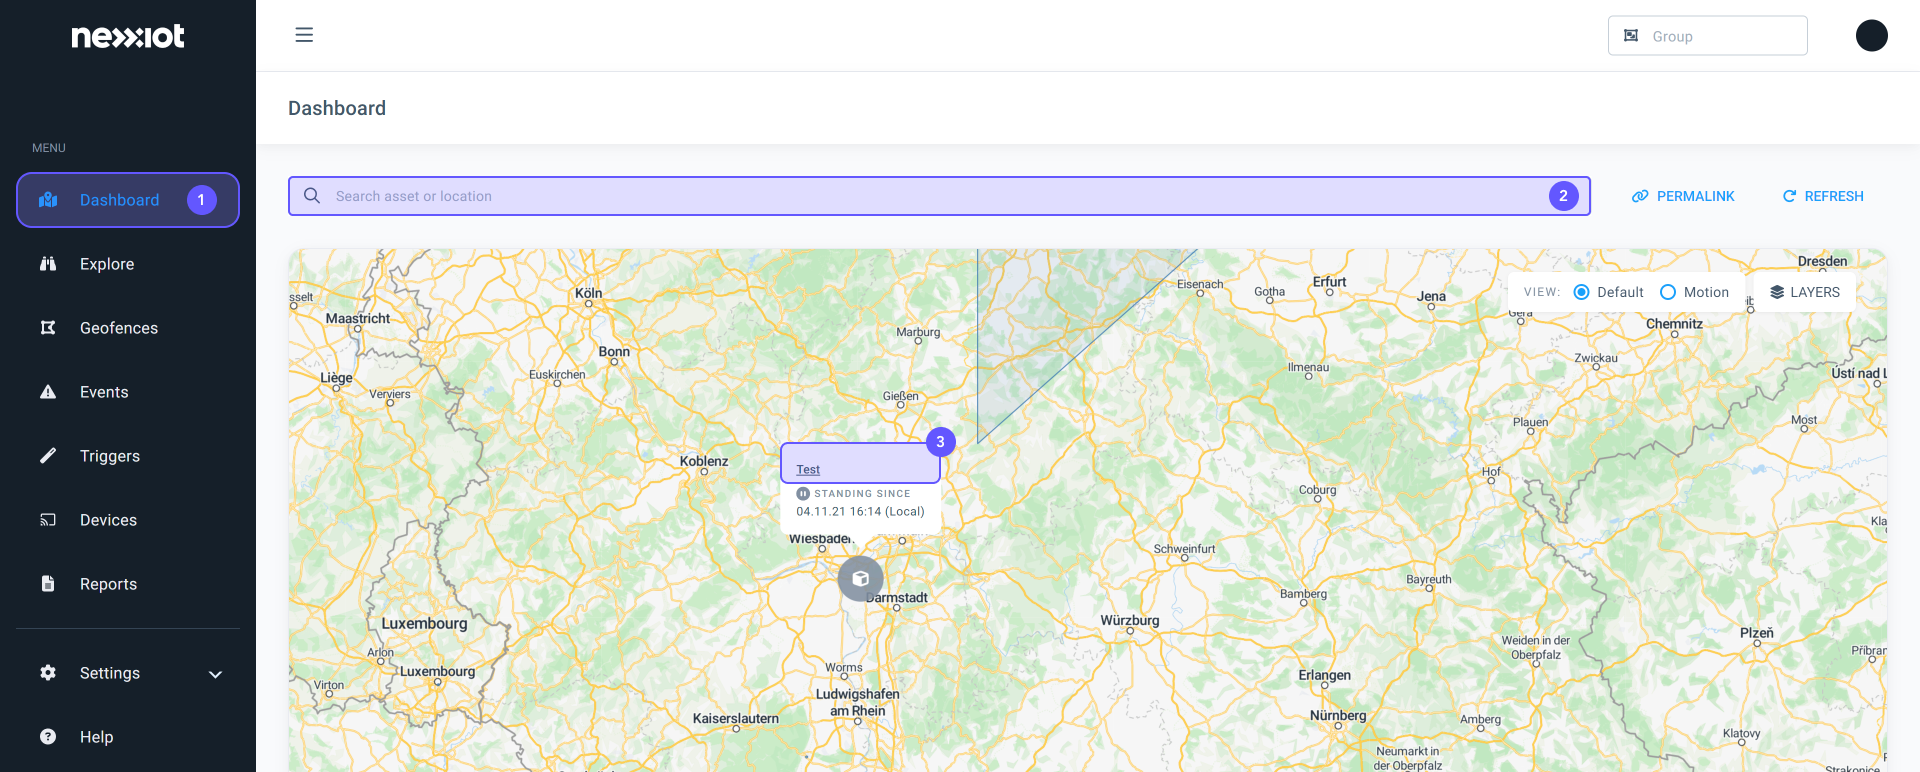
- Navigate to the Dashboard (1) page. Search for the asset by name using the search bar (2). Click on the asset on the map (3).
- In the new asset window on the map, you will find the location of your asset (1).
- Use the date field (2) to select the date range you are looking for (3); the map will now reflect where your asset was during your selected date range.
An asset’s motion status is based on the last message that the device sent. If the asset is moving, it will be labeled as moving and if an asset is not moving, it will appear as stationary on Nexxiot Connect Intelligent Cloud.
If an asset is moving, the device sends a message every 5 minutes and if stationary, the device will send a message every 12 hours to optimize battery usage.
Option 1:
- Navigate to the Explore (1) page
- In the list of your assets under MOTION STATUS (2) you can see if the asset is moving or standing
- Here you can filter (3) for Motion Status (4)
- Click on APPLY (5)

Option 2:
- Navigate to the Dashboard (1) page
- Your asset(s) will be shown on the map.
- The color of the item indicates the motion status; the green item means “moving” and grey means “standing”
- In the pop-up box above the item, you can also see the motion status (2)

- Navigate to the Explore (1) page
- Use the search bar (2) to find the asset you are looking for
- Click on the name of your asset (3) or click on DETAILS (4)

- On the bottom right of the map (1) you can see the mileage and route traveled by your asset

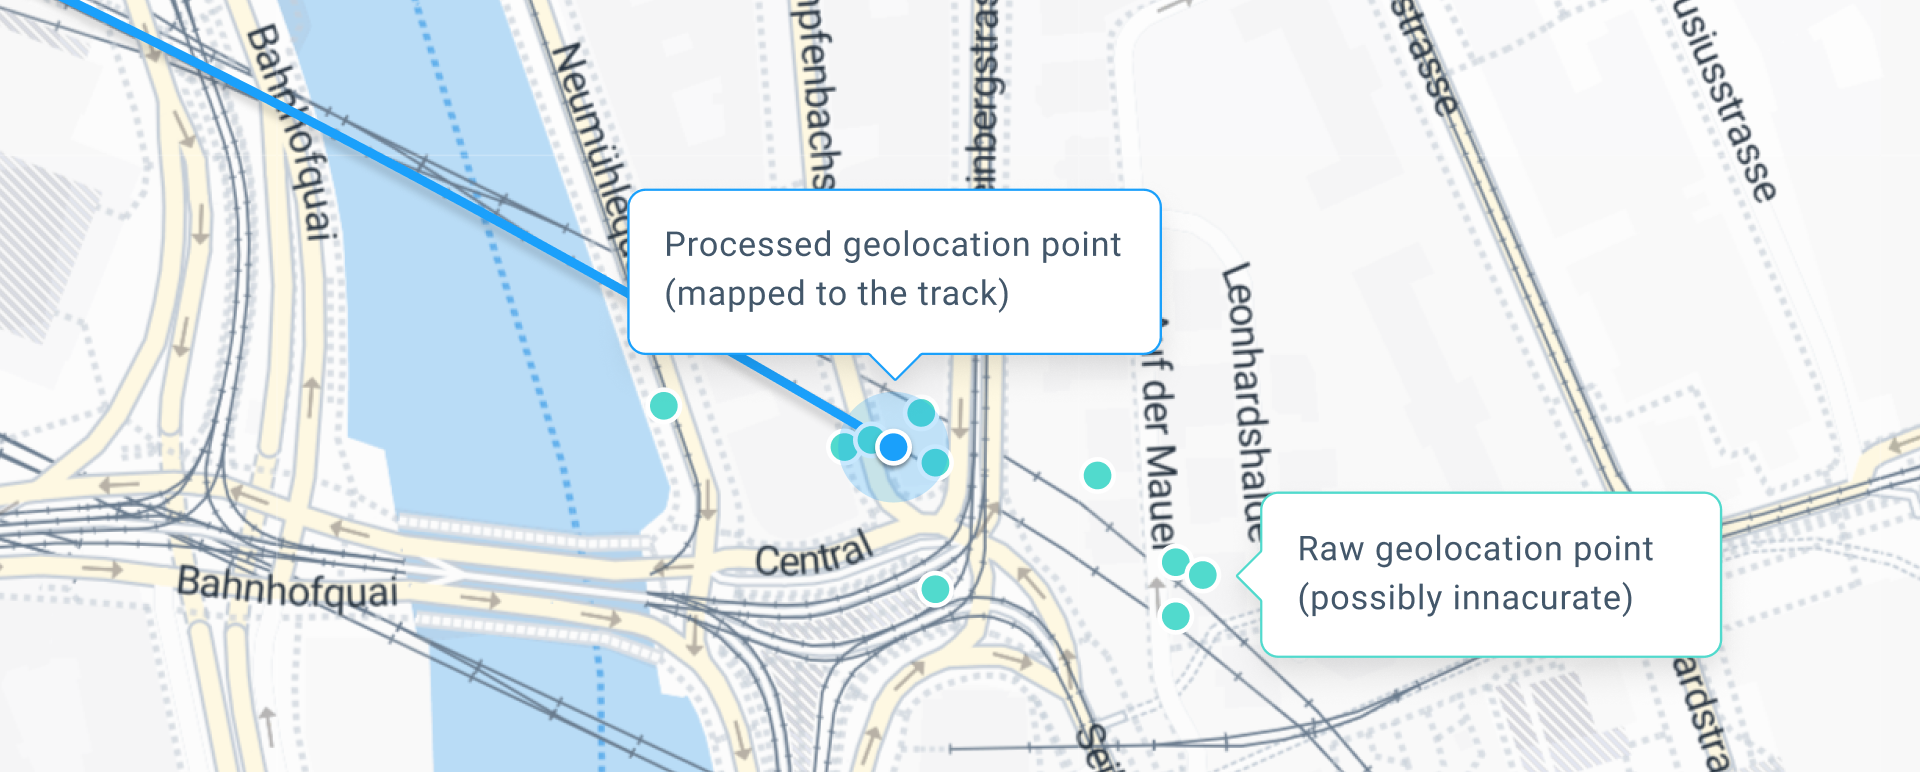
The calculation of the mileage is based on the geolocation messages sent by the asset.
As geolocation messages may be sent with some degree of inaccuracy, our proprietary map-matching software will carefully find the correct route or track the asset effectively took, hence allowing to extract mileage for each segment (i.e. in-between two geolocation points).
The asset on which the device is mounted may be in an area with poor cellular connection or the signal from the device might be obstructed by surrounding obstacles (e.g. other wagons or containers).
If the device is not sending any information for longer than 48 hours, please get in touch with us via support@nullnexxiot.com for assistance and, if available, provide additional information on the location and movement status of the asset.
- Navigate to the Explore (1) page
- Browse the list of assets or use the search bar (2) at the top of the table to find assets by their name
- Click on the asset name (3) or DETAILS (4)

- Under Manage Asset (1) you can change the name of the asset
- In the field asset name (2), you can change the name by clicking on EDIT

The asset speed is calculated for each segment (i.e., between two geolocation points or two intervals) as an average. By knowing both the distance traveled and the duration of the trip, we derive the asset’s speed.
When you look at your asset, there are two dates and times indicated.
Local represents the date and time using the asset’s physical location’s time zone. The second line indicates the user’s current date and time.

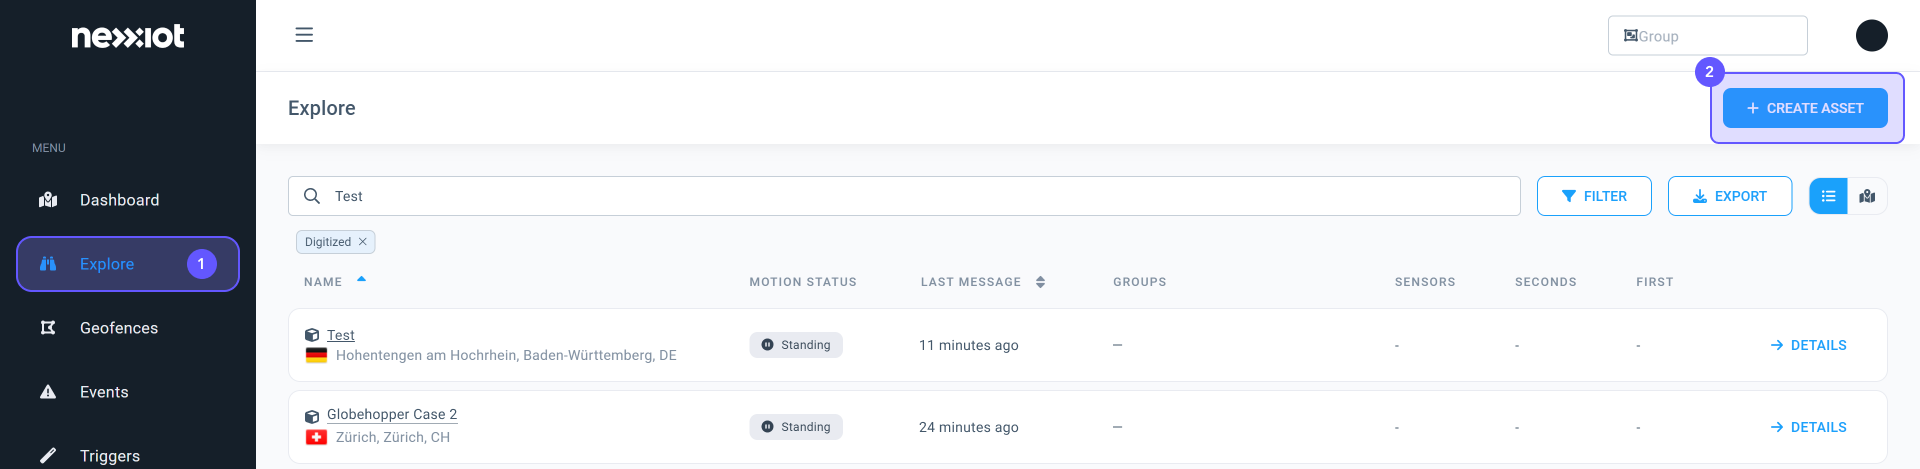
- To create an asset without a device, navigate to the Explore page (1)
- Click on +CREATE ASSET (2)
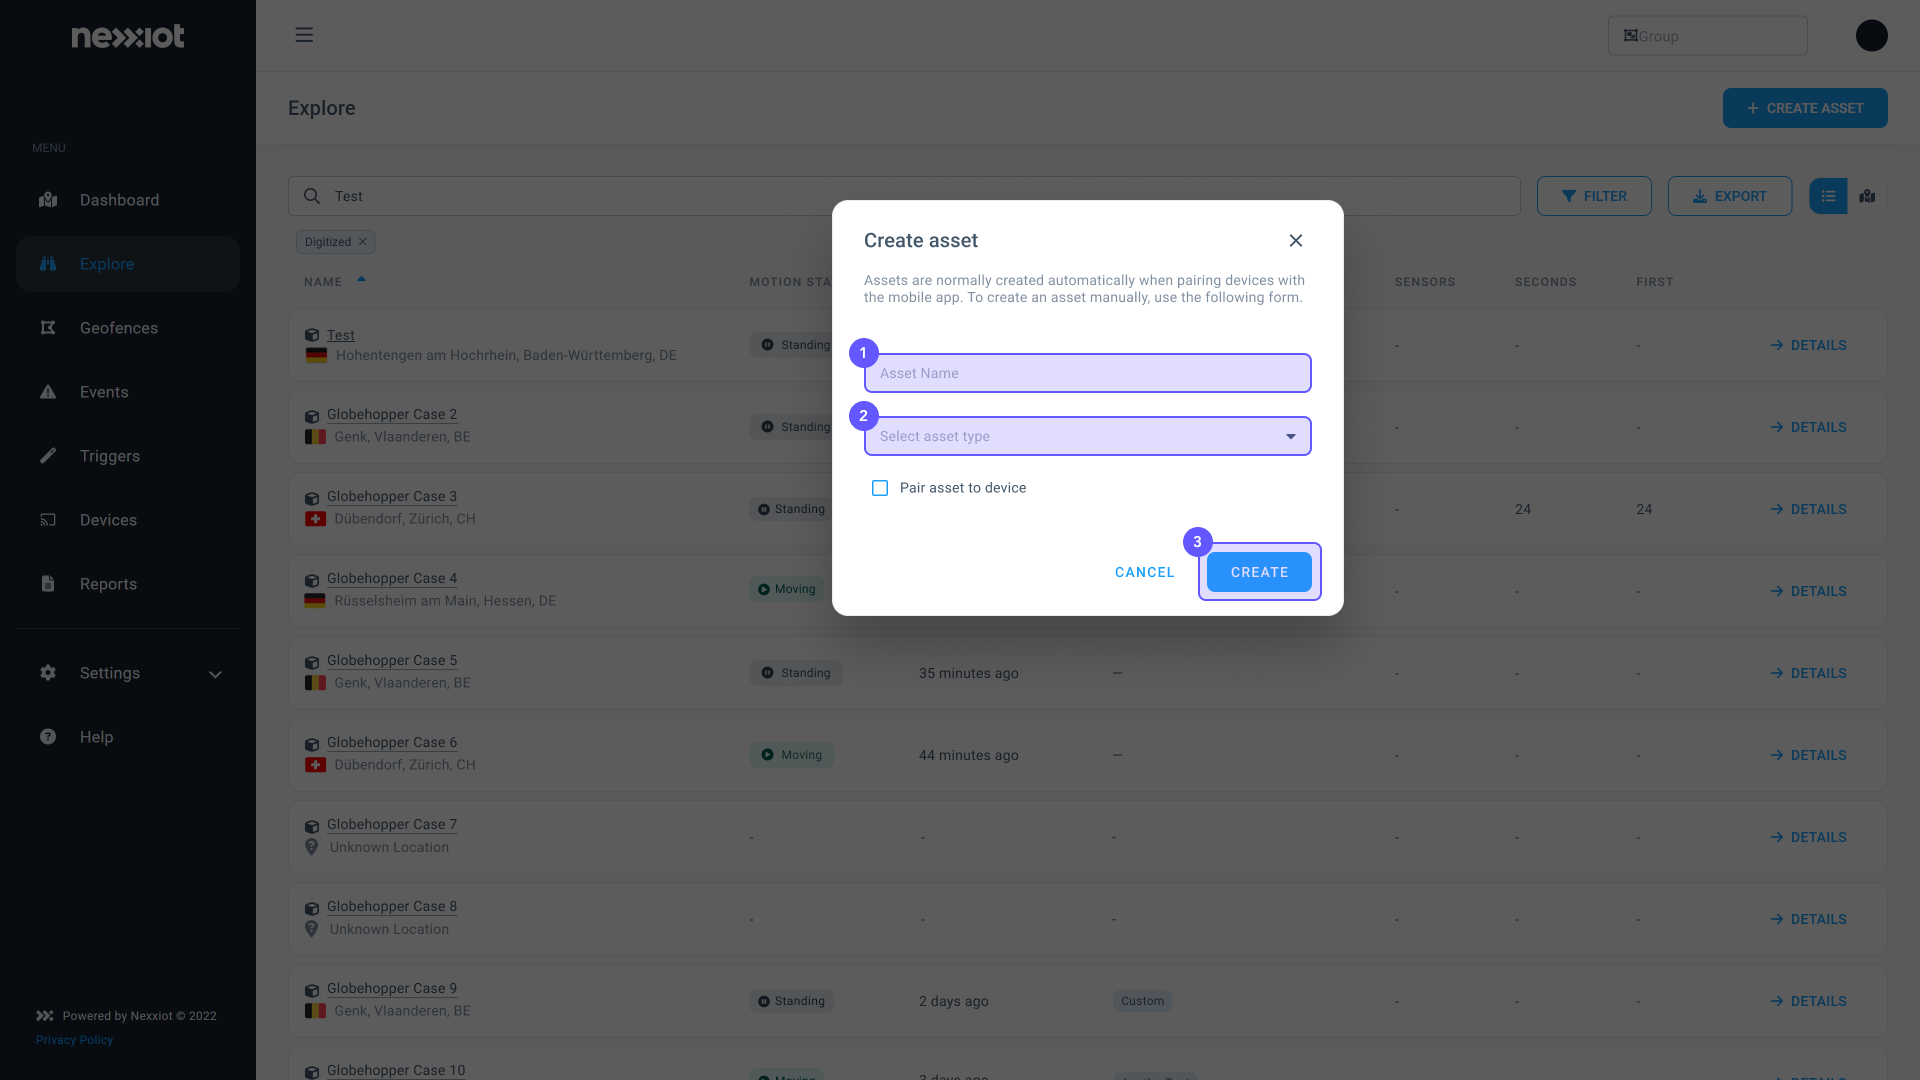
The Create Asset box will pop up and here you will enter your asset name in the Asset Name (1) field. Next, in the Asset Type (2) select your asset type. Click CREATE (3) to save the asset.
Your asset will now appear in the Explore list; when searching for your asset, filter by “not digitized”.
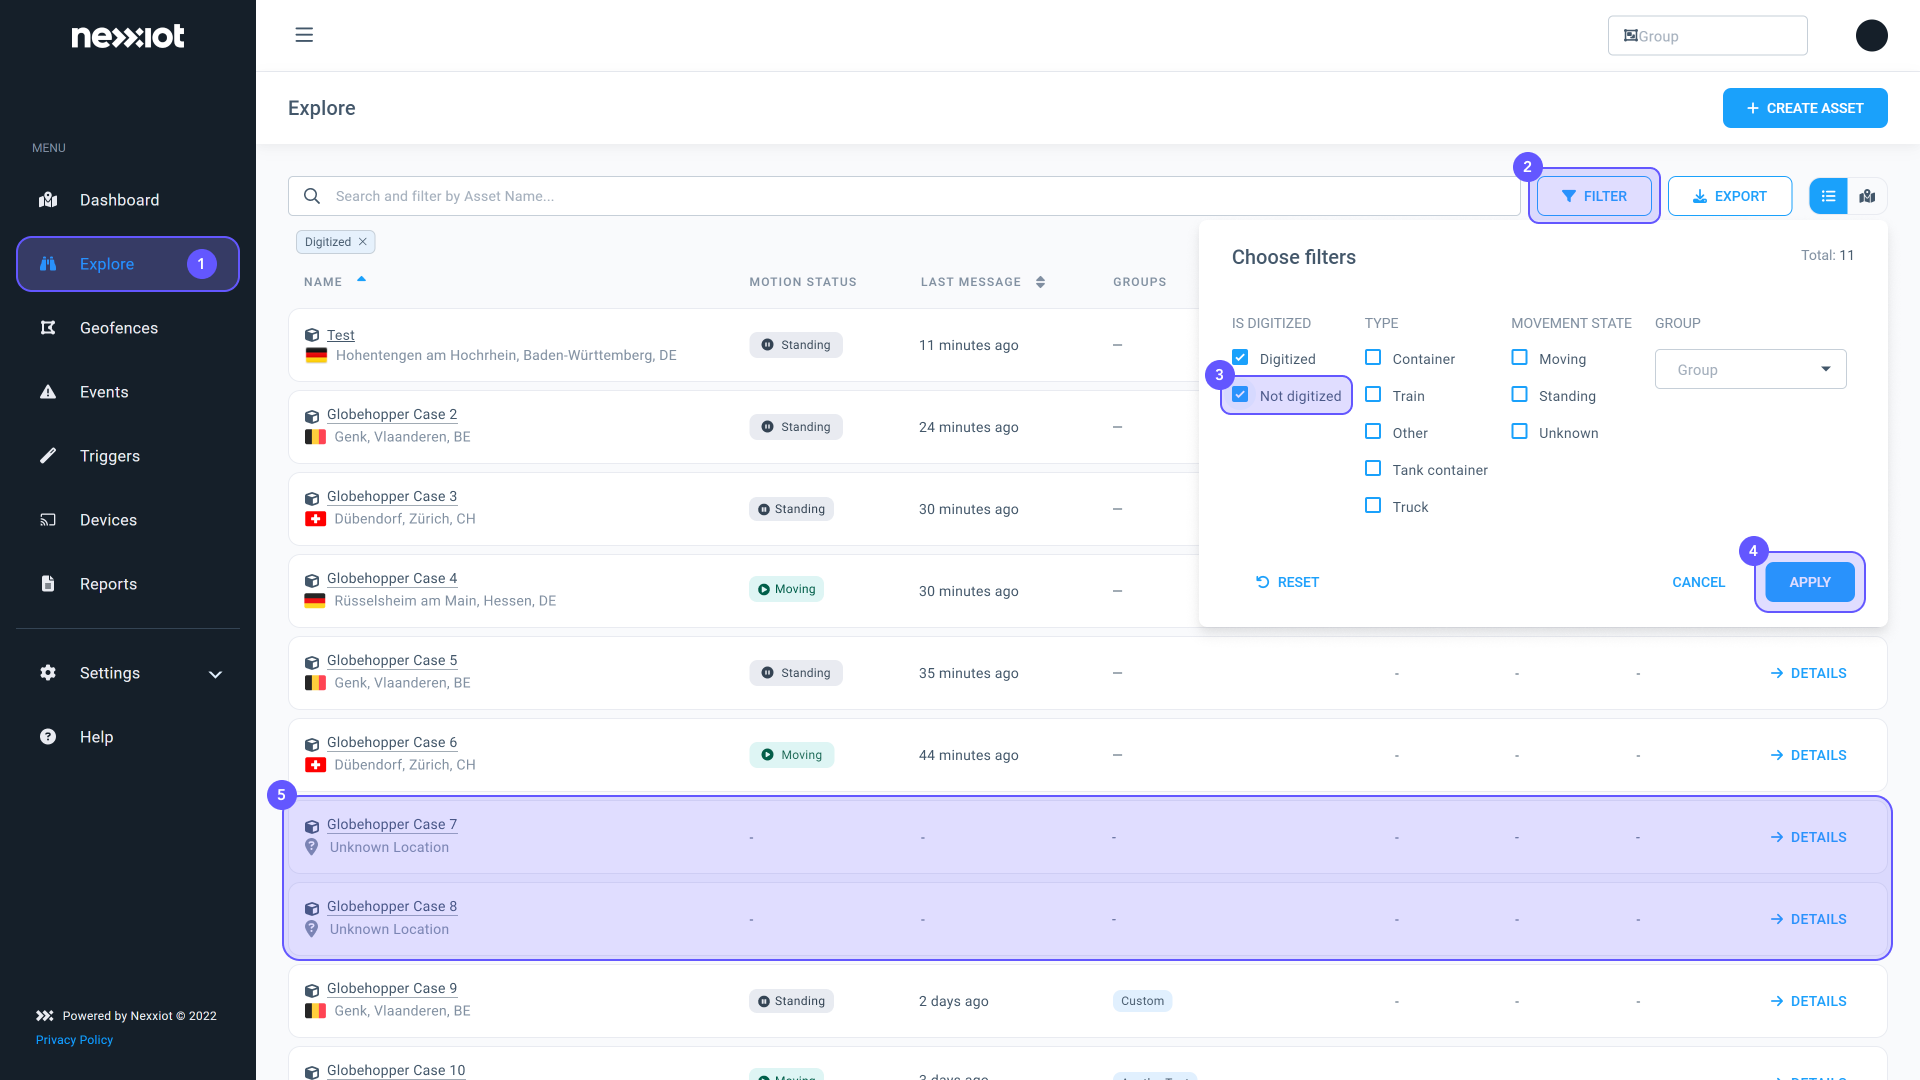
- Navigate to the Explore (1) page and filter (2) for “Not digitized” (3).
- Click on APPLY (4) and you can find the not digitized assets in the list (5) on the Explore page.
To pair a device with your asset, you first need to navigate to the Explore (1) page and click on “+ CREATE ASSET”.

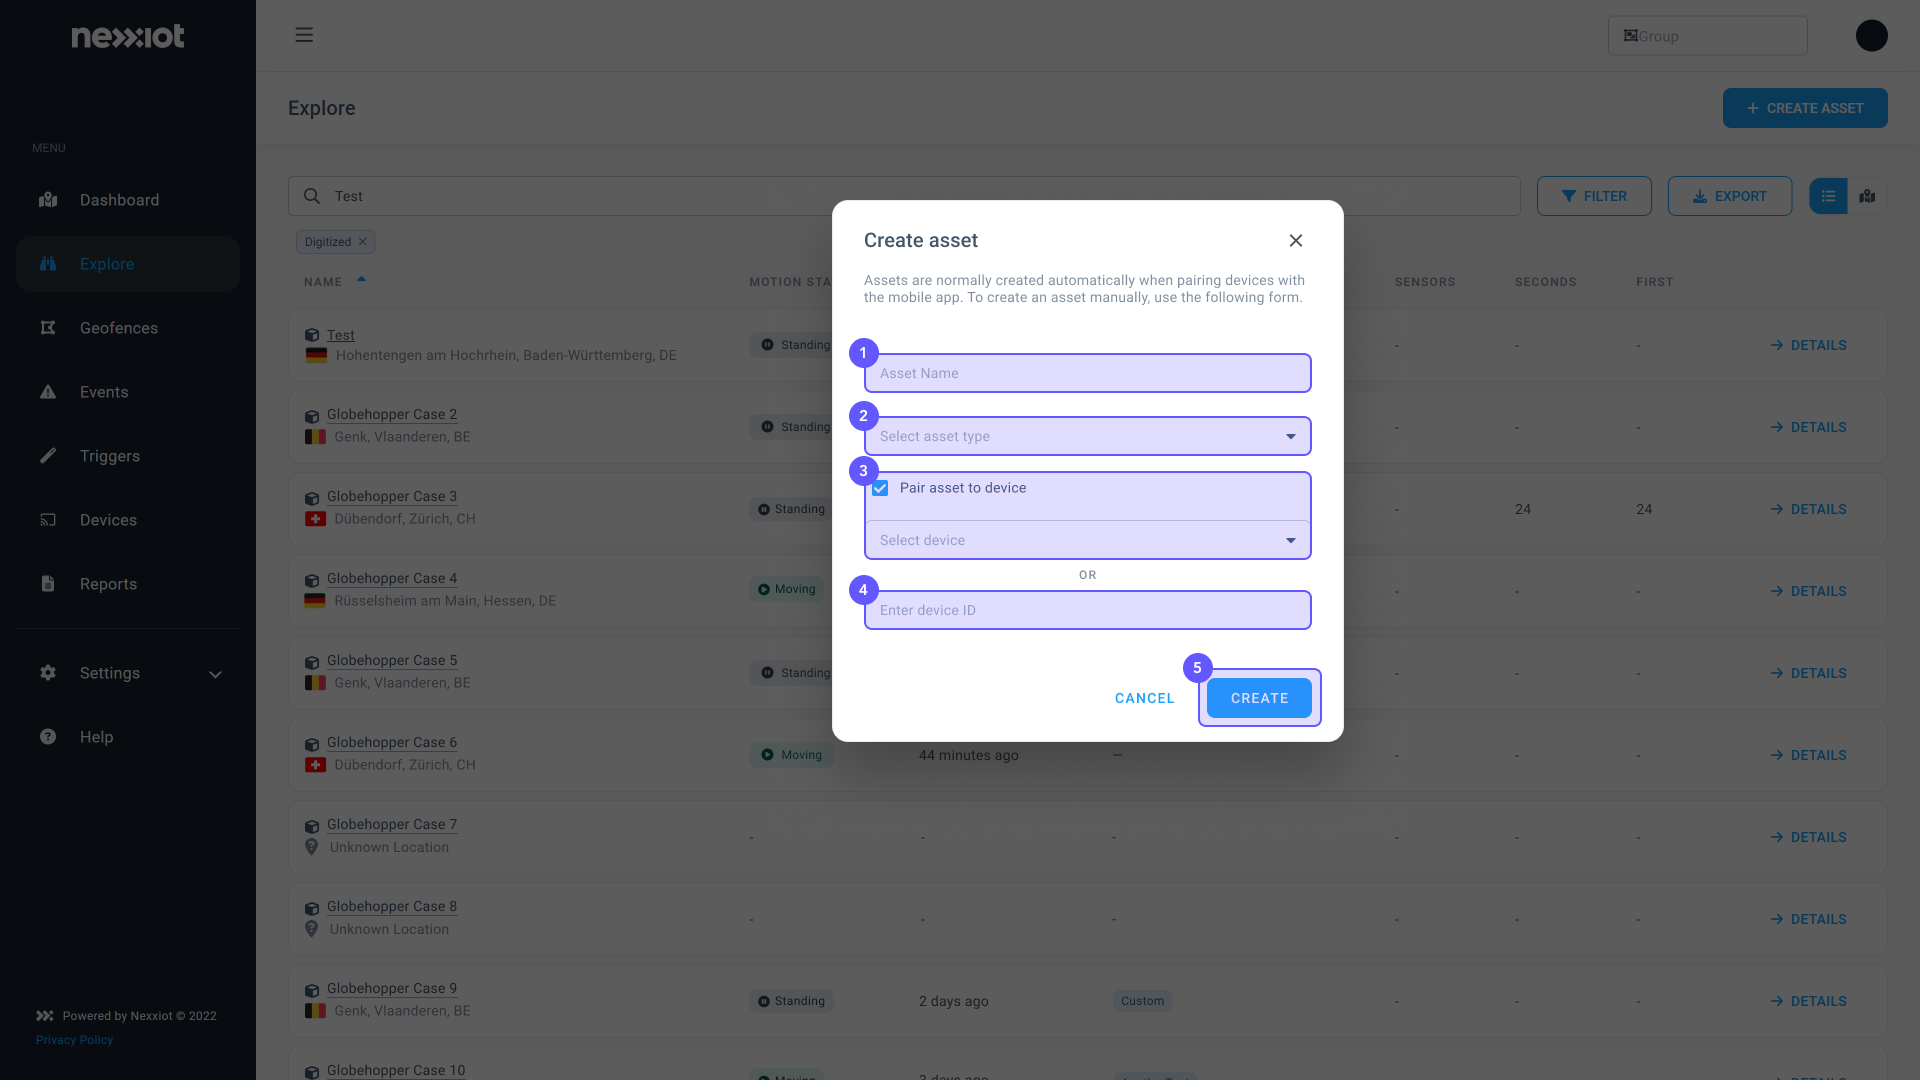
The Create asset box will pop up. Please follow these steps:
- In the field Asset Name (1), write the name of your asset down.
- In the field Asset Type (2), select the type of asset.
- Click the checkbox on the right side of the field, Pair asset to the device (3).
- Either find and select your device in the Select Device (3) dropdown menu or enter the device ID in Enter Device ID (4).
- Click on CREATE (5) and now the asset paired with your chosen device can be found on the Explore page.
(IMPORTANT: Do not forget to upload pictures after you have set a device on the Connect Intelligent Cloud)
It is likely that your user does not have permission to pair devices. Please get in touch with us via support@nullnexxiot.com for assistance.
Option 1:
- Navigate to the Explore (1) page
- Type the asset name in the search bar (2)
- The asset column will be shown directly under the search bar (3)
- Click on the name (4) or DETAILS (5)

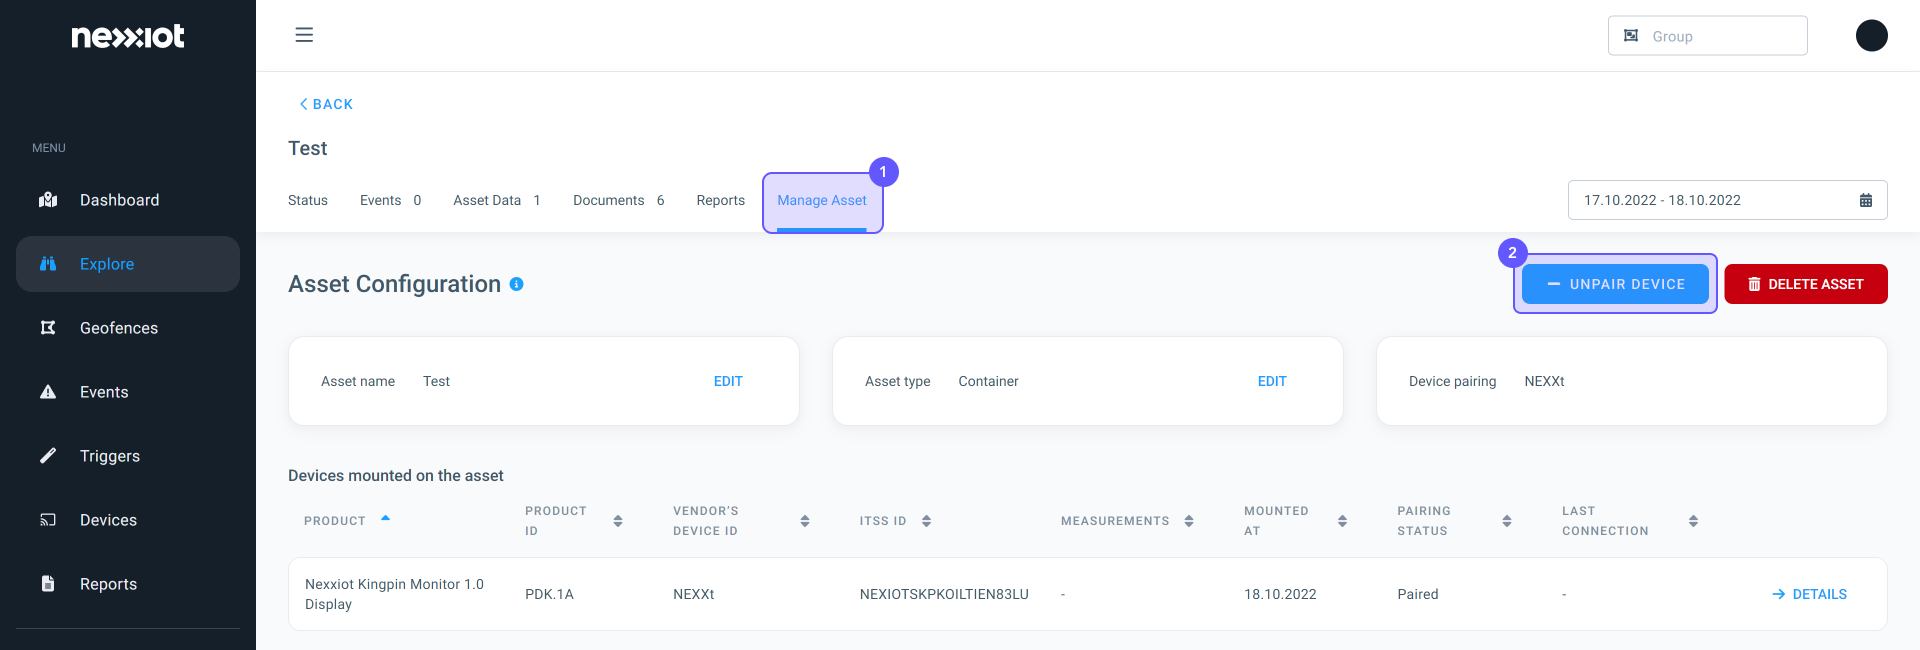
Please follow these steps on the Asset Configuration page.
- Click on the Manage Asset (1) tab
- Click on UNPAIR DEVICE (2)

- You will be asked if you would like to proceed with unpairing the device in a pop-up window. Click on UNPAIR

Option 2:
- Navigate to the Dashboard (1) page
- Type the asset name in the search bar (2)
- Click on the asset shown on the map (3)

Please follow these steps on the Asset Configuration page.
- Click on Manage Asset (1) tab
- Click on UNPAIR DEVICE (2)
Option 3:
Open the Nexxiot Pairing App on your Android smartphone.
- Click on MORE OPTIONS
- Click on UNPAIR DEVICE
- Choose your type of asset
- Follow the process shown on the app
- Navigate to the Explore page
- Search for the asset name
- The asset column will be shown directly under the search bar
- Click on the asset name or DETAILS
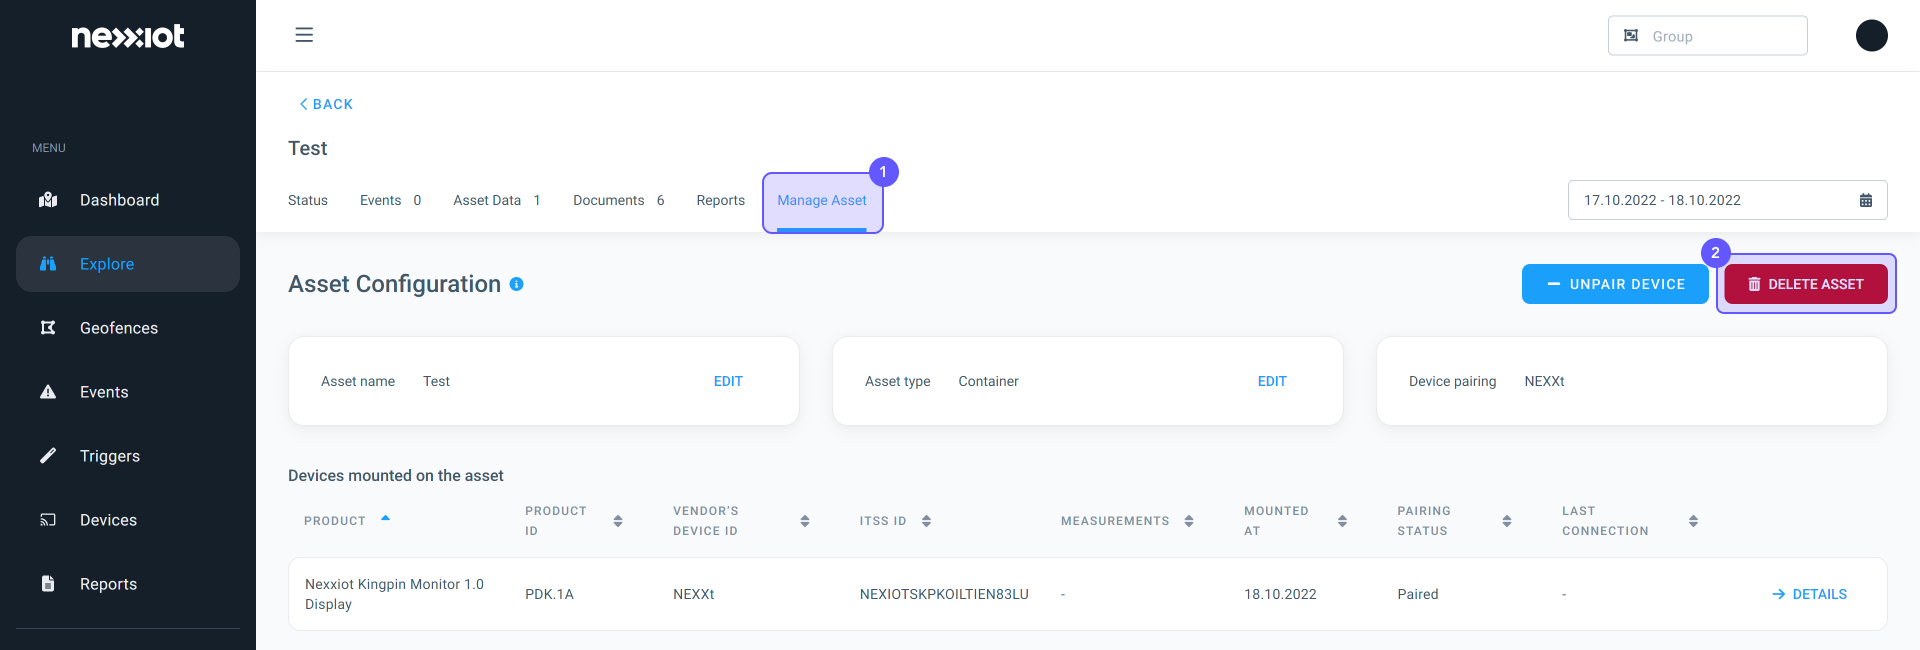
- Click on Manage Asset (1)
- Only when you have unpaired the device with the asset, you can delete the asset by clicking on DELETE ASSET (2)
- Ensure you have an Android Smartphone with NFC Scanning enabled
- Open the Play Store and download the Nexxiot Pairing App
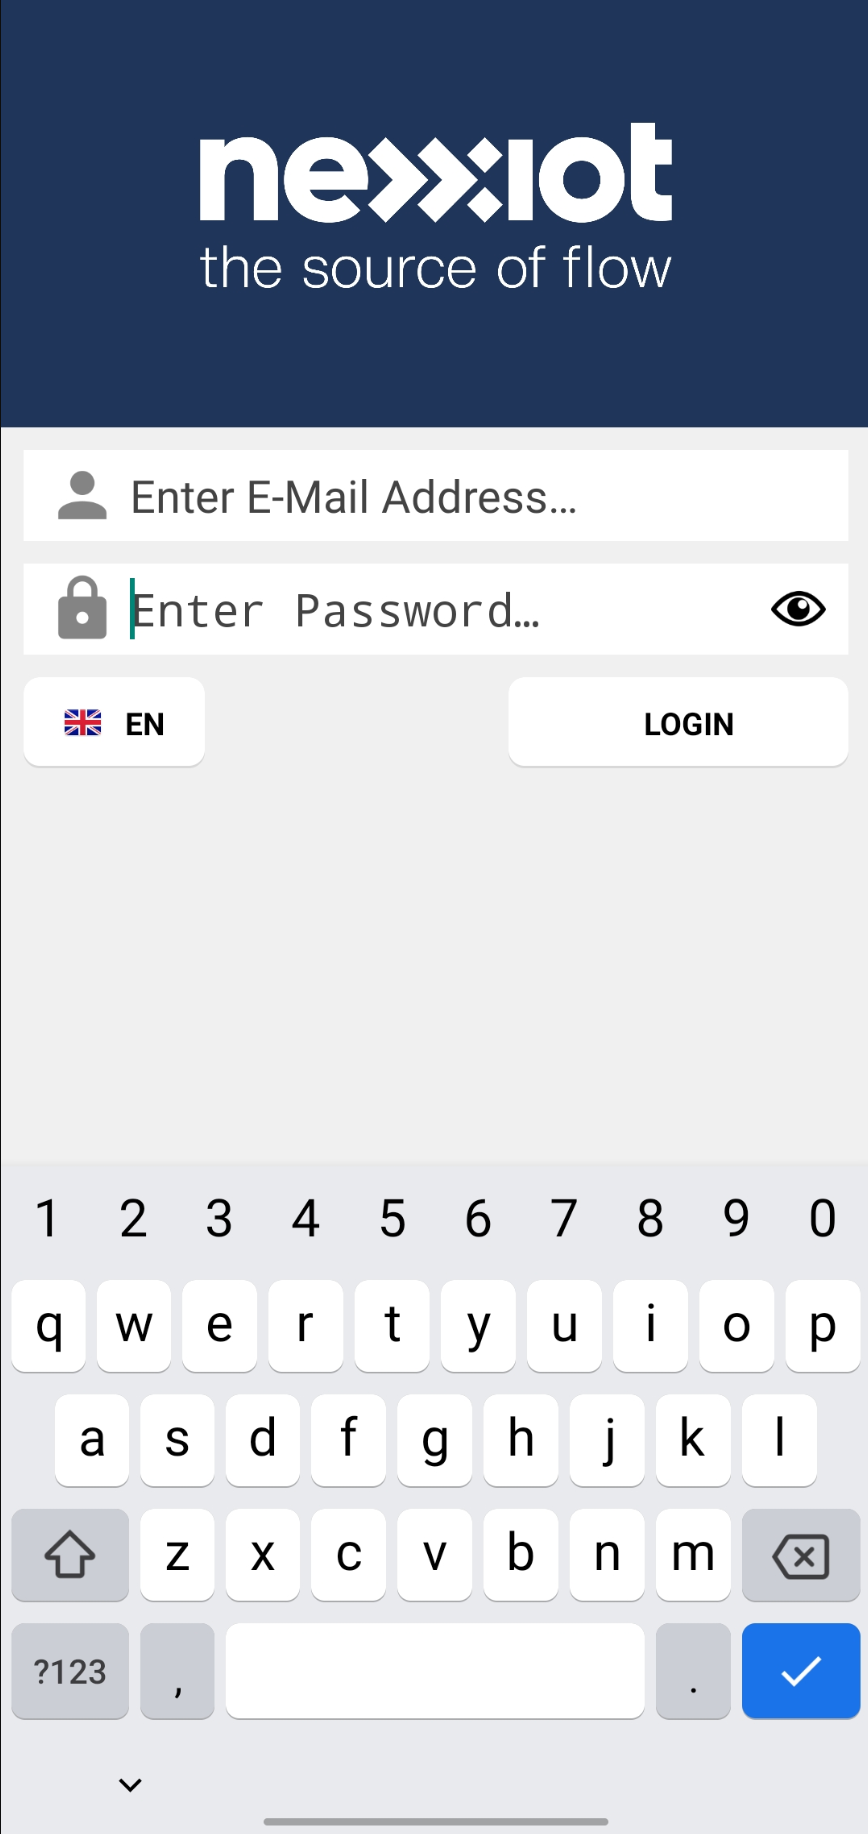
- Login with your Nexxiot credentials
- Click on pair wagon

- The camera on your phone will open and you will be asked to take a photo of the mounting location of the Globehopper
- If you’re satisfied with the image, press the “CONTINUE” button. If not, please take another photo by clicking on “CANCEL”
- Scan the Globehopper with your phone. If you have a case on your phone, take it off for better performance.

- When the message “Globehopper Identified” appears, you can start mounting the Globehopper on the asset.

- An example photo of the Globehopper is displayed below.

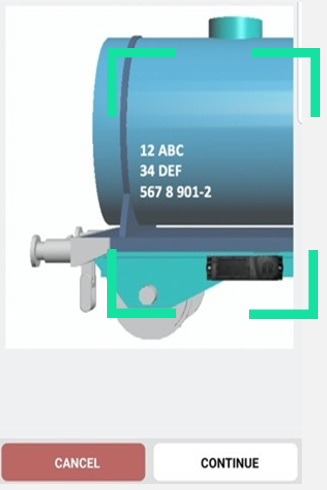
- An example picture of the mounting location of the Globehopper on the asset is displayed below. The camera will open to take a photo of the mounting location of the Globehopper. Please make sure that the Globehopper is visible in the photo. If you’re satisfied with the image, press the “CONTINUE” button. If not, please take another photo by clicking on “RETAKE PHOTO?”.
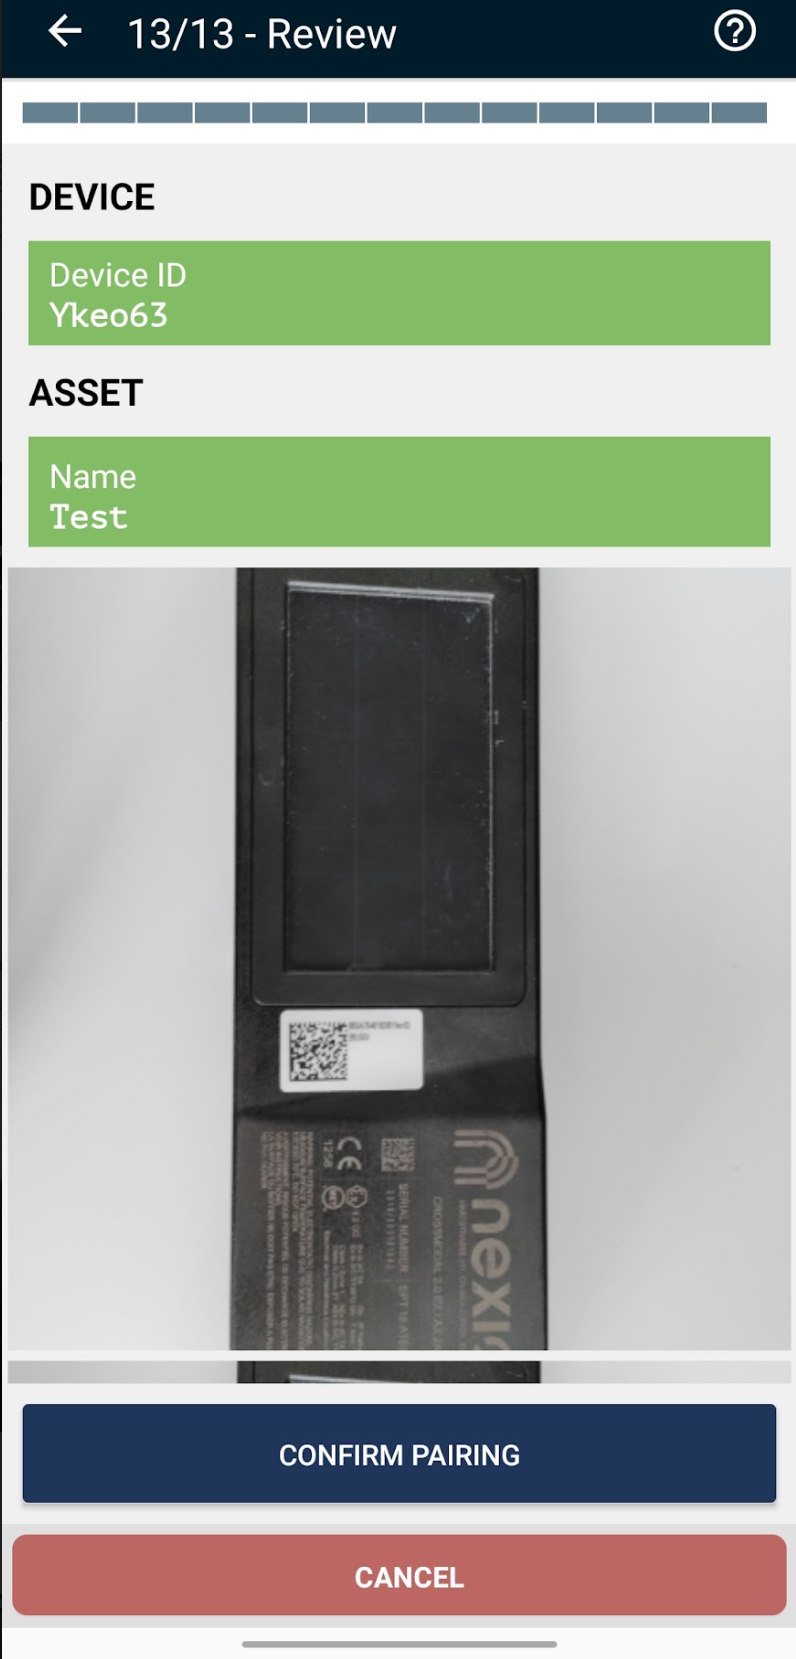
- Please review the pairing data. All the data from the previous steps is presented again for verification. If the details are correct, press the “CONFIRM PAIRING” button to complete the pairing process.

- A dialog window will appear to indicate that the pairing was successful.
- Ensure you have an Android Smartphone with NFC Scanning enabled.
- Open the Play Store and download the Nexxiot Pairing App.
- Login with your Nexxiot credentials.
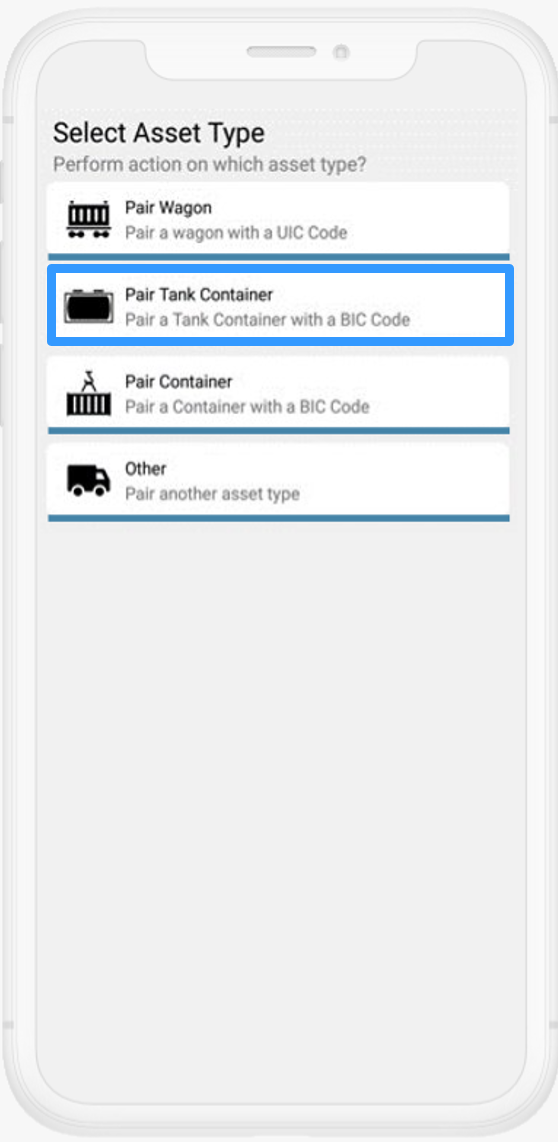
- Click on Pair Tank Container.
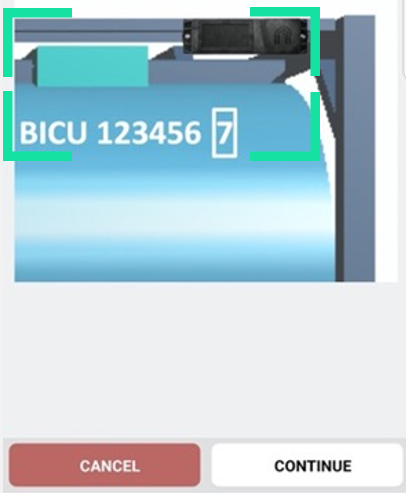
The camera will open to take a photo of the mounting location of the Globehopper.
If you’re satisfied with the image, press the “CONTINUE” button. If not, please take another photo by clicking on “CANCEL”.
Scan the Globehopper with your phone. If you have a case on your phone, take it off for better performance.
- When the message “Globehopper Identified” appears, you can start mounting the Globehopper on the asset.
An example photo of the Globehopper is displayed below.
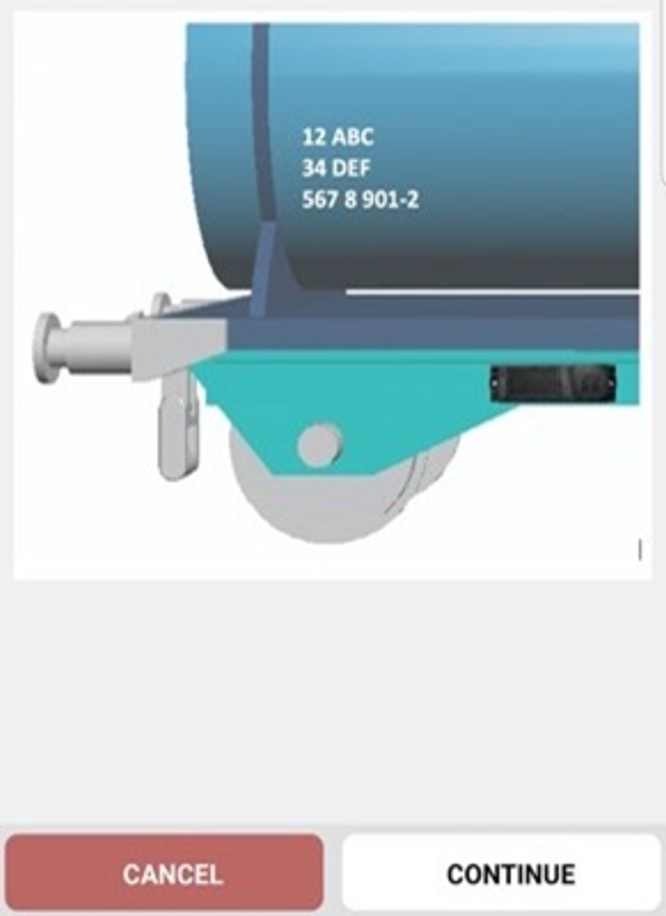
An example picture of the mounting location of the Globehopper on the Asset is displayed below.
The camera will open to take a photo of the mounting location of the Globehopper.
Please make sure that the Globehopper is visible in the photo.
If you’re satisfied with the image, press the “CONTINUE” button. If not, please take another photo by clicking on “RETAKE PHOTO?”.
Please review the pairing data. All the data from the previous steps is presented again for verification. If the details are correct, press the “CONFIRM PAIRING” button to complete the pairing process.
A dialog window will appear to indicate that the pairing was successful.
- Ensure you have an Android Smartphone with NFC Scanning enabled.
- Open the Play Store and download the Nexxiot Pairing App.
- Login with your Nexxiot credentials.
- Click on Pair Container.

The camera will open to take a photo of the mounting location of the Globehopper.
Please make sure the Globehopper is visible on the Asset.
If you’re satisfied with the image, press the “CONTINUE” button. If not, please take another photo by clicking on “CANCEL”.
Scan the Globehopper with your phone. If you have a case on your phone, take it off for better performance.
When the message “Globehopper Identified” appears, you can start mounting the Globehopper on the asset.
An example photo of the Globehopper is displayed below.
An example picture of the mounting location of the Globehopper on the Asset is displayed below.
The camera will open to take a photo of the mounting location of the Globehopper.
Please make sure that the Globehopper is visible in the photo.
If you’re satisfied with the image, press the “CONTINUE” button. If not, please take another photo by clicking on “RETAKE PHOTO?”.
Please review the pairing data. All the data from the previous steps is presented again for verification. If the details are correct, click on “CONFIRM PAIRING” to complete the pairing process.
- A dialog window will appear to indicate that the pairing was successful.
- Ensure you have an Android Smartphone with NFC Scanning enabled.
- Open the Play Store and download the Nexxiot Pairing App.
- Login with your Nexxiot credentials.
- Click on “Other” to pair another asset type.

The camera will open to take a photo of the mounting location of the Globehopper.
Please make sure the Globehopper is visible on the Asset.
If you’re satisfied with the image, press the “CONTINUE” button. If not, please take another photo by clicking on “CANCEL”.

Scan the Globehopper with your phone. If you have a case on your phone, take it off for better performance.
- When the message “Globehopper Identified” appears, you can start mounting the Globehopper on the asset.
An example photo of the Globehopper is displayed below.
An example picture of the mounting location of the Globehopper on the Asset is displayed below.
The camera will open to take a photo of the mounting location of the Globehopper.
Please make sure that the Globehopper is visible in the photo.
If you’re satisfied with the image, press the “CONTINUE” button. If not, please take another photo by clicking on “RETAKE PHOTO?”.
Please review the pairing data. All the data from the previous steps is presented again for verification. If the details are correct, press the “CONFIRM PAIRING” button to complete the pairing process.
- A dialog window will appear to indicate that the pairing was successful.
- Open the Play Store (for Android) or Apple Store (for iOS).
- Download the Nexxiot Mounting App.
- Login with your Nexxiot credentials.
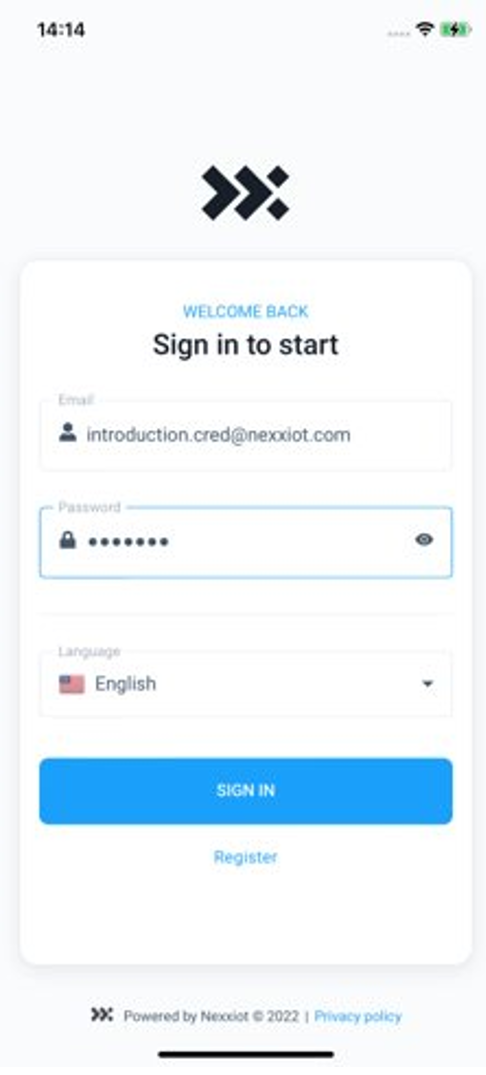
- Click on Railcar (1).
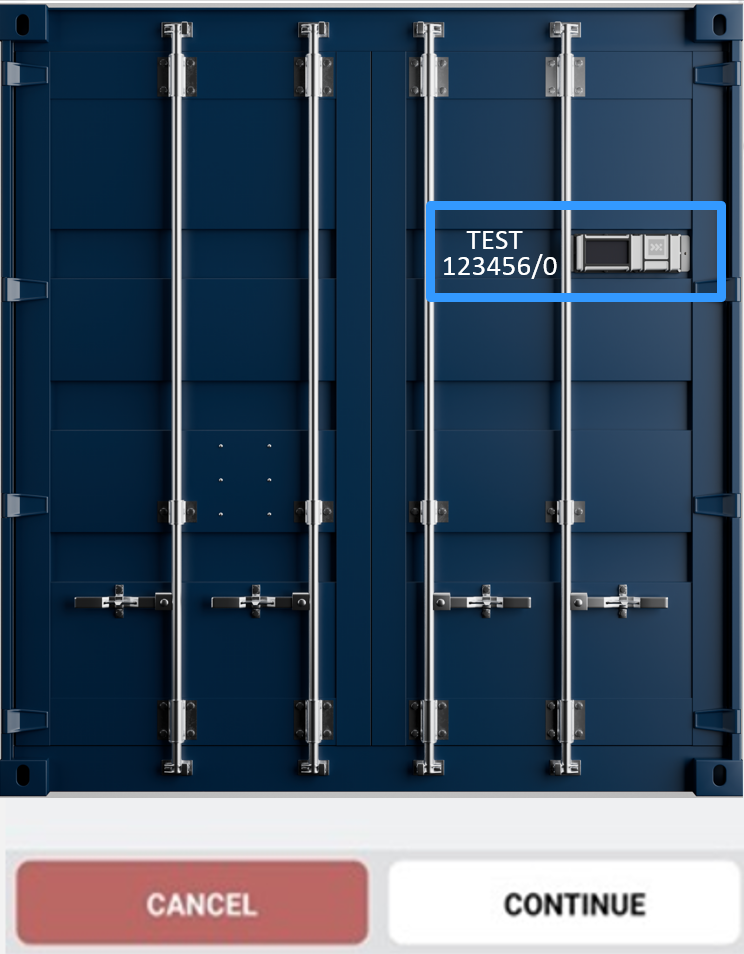
- Write in Reporting mark the letters and number the serial number of your asset (2).

Click on the “+” of the asset.

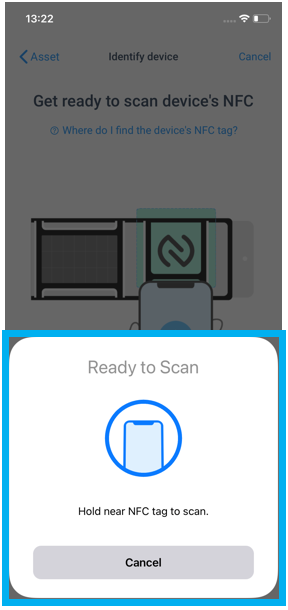
Click on “PRESS TO START SCANNING”.

The window will close, once the phone detected the device’s NFC tag.
Check if the information is correct (1).
Click on “CONTINUE” (2).

Please review the pairing data. All the data from the previous steps is presented again for verification. If the details are correct, click on “CONFIRM PAIRING” to complete the pairing process.
A dialog window will appear to indicate that the pairing was successful.
A geofence represents a virtual border for a physical space or area. Typically, a geofence is created to mark a specific area of interest, for example, a city, rail station, or workshop.
You can associate events with geofence activity, which will notify you of events relevant to you, such as when an asset enters or leaves a geofence.

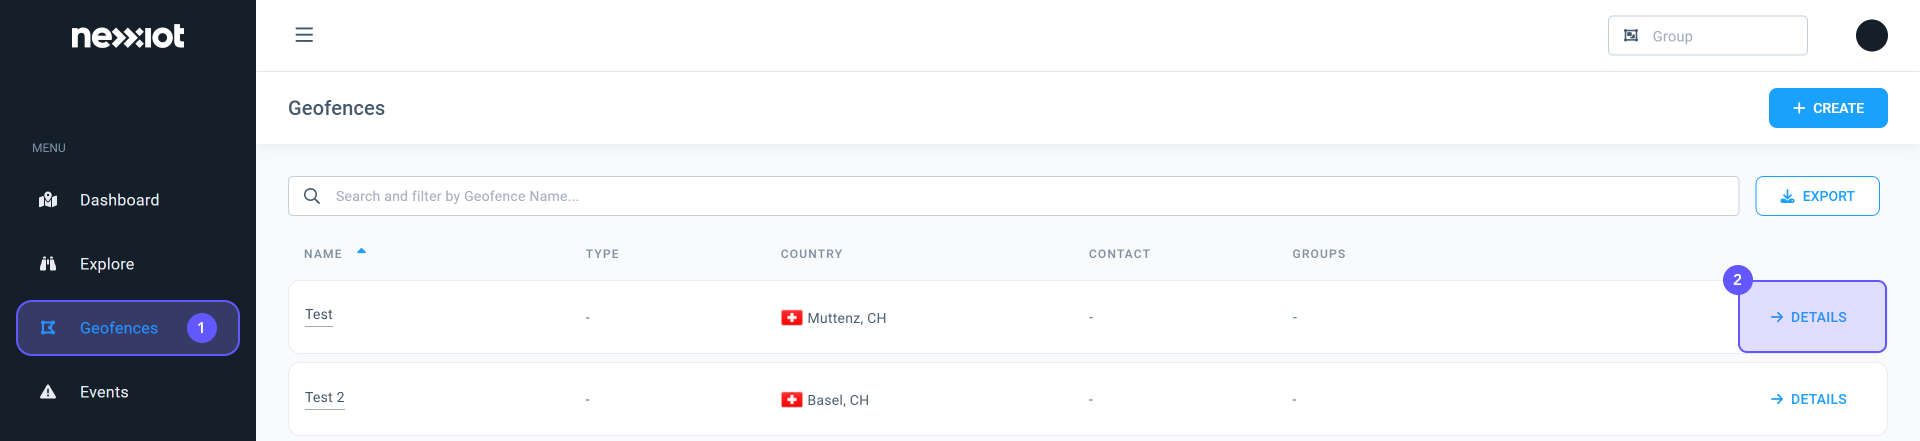
- Navigate to the Geofences (1) page
- Here you can browse the list of geofences or use the search bar (2)
- By clicking on DETAILS you can find further information on each geofence and can make changes to the geofence. In Basic Details, you can see the name of the geofence, details about the geofence group, and where the geofence was set on the map.
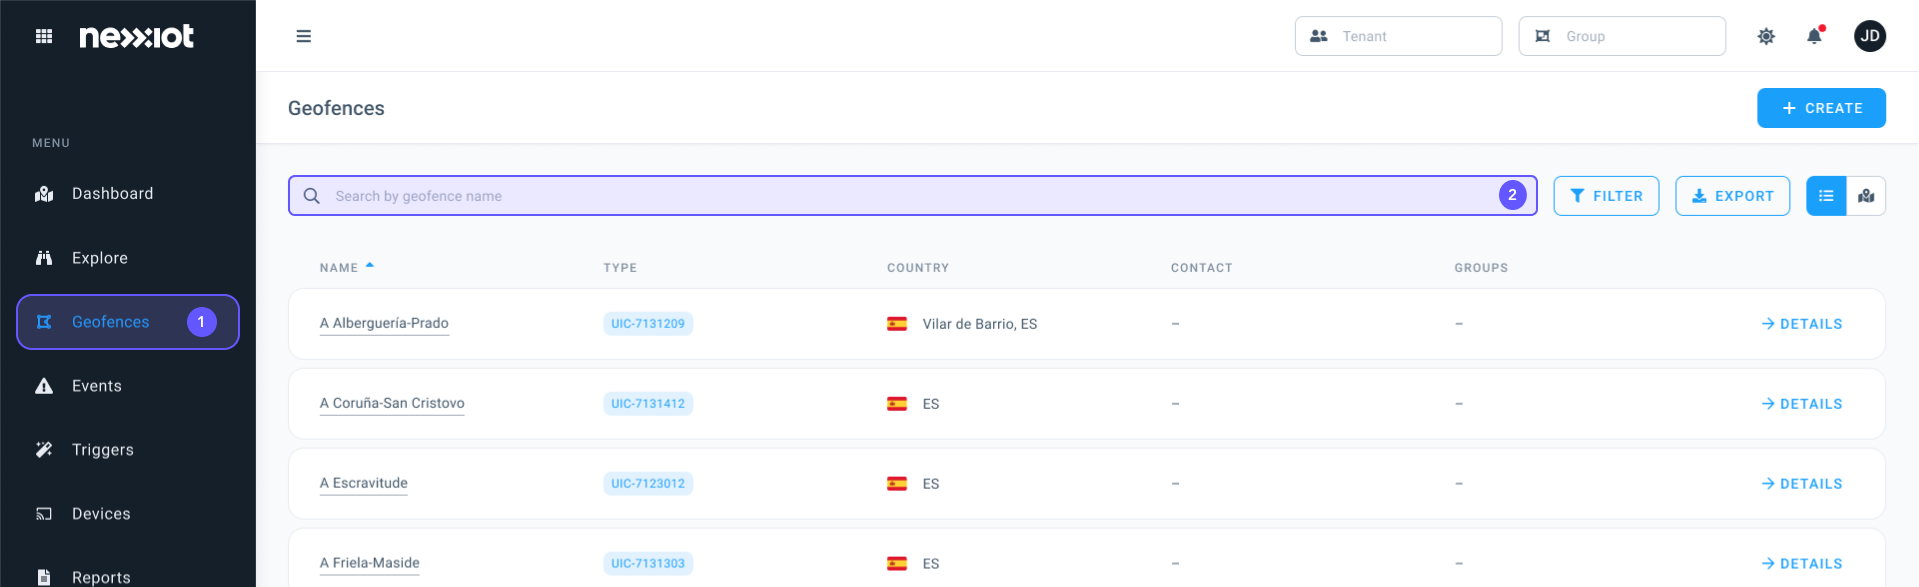
- You can also see and search for all your geofences directly on the Dashboard page
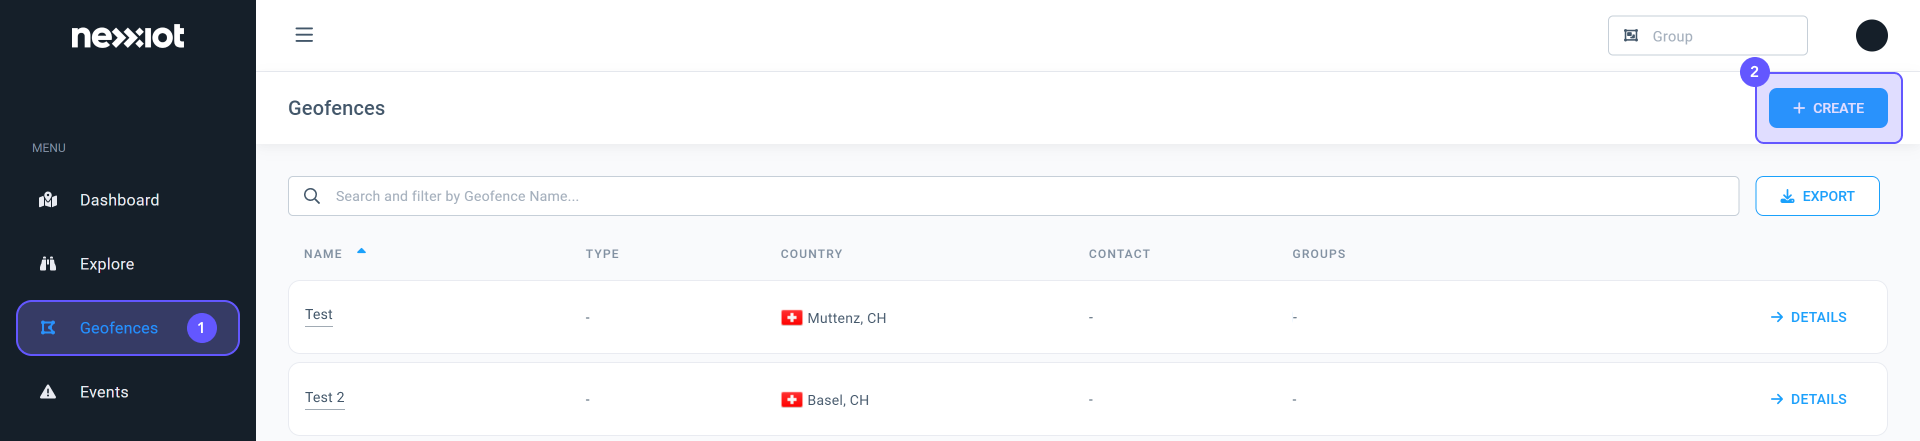
- Navigate to the Geofences (1) page
- Click on + CREATE (2)
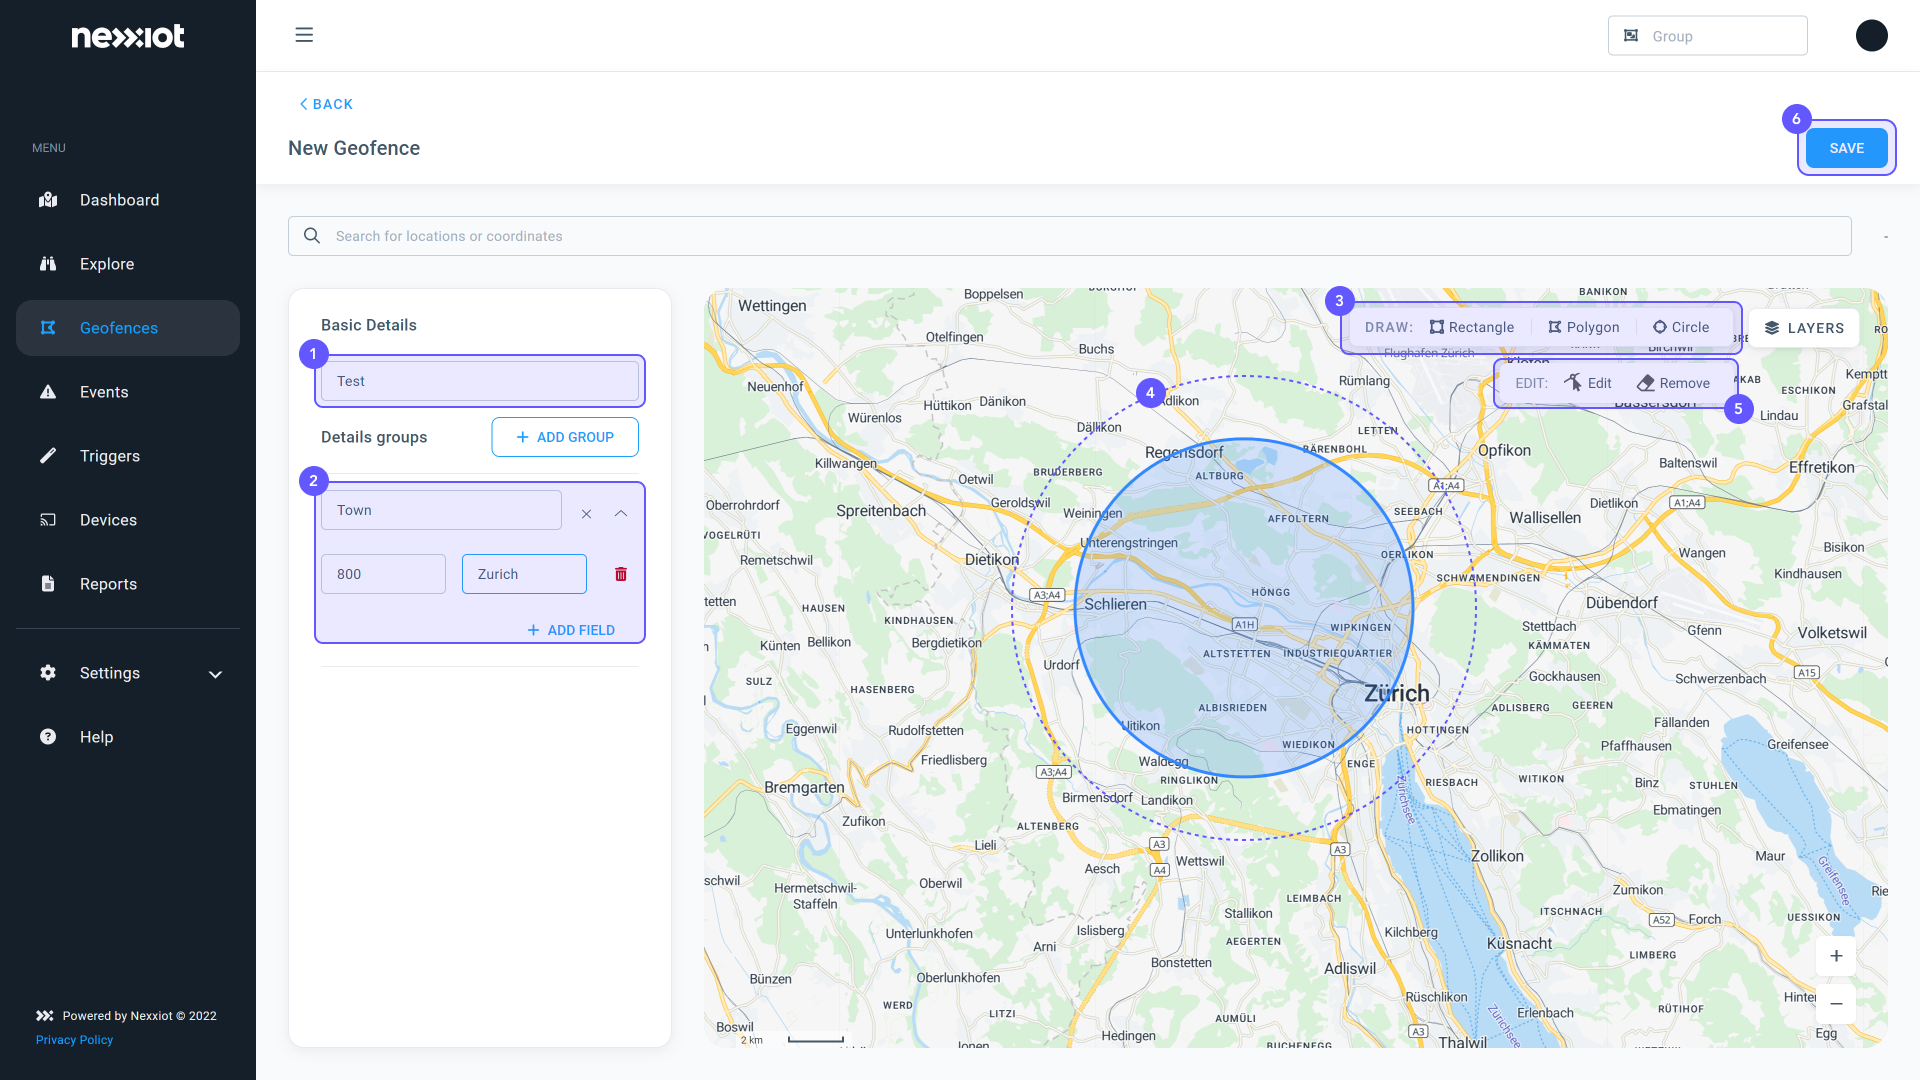
- Under Basic Details (1) you can name the geofence
- In the box Details groups (2) you can set the Geofence type, e.g., railway, harbor, etc.
- On the map on the top right side you can choose which shape you want to use to create the geofence (3)
- Set the geofence in the region of interest (4)
- To save the geofence, click on FINISH (5) and SAVE (6)
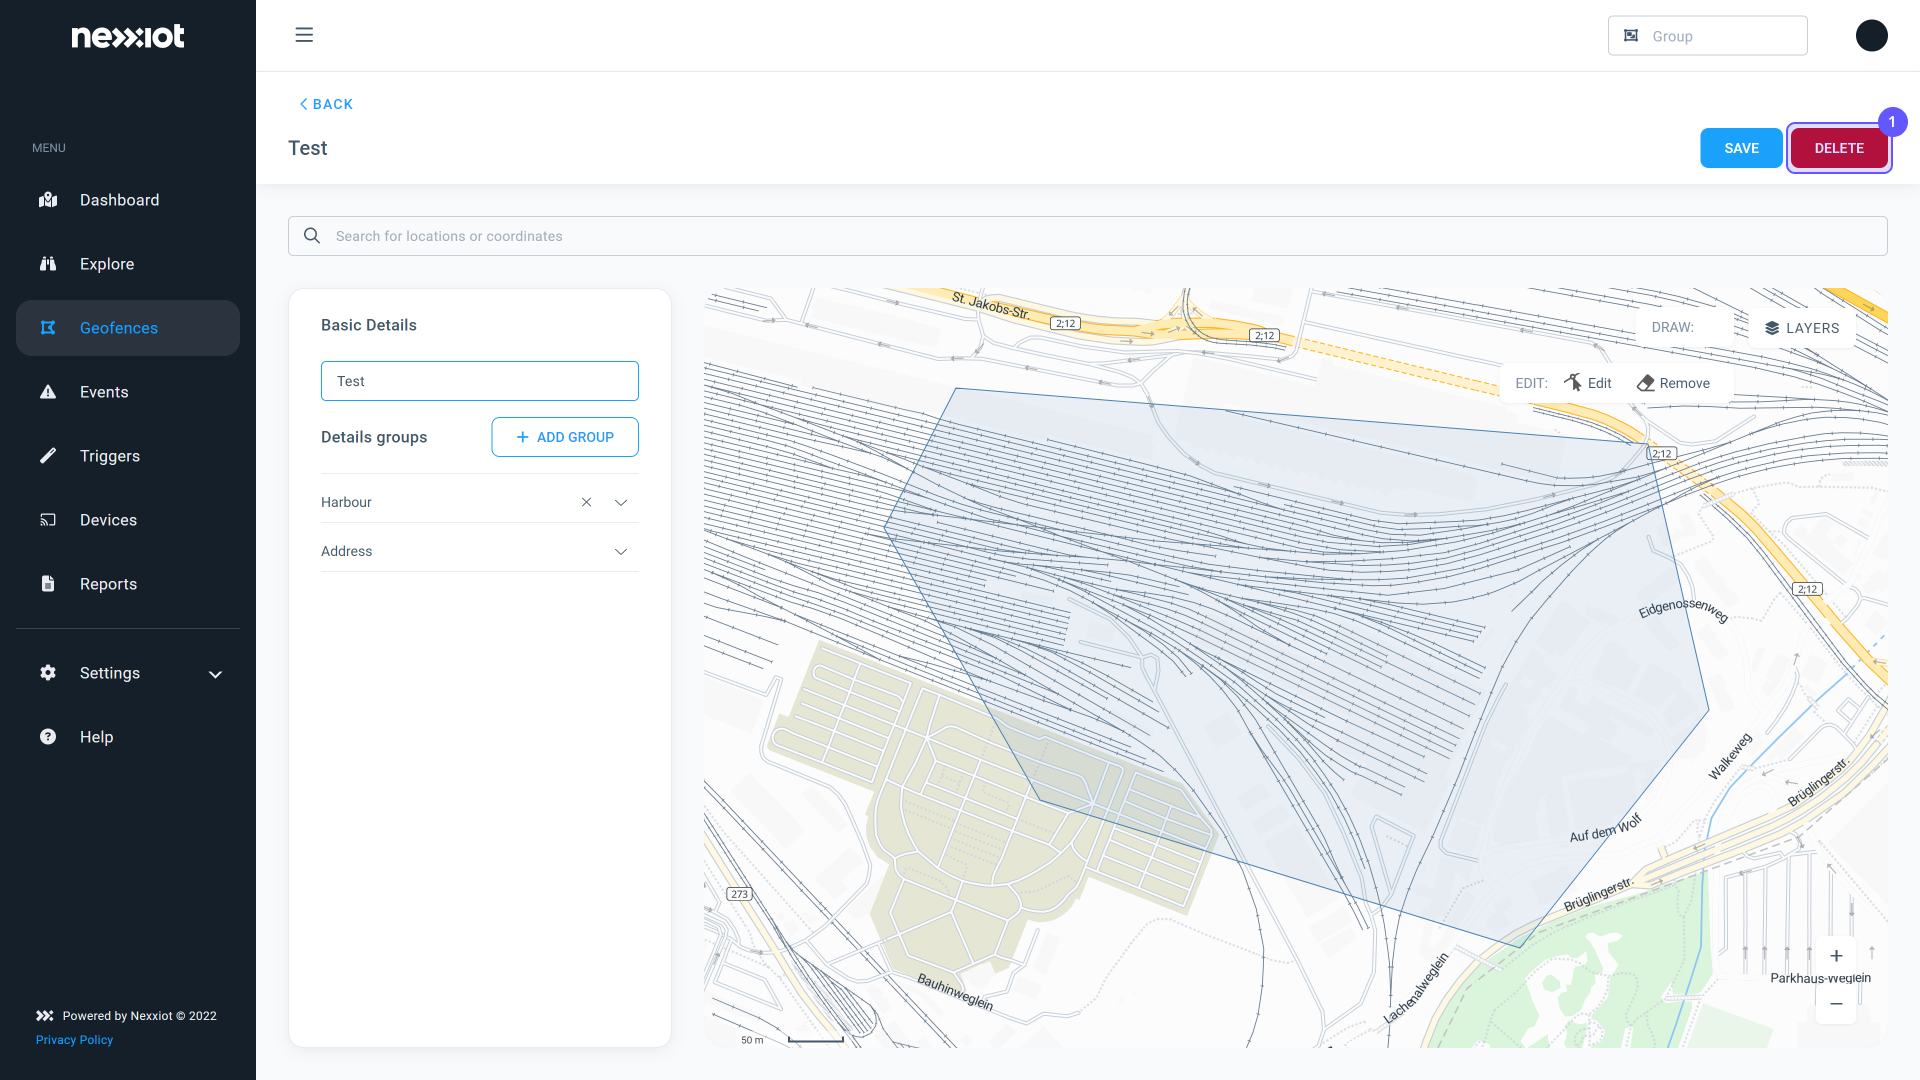
- Navigate to the Geofences (1) page
- Click on DETAILS (2) of the geofence you want to delete
- Click on DELETE (1)
A trigger is defined by a set of conditions to generate an event. That could be followed by an action such as notifying you or your customer by e-mail or desktop notification.
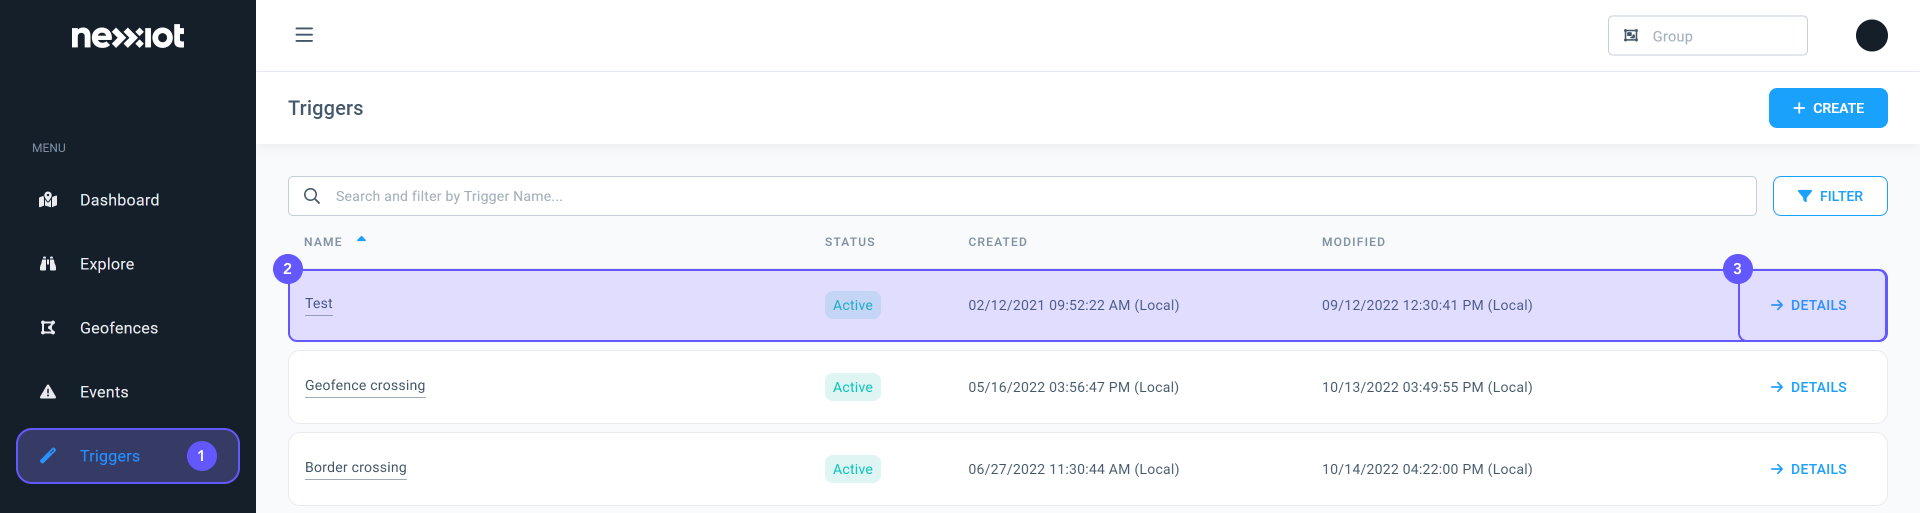
- Navigate to the Trigger (1) page
- Here you can either browse the list of triggers or use the search bar (2)
- Further details of the triggers can be found here, e.g. you can see the date when a trigger was created or modified

Defining a severity level for the event trigger allows you to distinguish and filter events by priority (Information, Warning, Alert).
The rule “All” means that an event is created when all of the set conditions happen.
The rule “Any” means that an event is created when one of the set conditions happens.
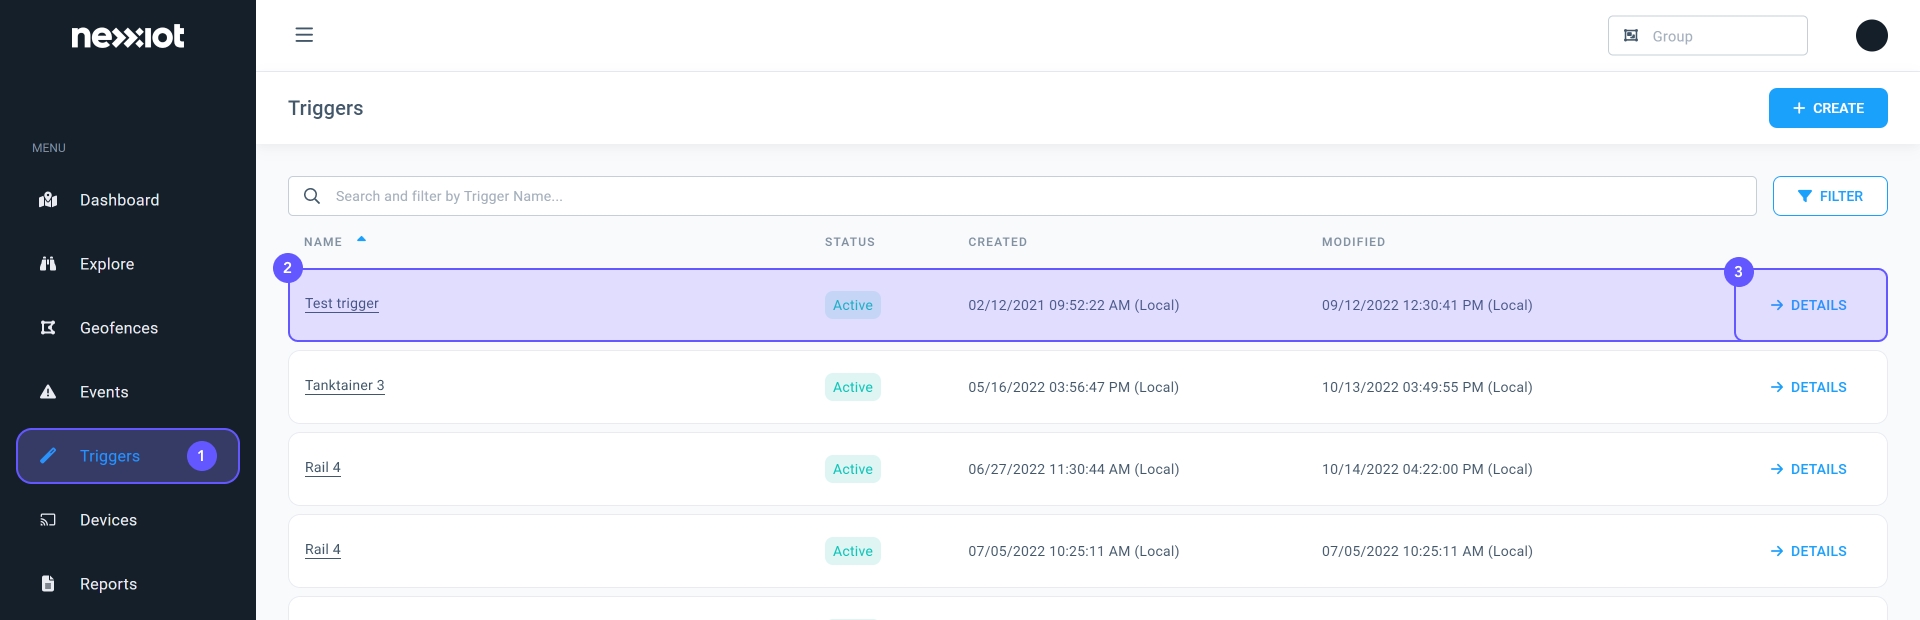
- Navigate to the Trigger (1) page
- Here you can either browse the list of triggers or use the search bar (2)
- Click on DETAILS (3)
- You can name the trigger under Trigger Name (1)
- You can set the importance of the trigger by choosing Severity Level (2) which allows you to separate and filter events by priority (Information, Warning, Alert).
- In Scope (3) you can set the trigger for either your entire fleet or a specific asset or group
- Under Conditions (4) you can set “all” or “any” as a rule
– The rule “All” means that an event is created when all of the set conditions happen
– The rule “Any” means that an event is created when one of the set conditions happens
– With +ADD CONDITIONS, you can set more than just one condition - In Actions (5) you can choose if you would like to receive the trigger information via e-mail or desktop notification
- Click on SAVE (6)

- Navigate to the Triggers page
- Select a trigger you want to delete and click on DETAILS
- Click on DELETE
An event is created when pre-defined trigger conditions are met, for example:
- An asset entered, crossed, or left a particular geofence
- The temperature of a particular asset exceeded the set threshold
- A shock with a magnitude above a threshold has been recorded
You can find all the events under the Events page or by selecting an asset via the Explore page.
By creating a trigger, you can choose to be notified yourself or to notify others via e-mail or desktop notification.
- Navigate to the Triggers (1) page
- Here you can browse the list of triggers or use the search bar (2)
- Click on DETAILS (3)
- In Actions (1) you can choose if you want to get the trigger information via e-mail or desktop notification
- Click on SAVE (2)

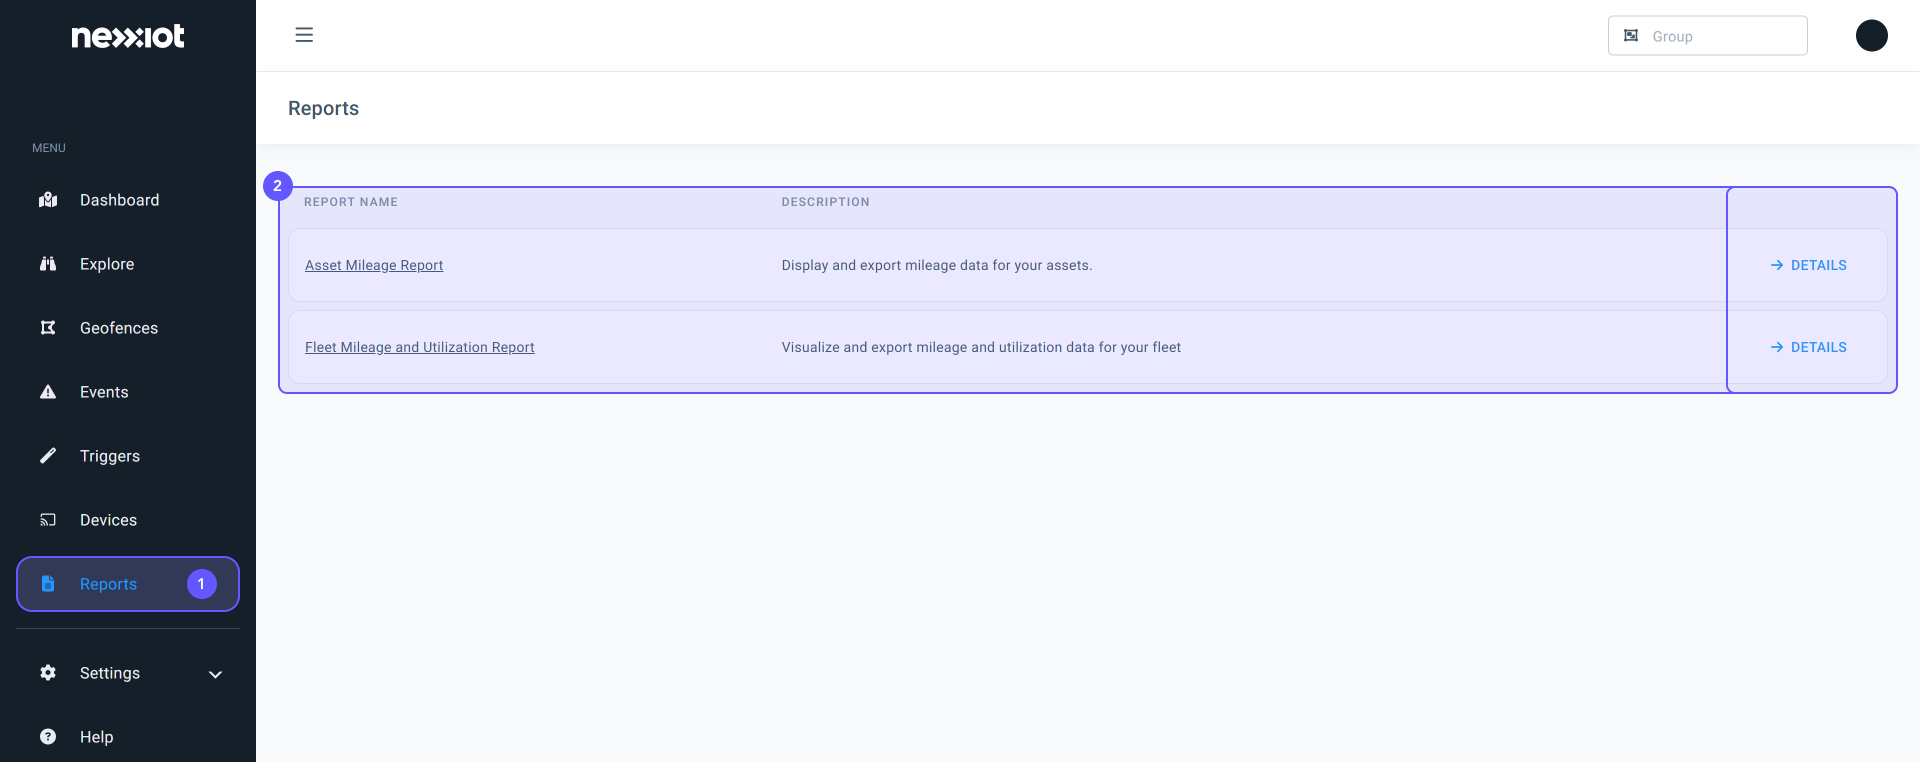
Our reports allow you to visualize and export various types of data for your account and your fleet.
There are two main types of reports:
- Asset Mileage Report
- Fleet Mileage and Utilization Report
All reports operate based on a time range (i.e., start and end time). By default, reports will display data for the past week; you can however adjust the time range to your liking and visualize historical data as well.
Our proprietary map-matching software is responsible for calculating the exact route the asset took based on the geolocation points it sent. To make sure we provide accurate metrics, our software can wait for more data to confirm the route the asset took and possibly correct the mileage.
The Availability column can take two values:
- In progress: the associated mileage for the relevant asset is not considered final. This means that our system can still bring adjustments and possibly correct the mileage. The mileage and other associated metrics can usually be corrected for a maximum period of 3 days.
- Complete: the associated mileage for the relevant asset is considered final. The software found the most accurate route that the asset took.
Our Fleet Mileage and Utilization Report is a collection of charts around mileage and utilization for your entire fleet. This includes total aggregated mileage, moving versus standing time percentage, mileage broken down by country, and more.
The Asset Mileage Report breaks down the individual total mileage, average daily mileage, moving percentage, and several significant shocks recorded for every asset of your fleet.
- Navigate to the Reports (1) page.
- Click on DETAILS on the desired report (2).
- Click on EXPORT (1) and open the new file.

No, you can not set your own reports.
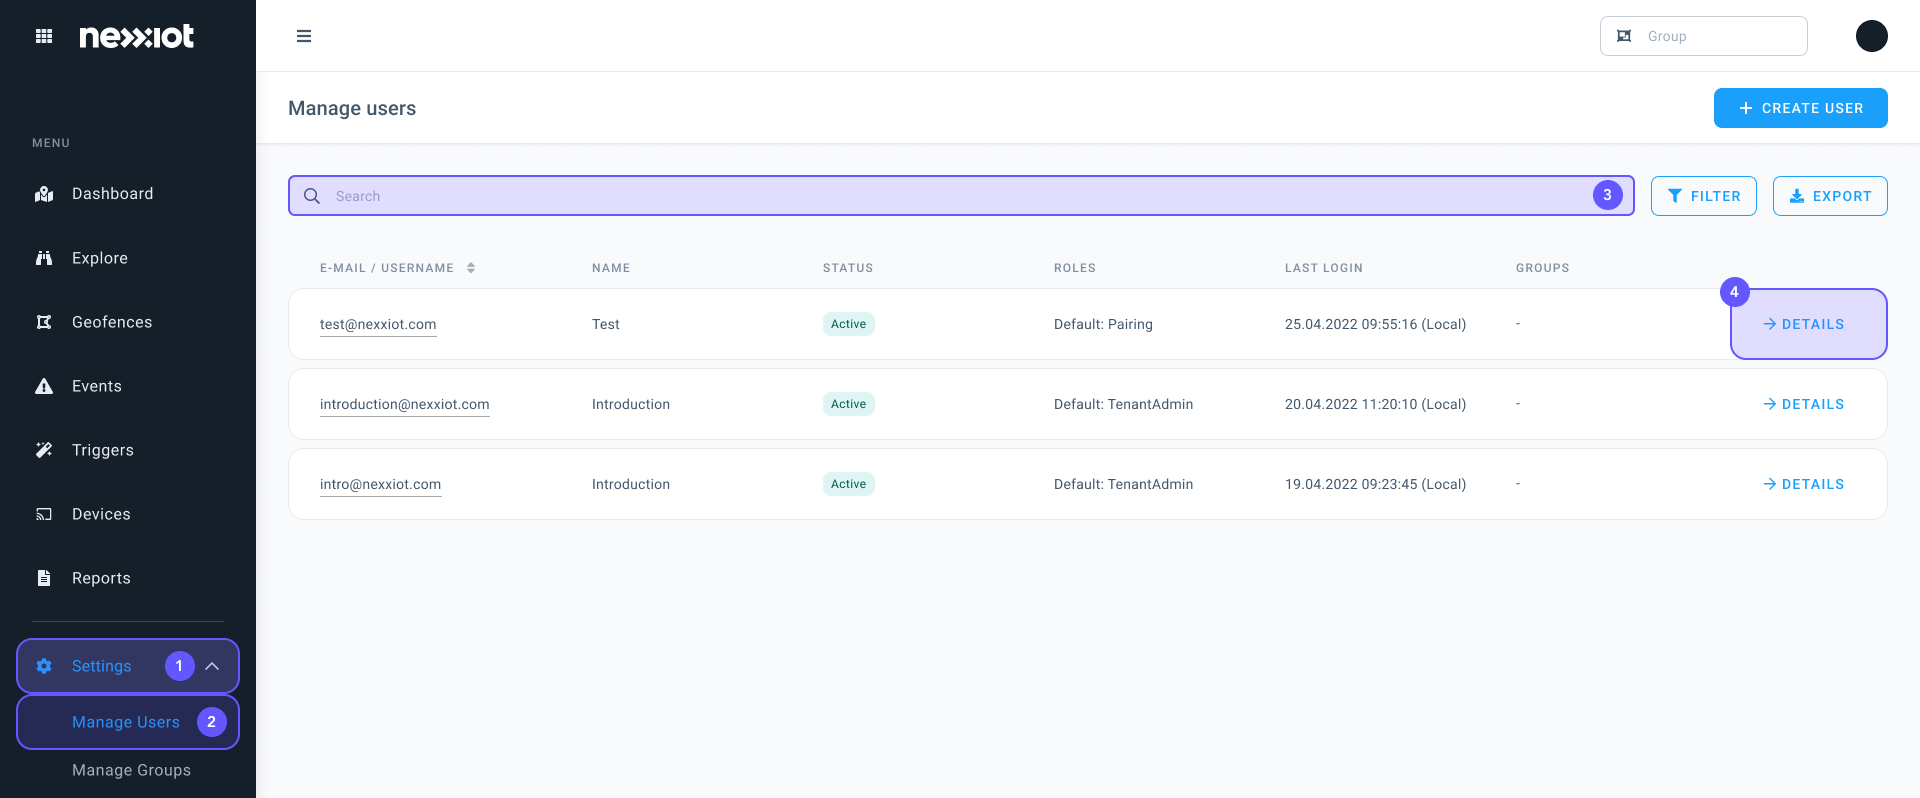
- Navigate to Settings (1)
- Click on Manage Users (2)
- In the search bar you can search for the Email or the name of the user (3)
- In the user line click on DETAILS (4)
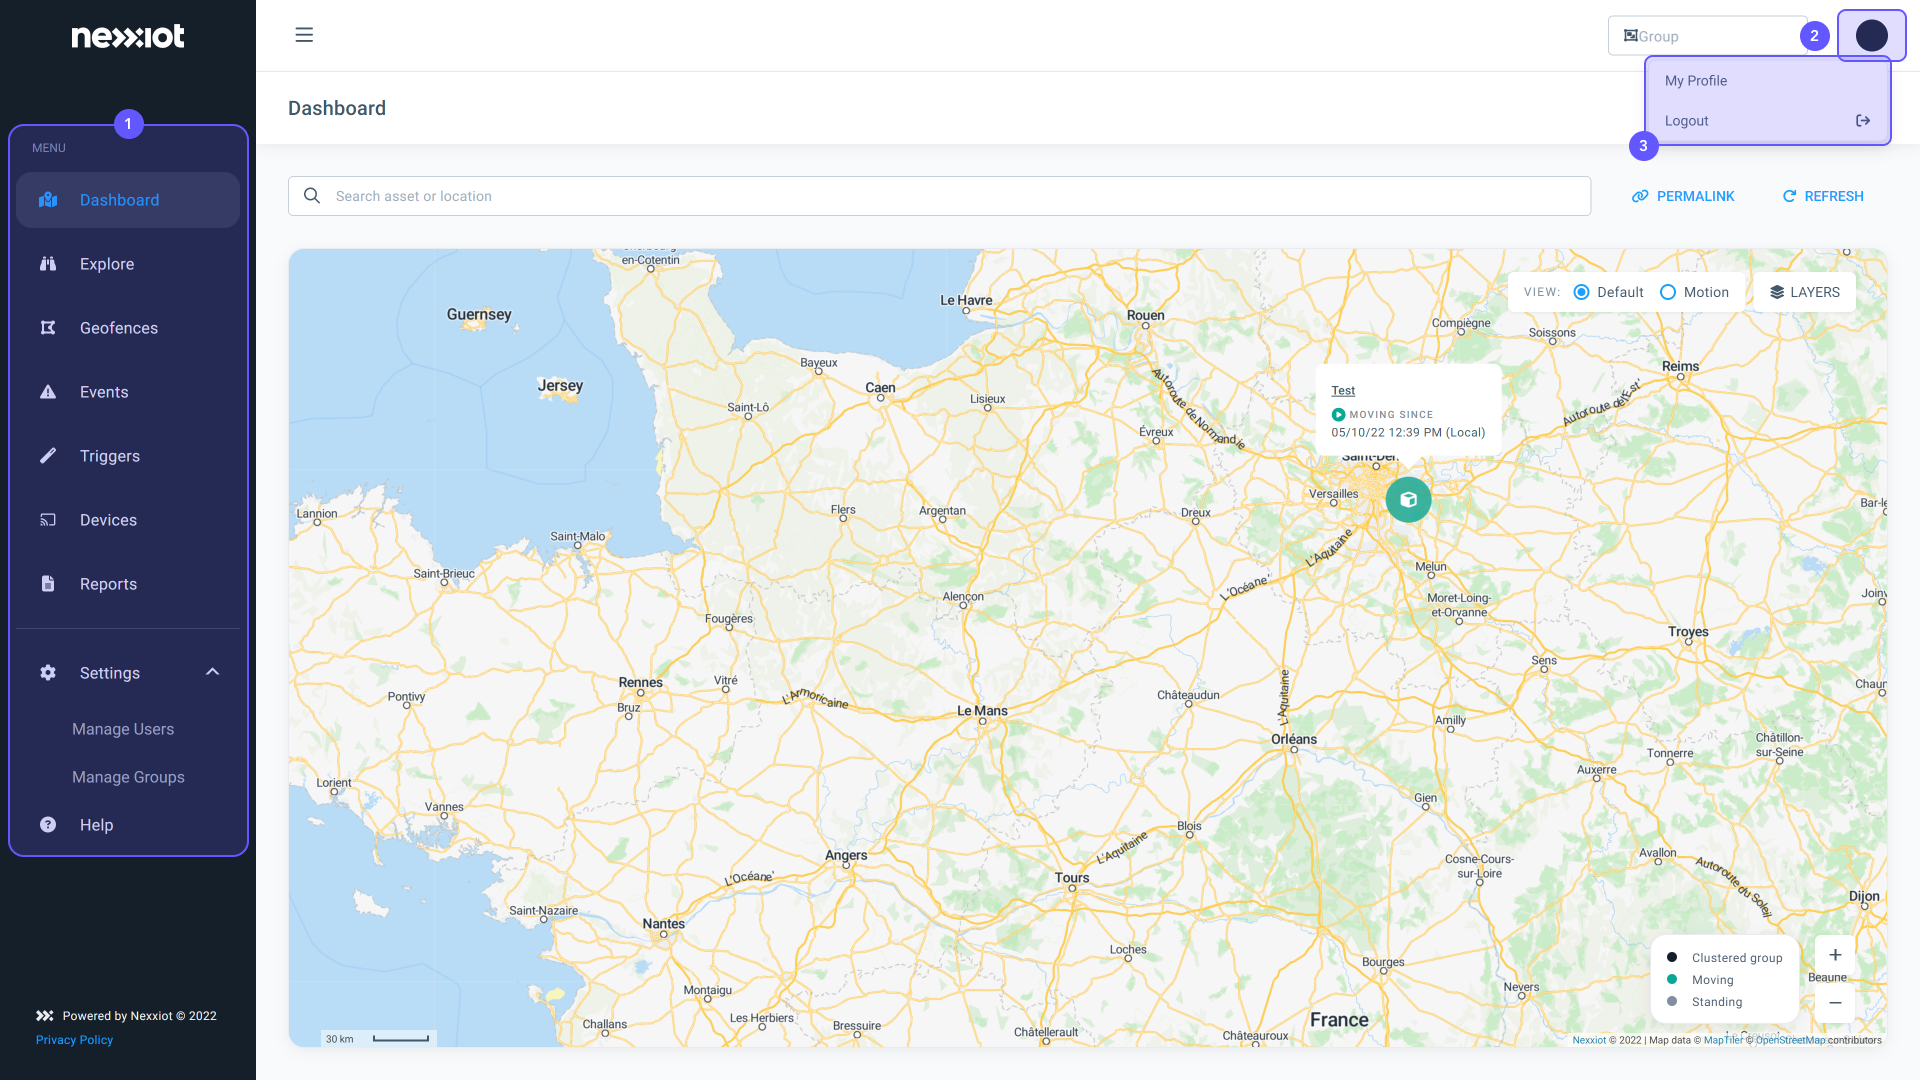
- Navigate to any main menu page (1)
- On the top right, click on your Account letters (2)
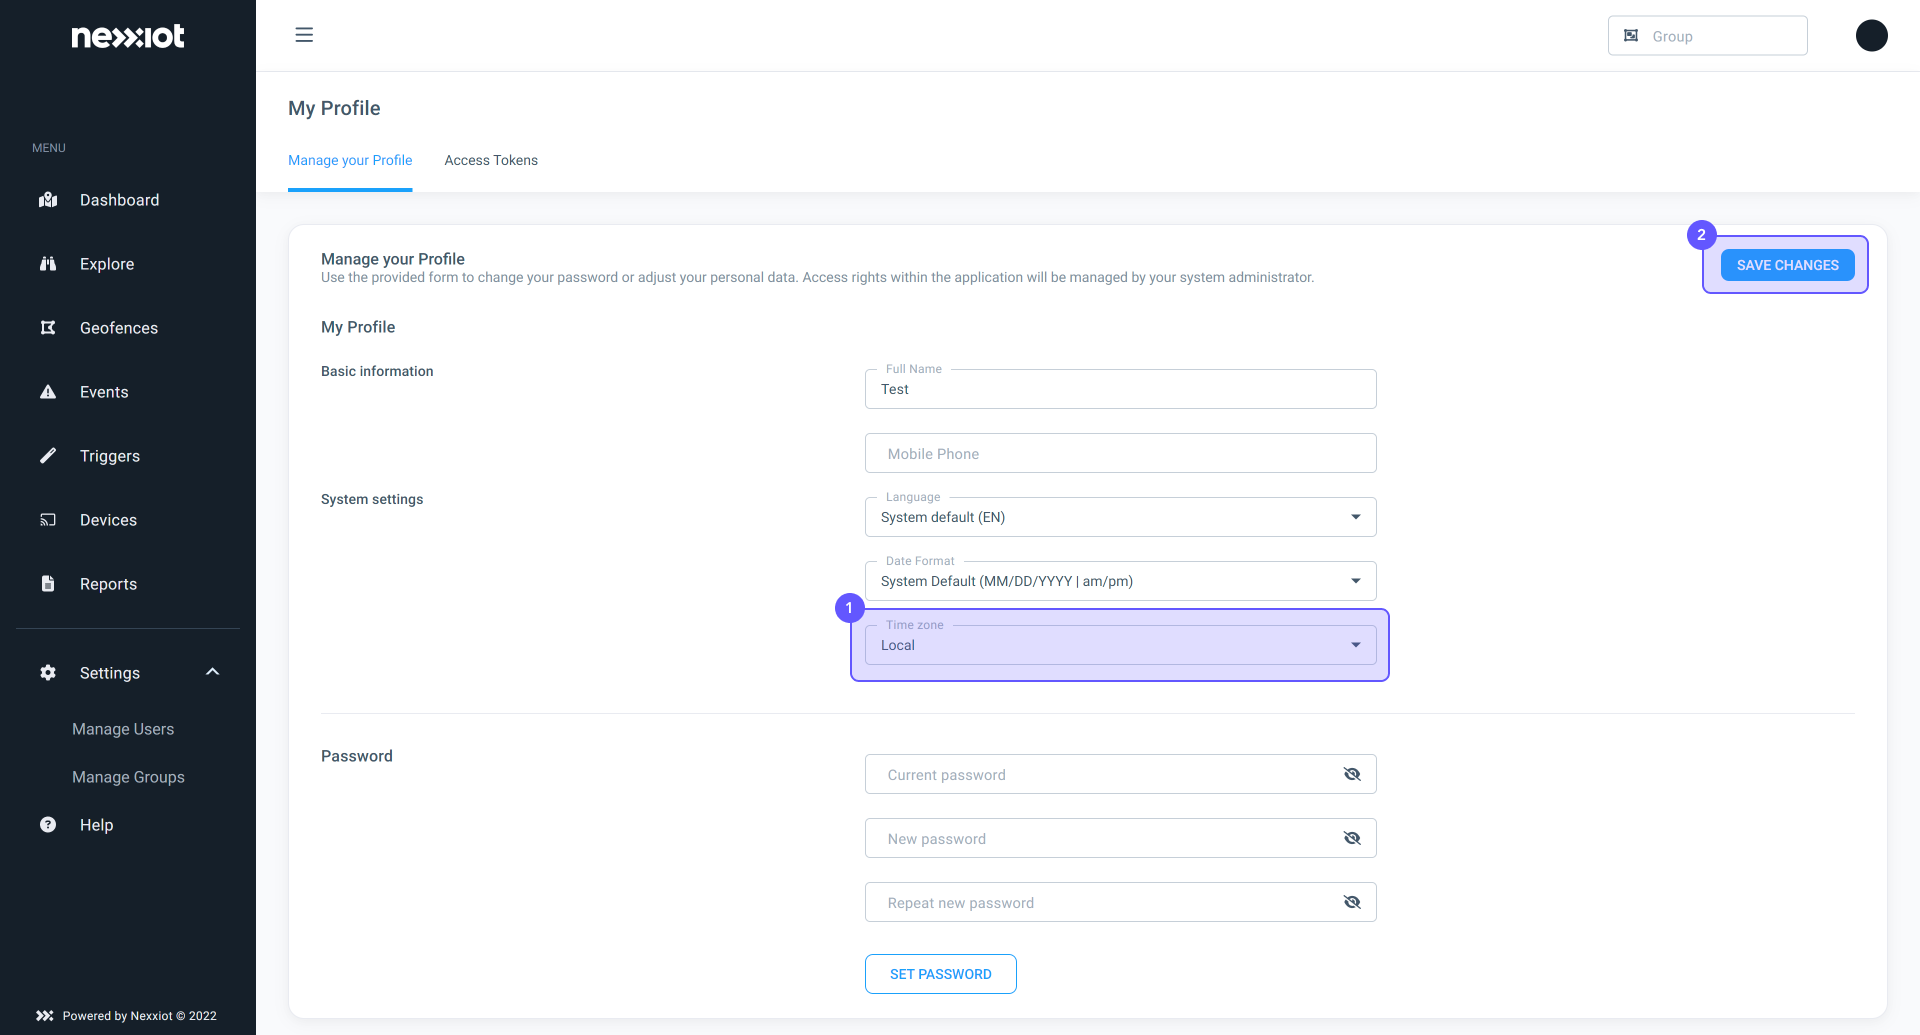
- Go to My Profile (3)

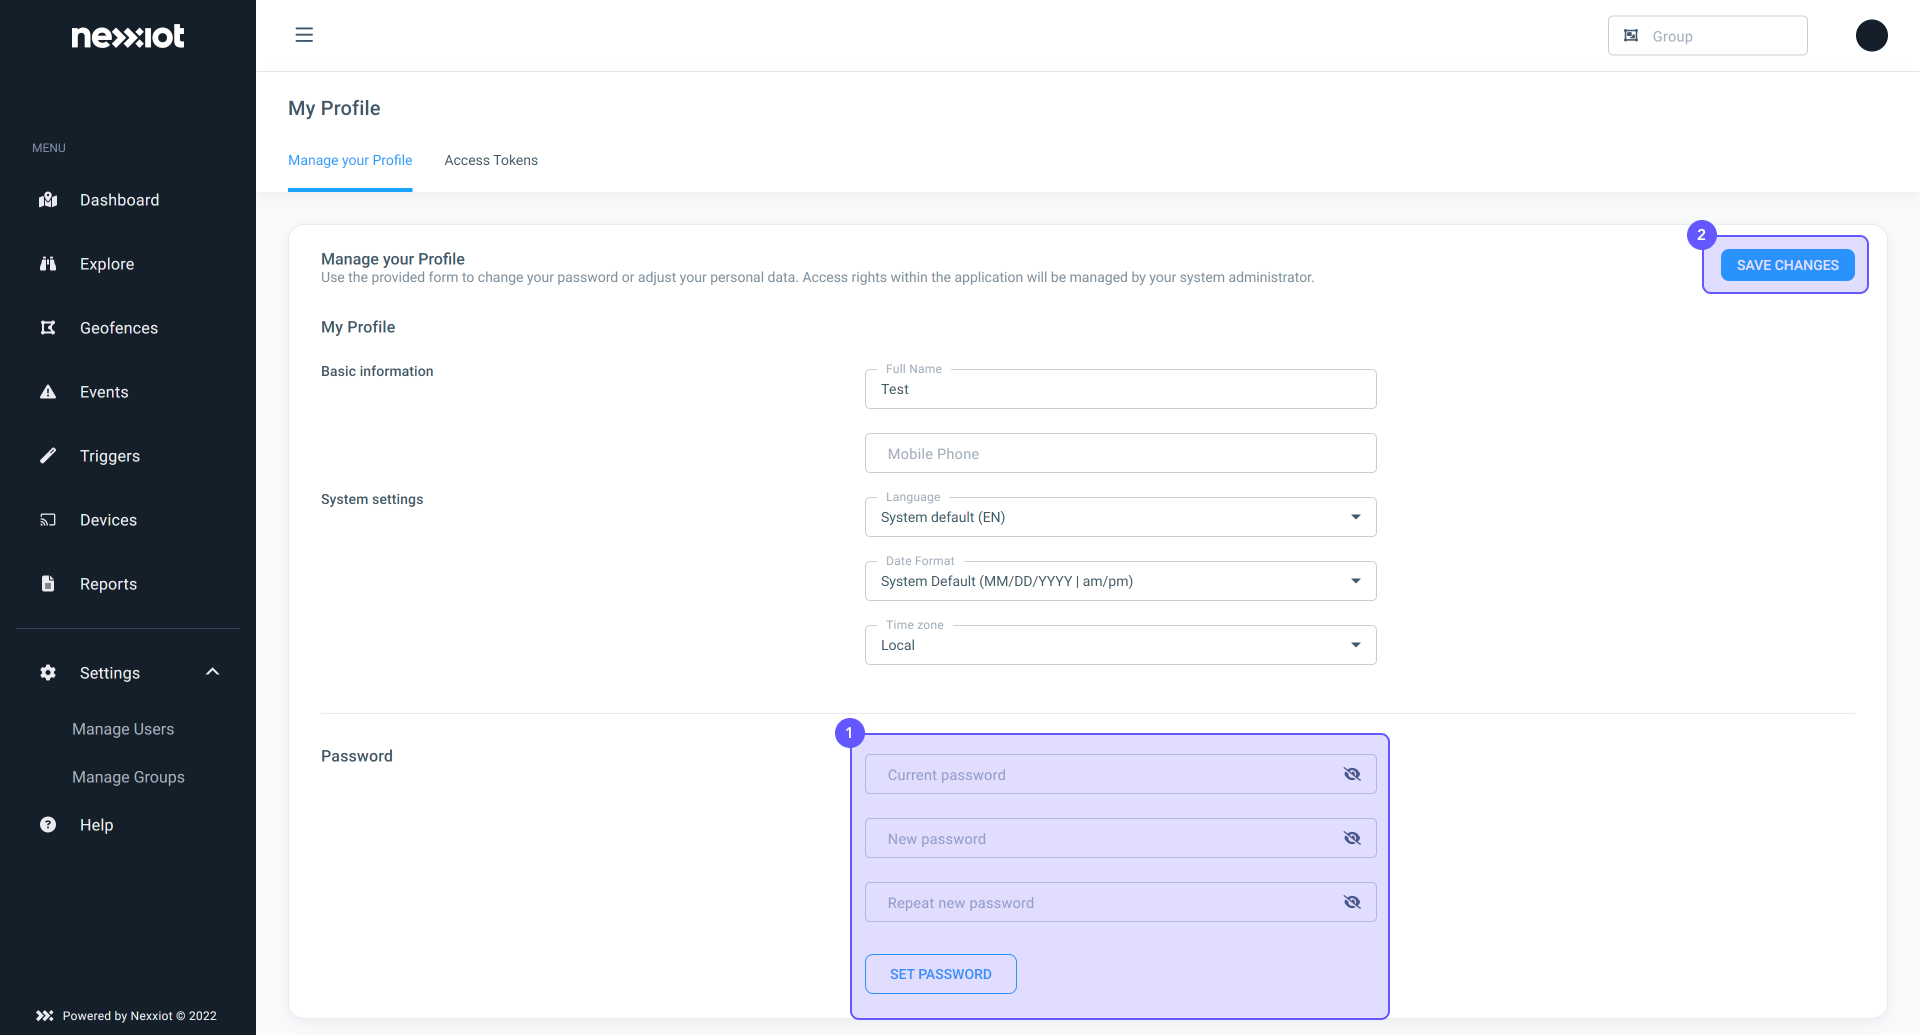
- On the My Profile page (1), you can change your name, mobile phone number, language, date format, timezone, as well as your password
- Click on SAVE CHANGES (2)

- Navigate to any main menu page (1)
- On the top right, click on your Account letters (2)
- Click on My Profile (3)
- You can change your password under Manage your Profile (1)
- Click on SAVE
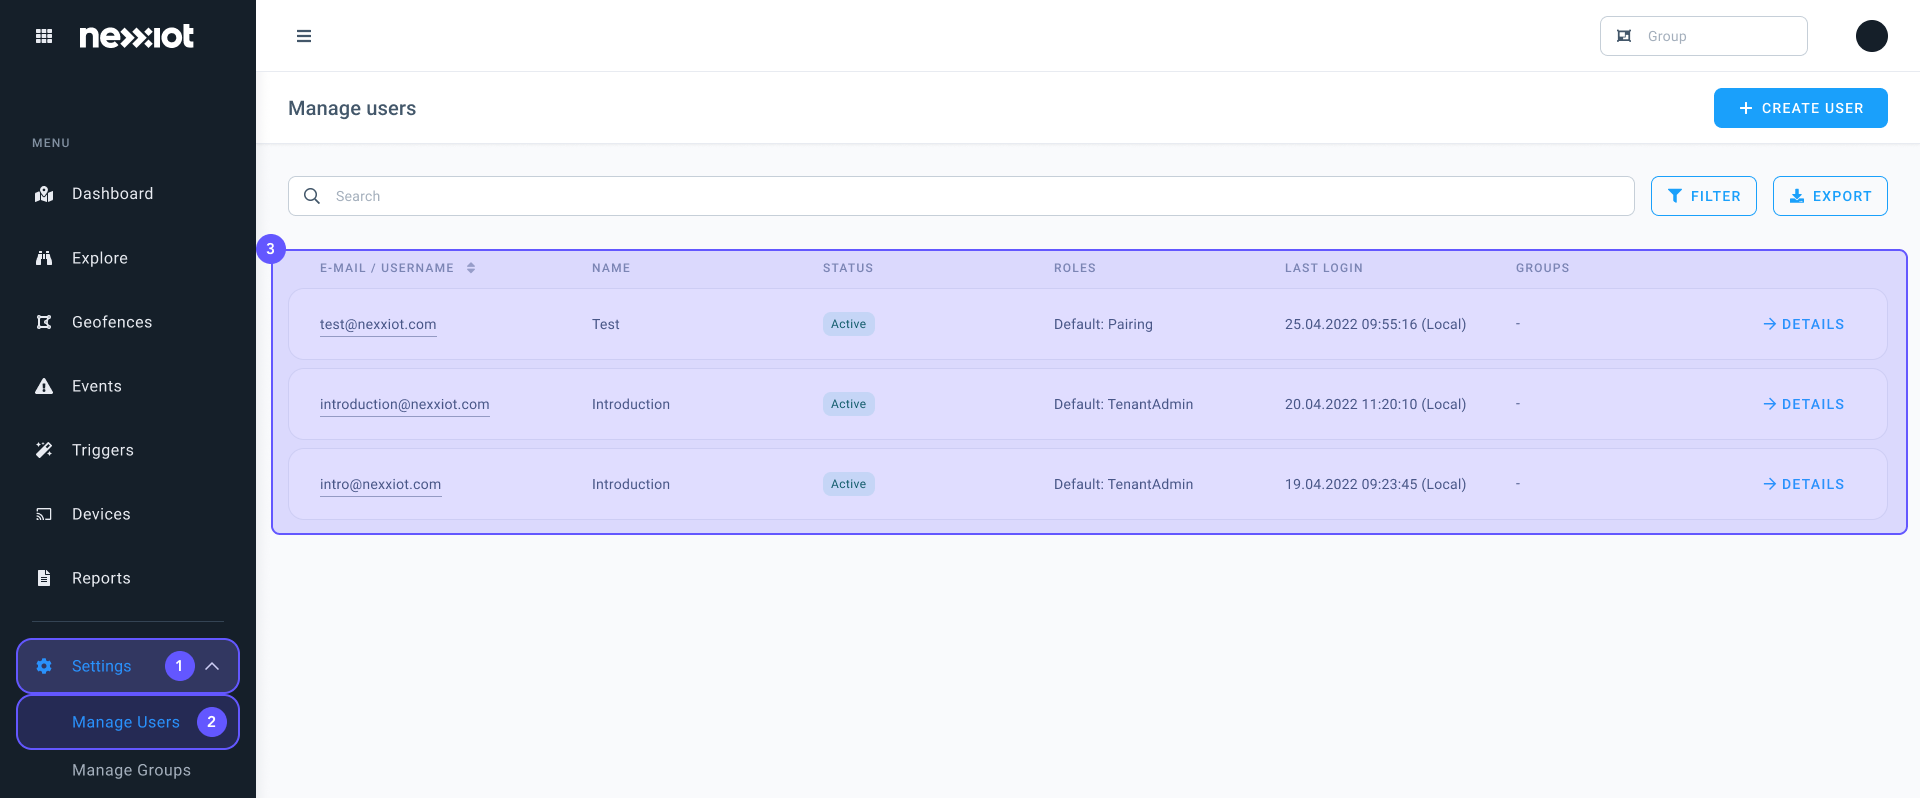
- Navigate to Settings (1)
- Click on Manage User (2)
- In the list (3) you can see all users with the Email/ Name/ Active or Inactive/ Roles/ Last Login/ in which groups they are
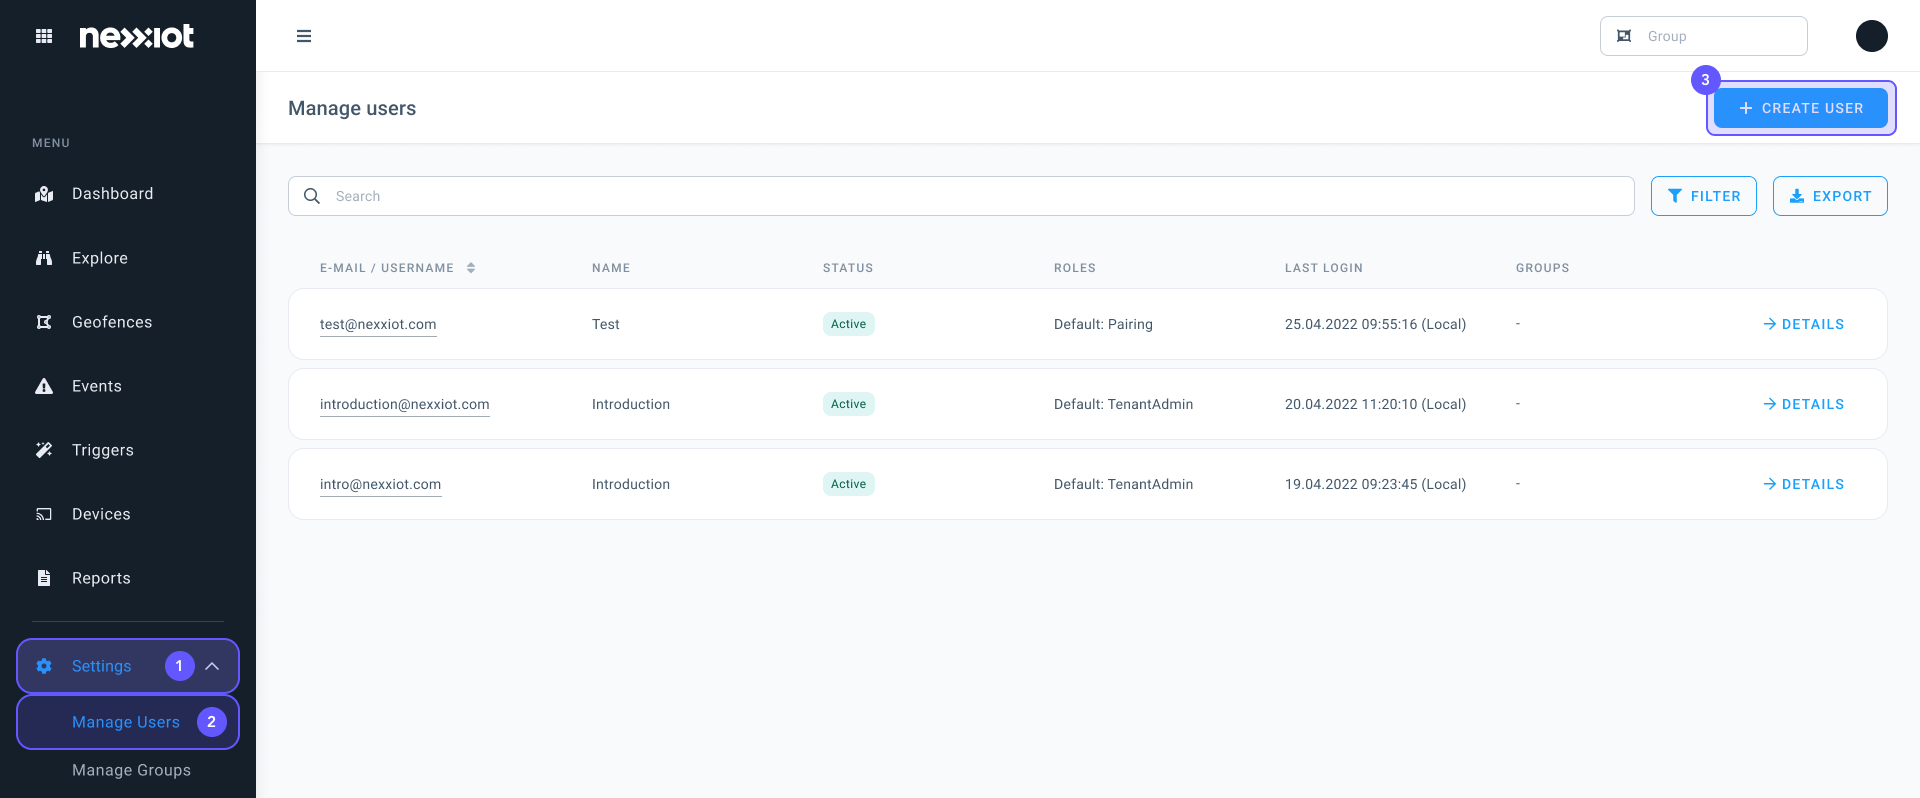
- Navigate to Settings (1)
- Click on Manage Users (2)
- Click on + CREATE (3)
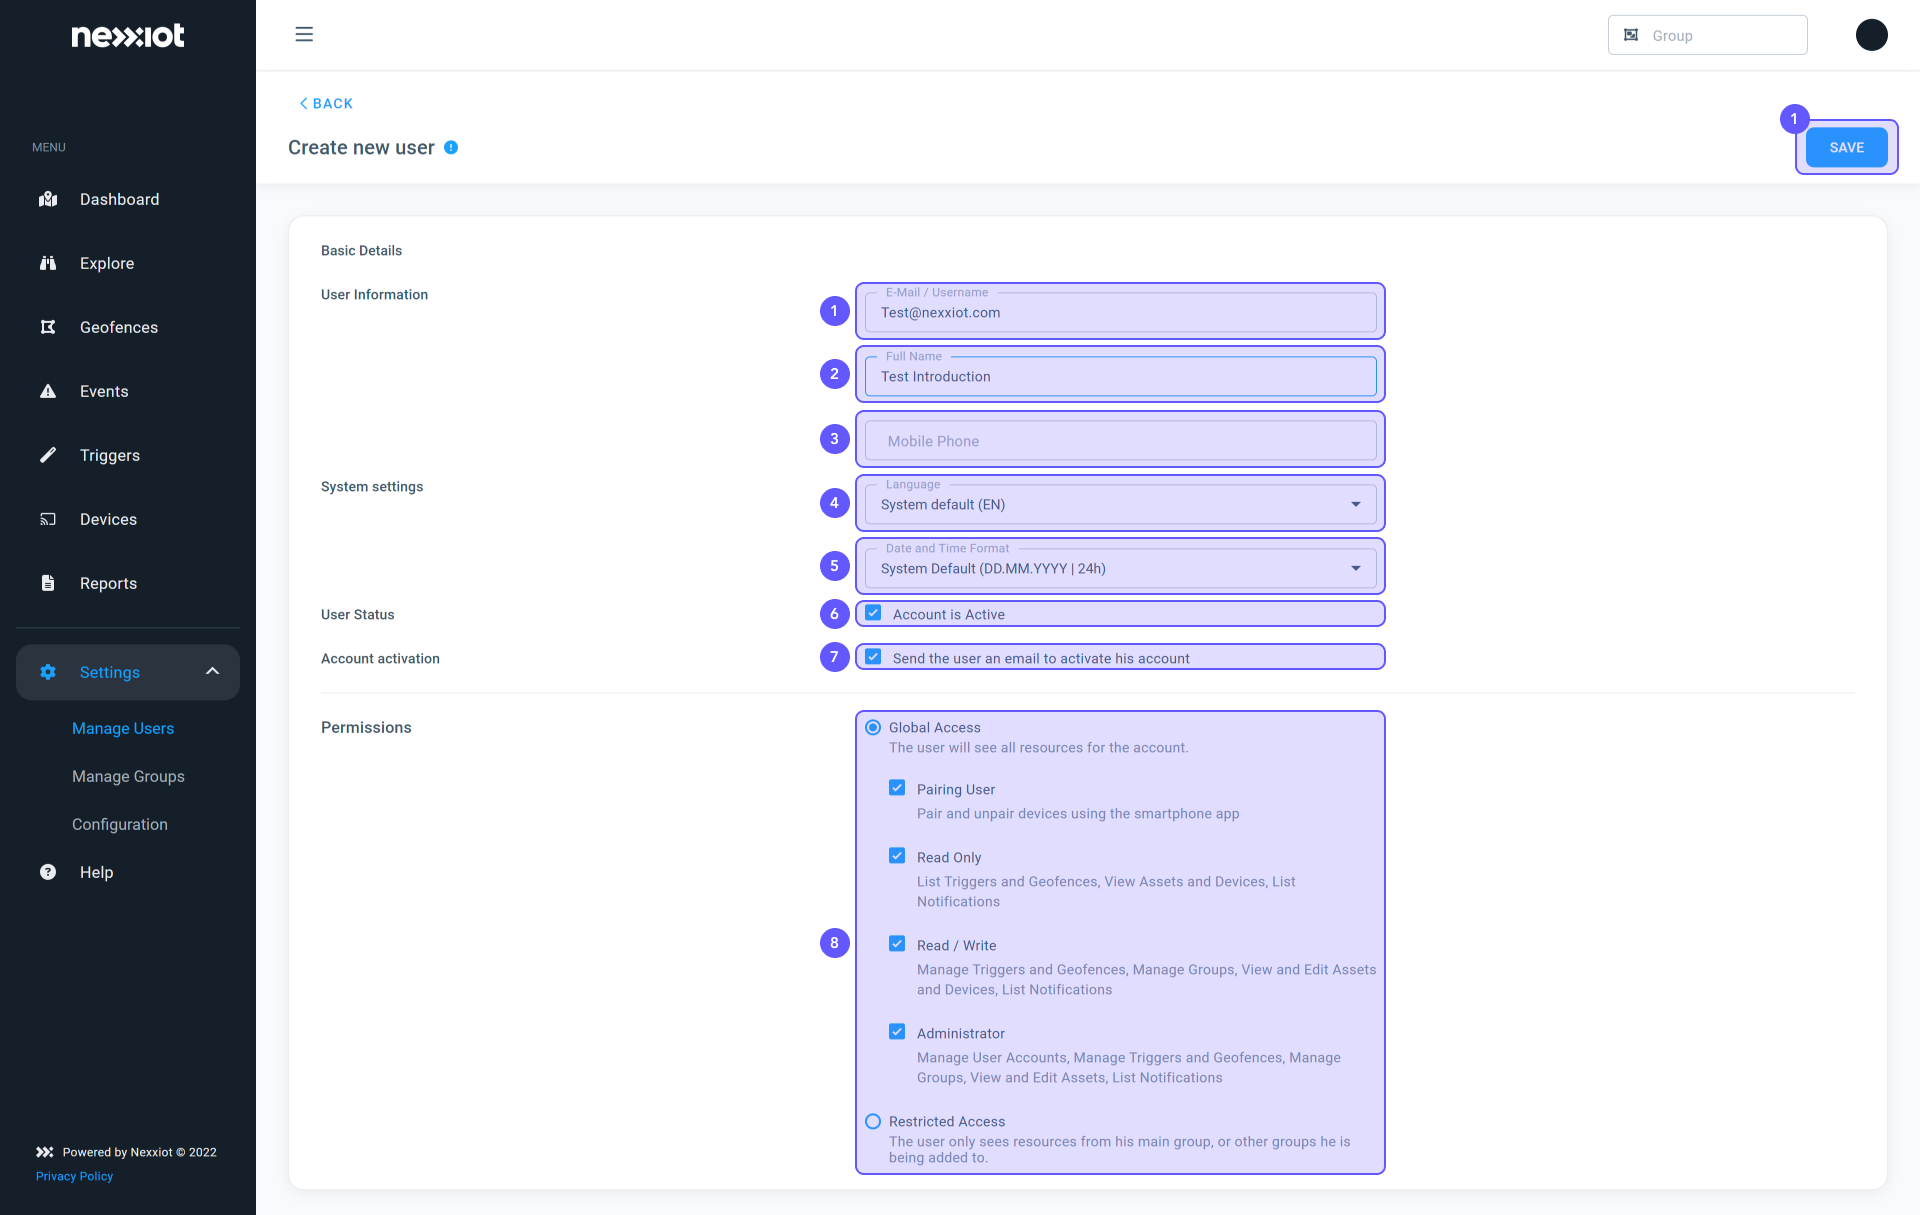
- Enter the E-mail address in the field E-Mail/username (1) (The E-Mail will be the username)
- Fill in the name of the user (2)
- Optional: You can also add a mobile phone number (3)
- Under System Settings you can choose the preferred language (4) and timezone (5)
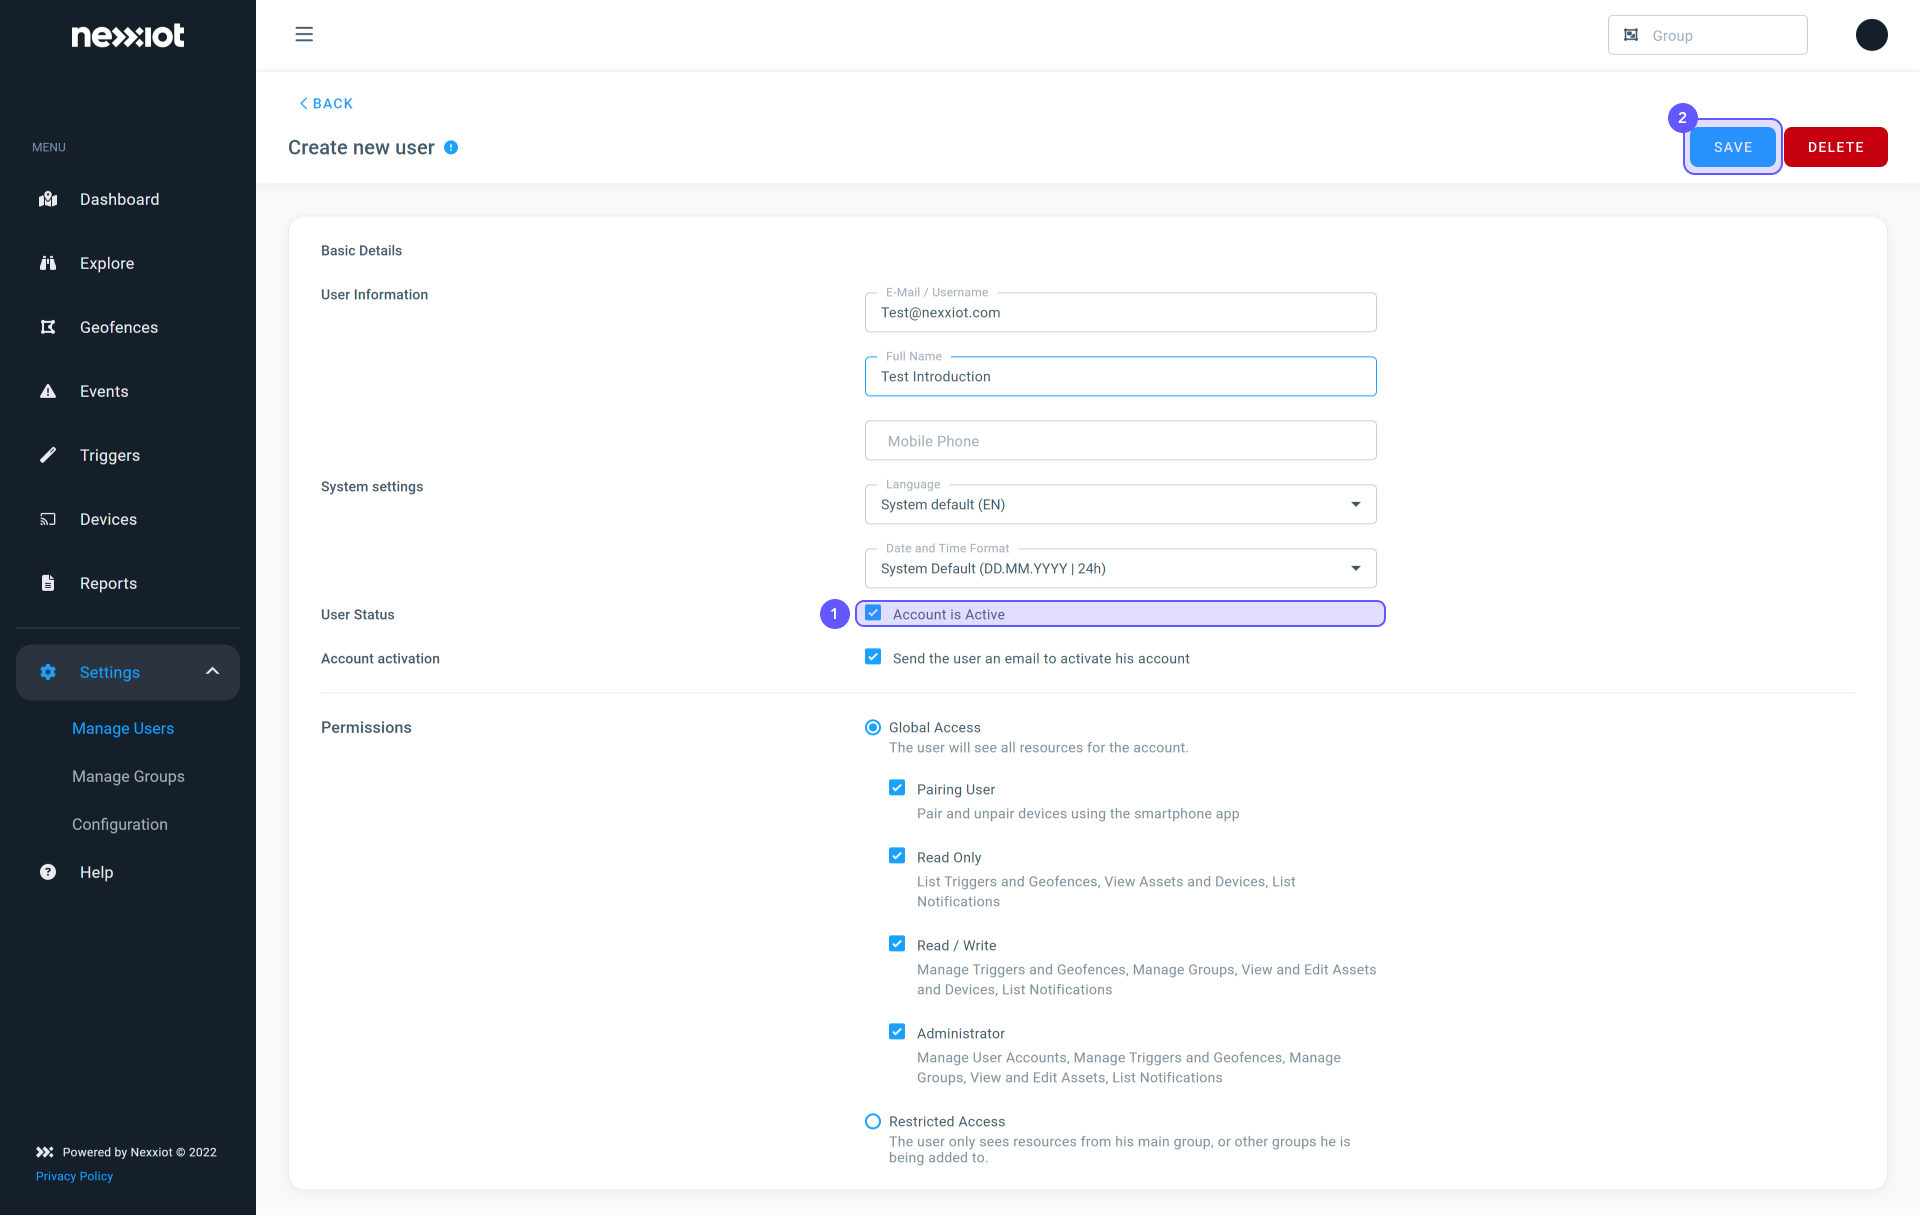
- Under User Status (6) you can set the user to inactive
- Under Account Activation (7) you can choose if the user should get an E-mail to create a password or with a single sign-on (If you choose a single sign-on a little window will pop up when you have clicked on save. You have to copy this and send it to the user)
- Under Permissions (8) you can choose which account permissions he should get. All the account permissions are explained below
- Navigate to the main menu Settings (1)
- Click on Manage Users (2)
- In the search bar you can search for the Email or the name of the user (3)
- In the user line click on DETAILS (4)

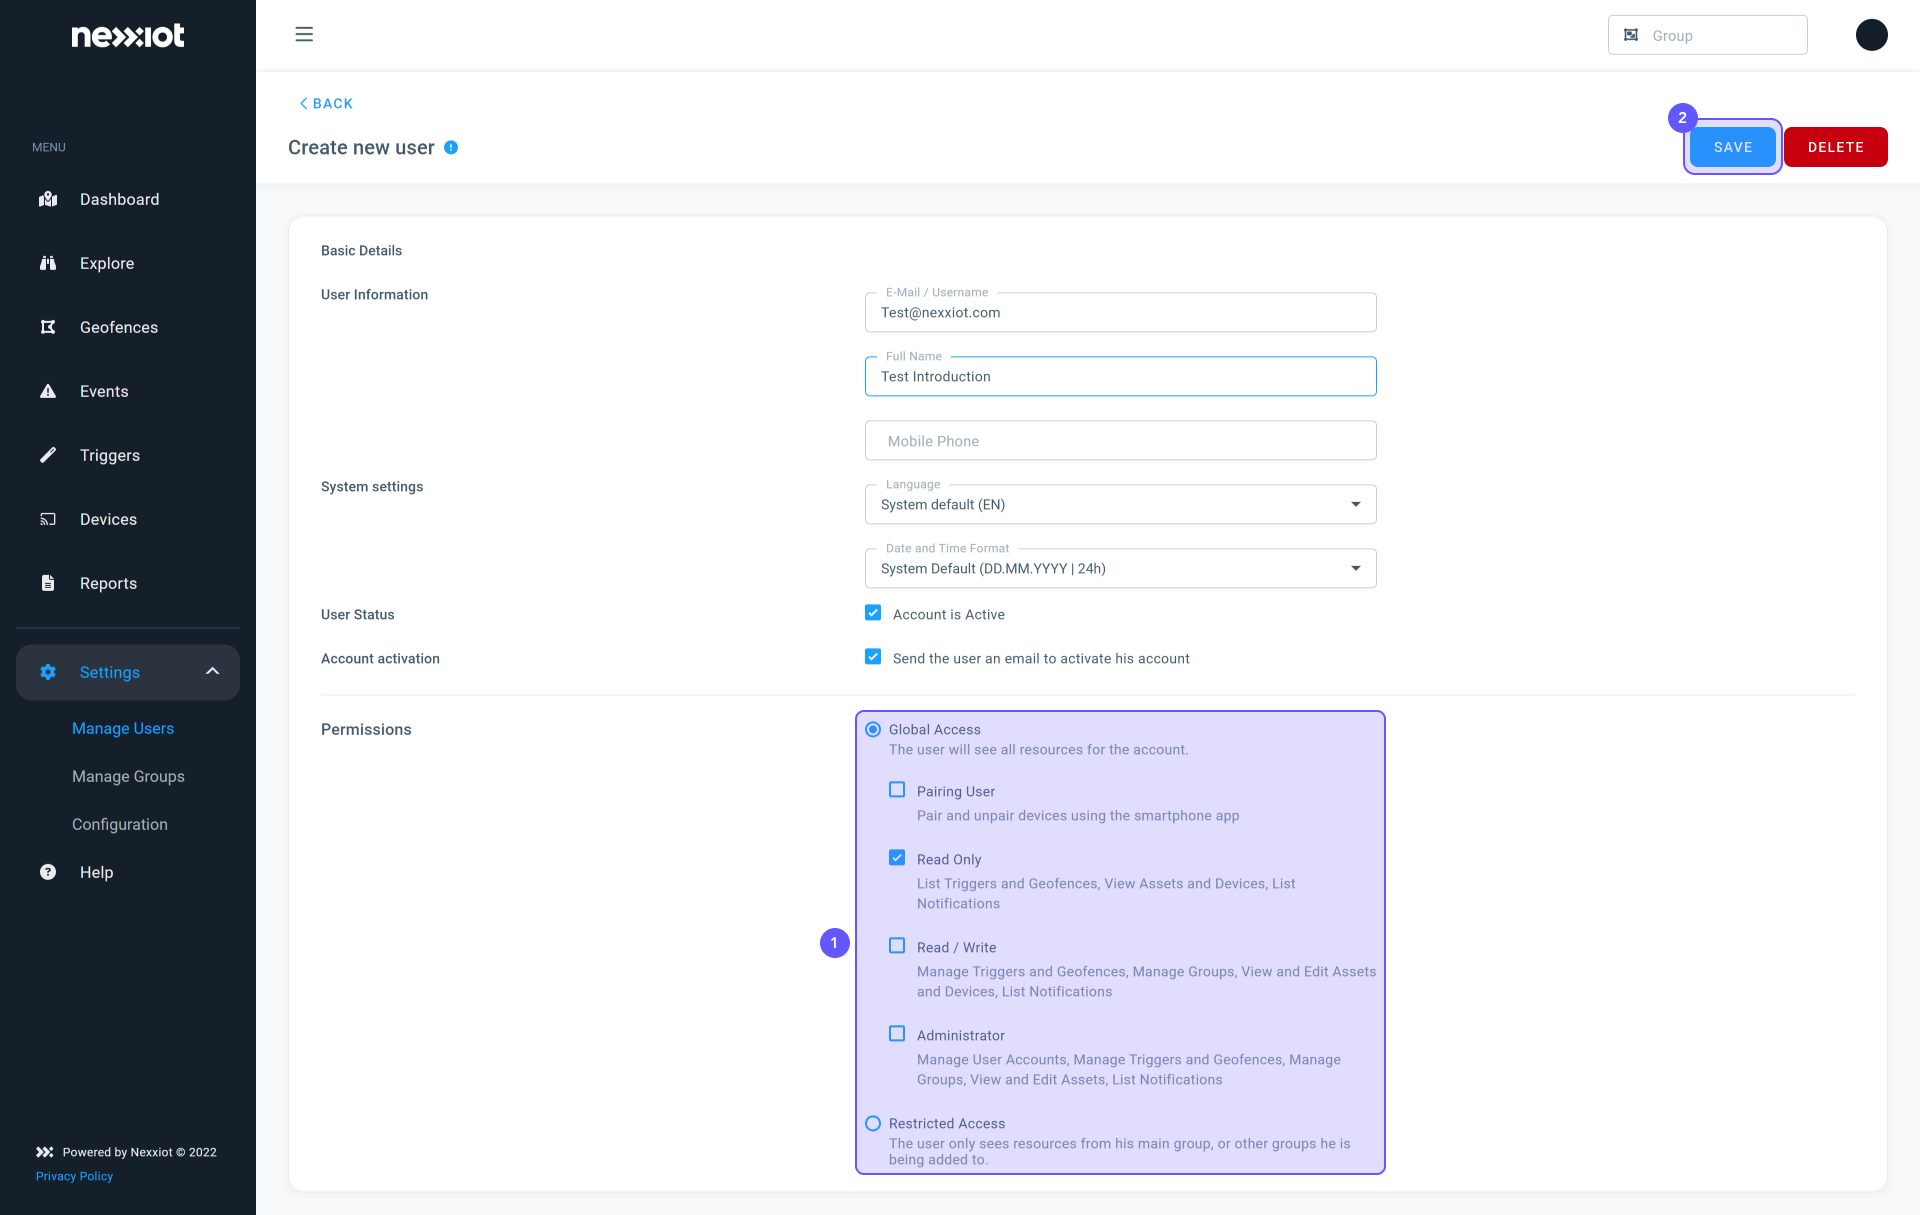
- Under permissions (1) you can see which account permissions the user has
- Click on SAVE (2)
- Navigate to Settings (1)
- Click on Manage Users (2)
- In the new window in the top right, you can click on +Create (3)
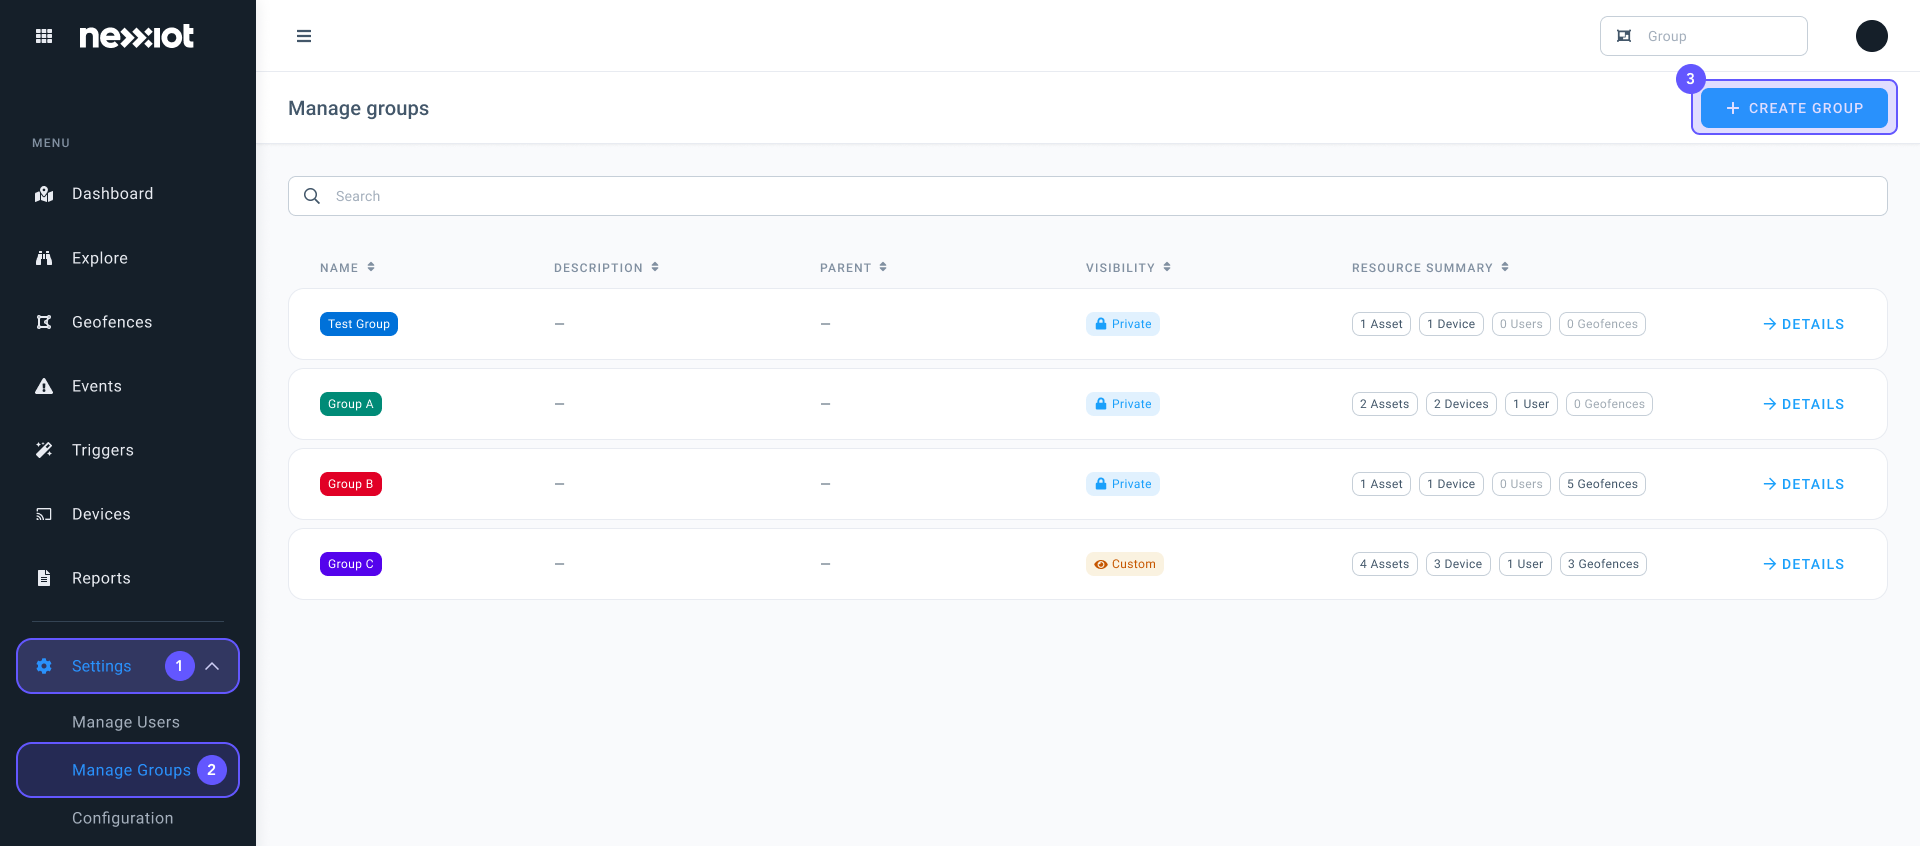
- In the group menu (1) you can choose if you will add assets, geofences, users, or unpaired devices
- In Group Editor (2) you have to give the group a name, you can describe the group, and can give the group color to find the group better
- Group visibility gives you the possibility to select which kind of public visibility you want to give to the group and the Dashboard Asset Visibility
- If you have made a group, do not forget to click on create group (4)

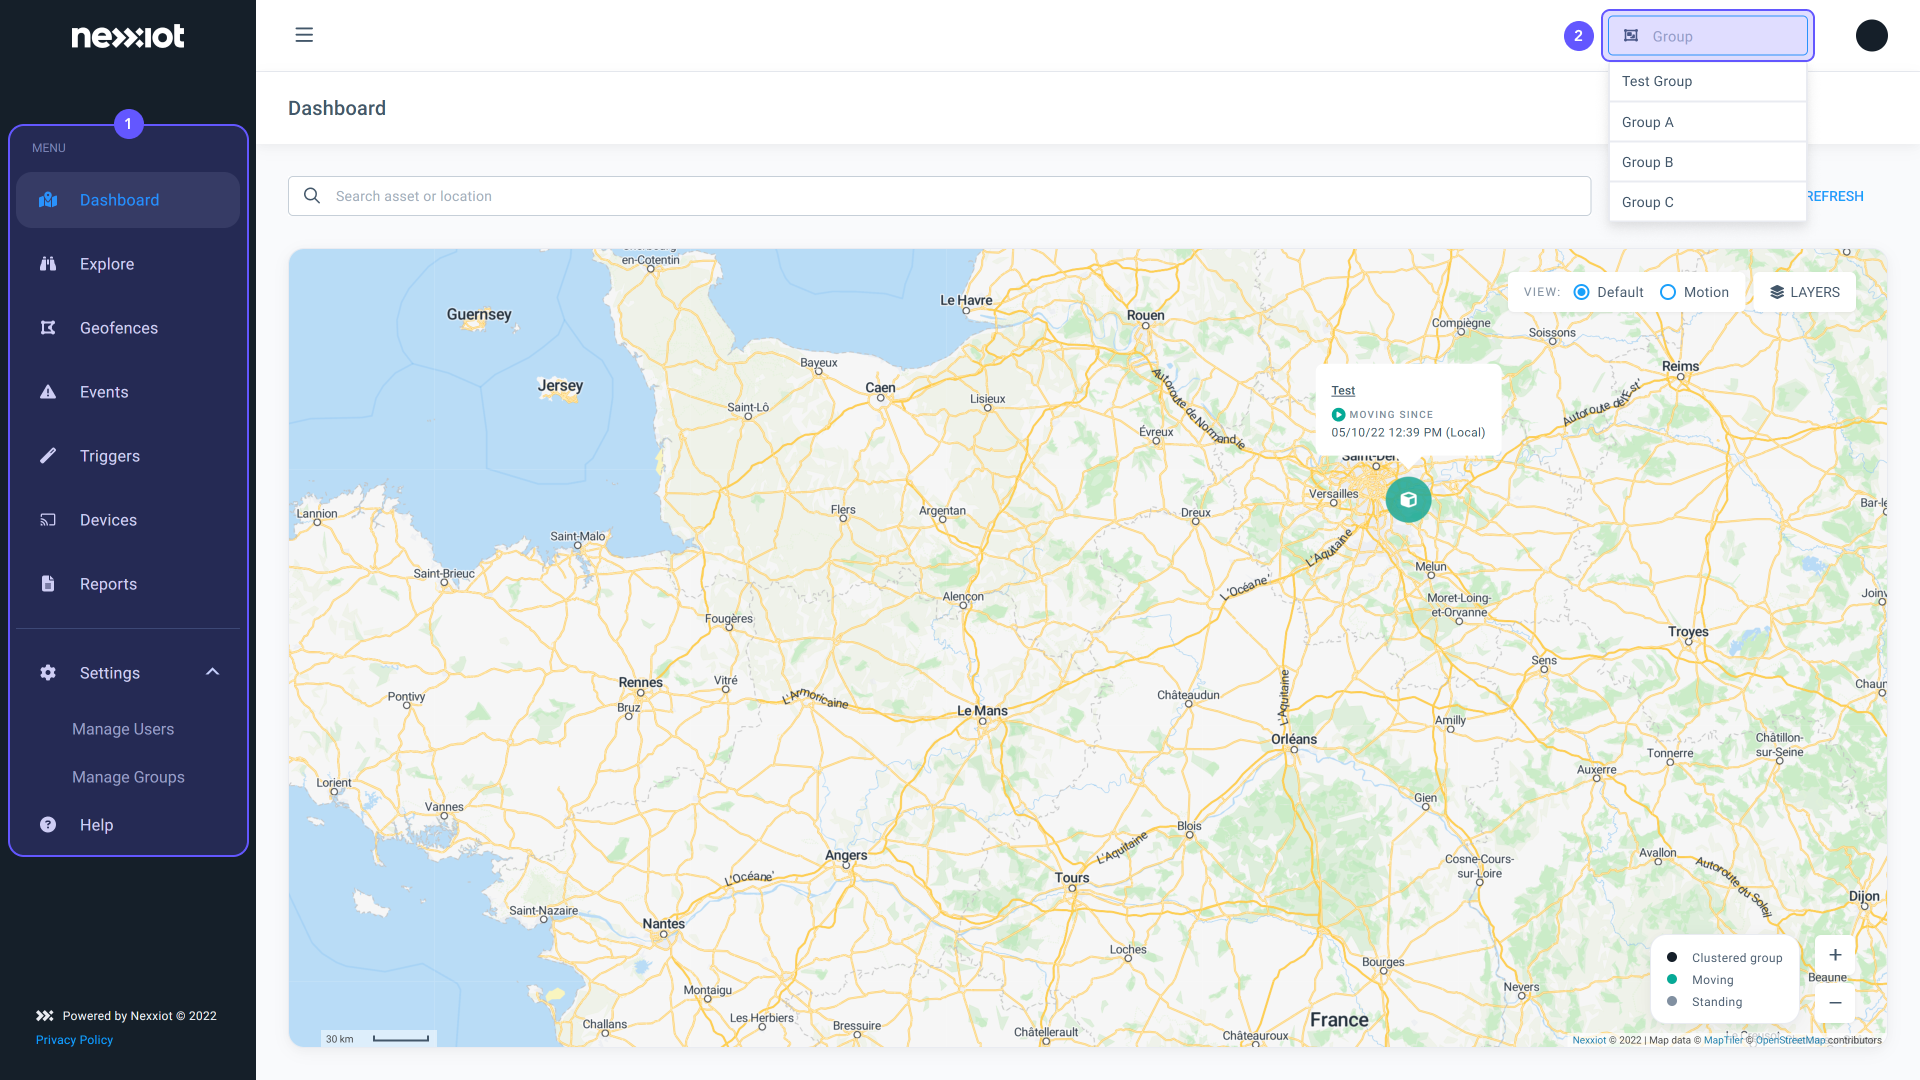
- Navigate to the Dashboard page (1)
- Enter the group name in the Groups search bar (2) to change to a different group
- Navigate to any main menu page (1).
- Click on the top right on your Account letters (2).
- Click on My Profile (3).

- In the new window (1) you can change your password.
- Do not forget to click on save changes (2).
Option 1:
- Navigate to the Dashboard (1) page.
- Click on Layers (2).

- In the new window, you can click on the map (1) Railway, Transport, or Satellite and it will change directly.

Option 2:
- Navigate to Settings (1).
- Click on Configuration (2).
- Click on UI Configuration (3).
- Click on the custom display name (4).
- On the map below you can choose the area you would like to have in the dashboard (5).
- Click on Save UI Configuration (6).

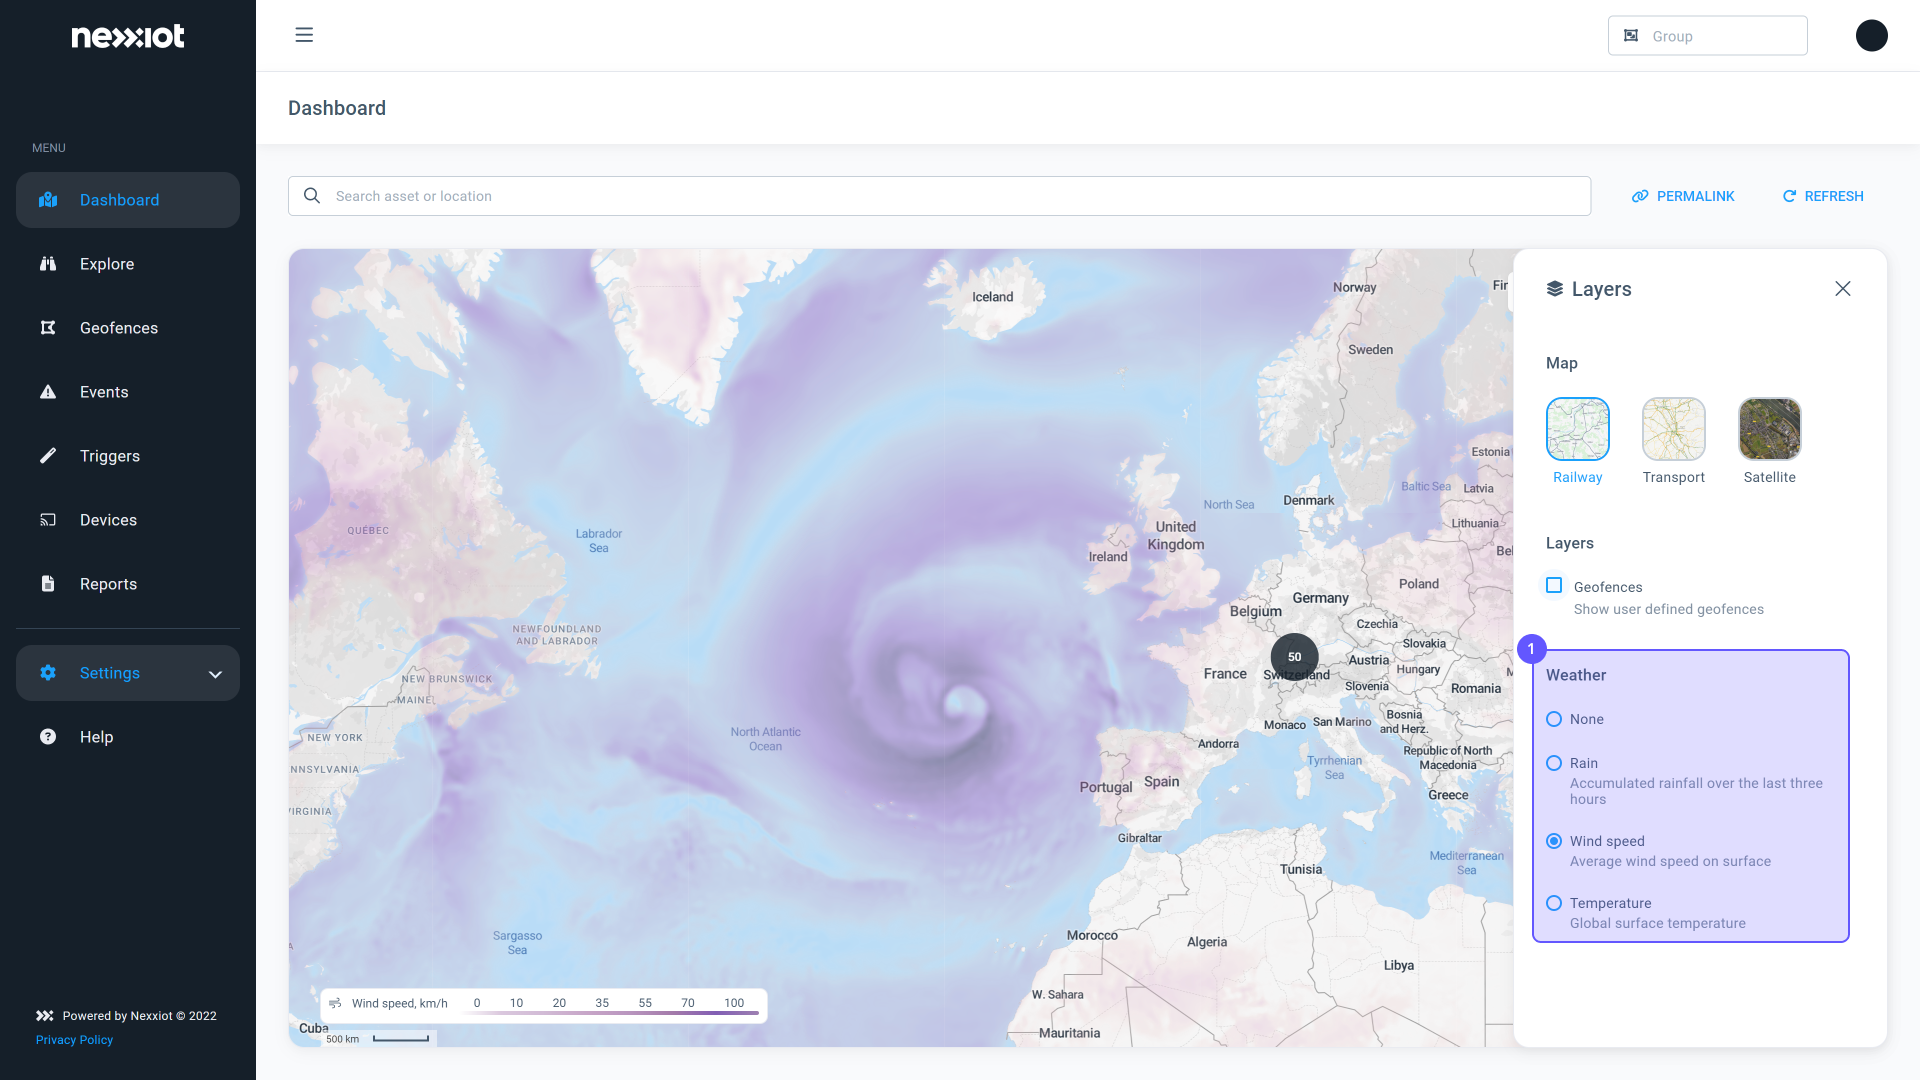
Option 1: You can navigate to the Dashboard (1) page.
- Click on Layers (2)
- Here you can click on rain/wind speed/temperature (1)

Option 2: You can navigate to the main menu Explore (1).
- Here you can browse the list of assets or use the search bar (2) at the top of the table to search assets by their name
- Click on the name (3) or click on details (4)
- In the new window click on Layers (1)
- The Layer window pops up and you can choose if you want rain/wind speed or temperature (1)
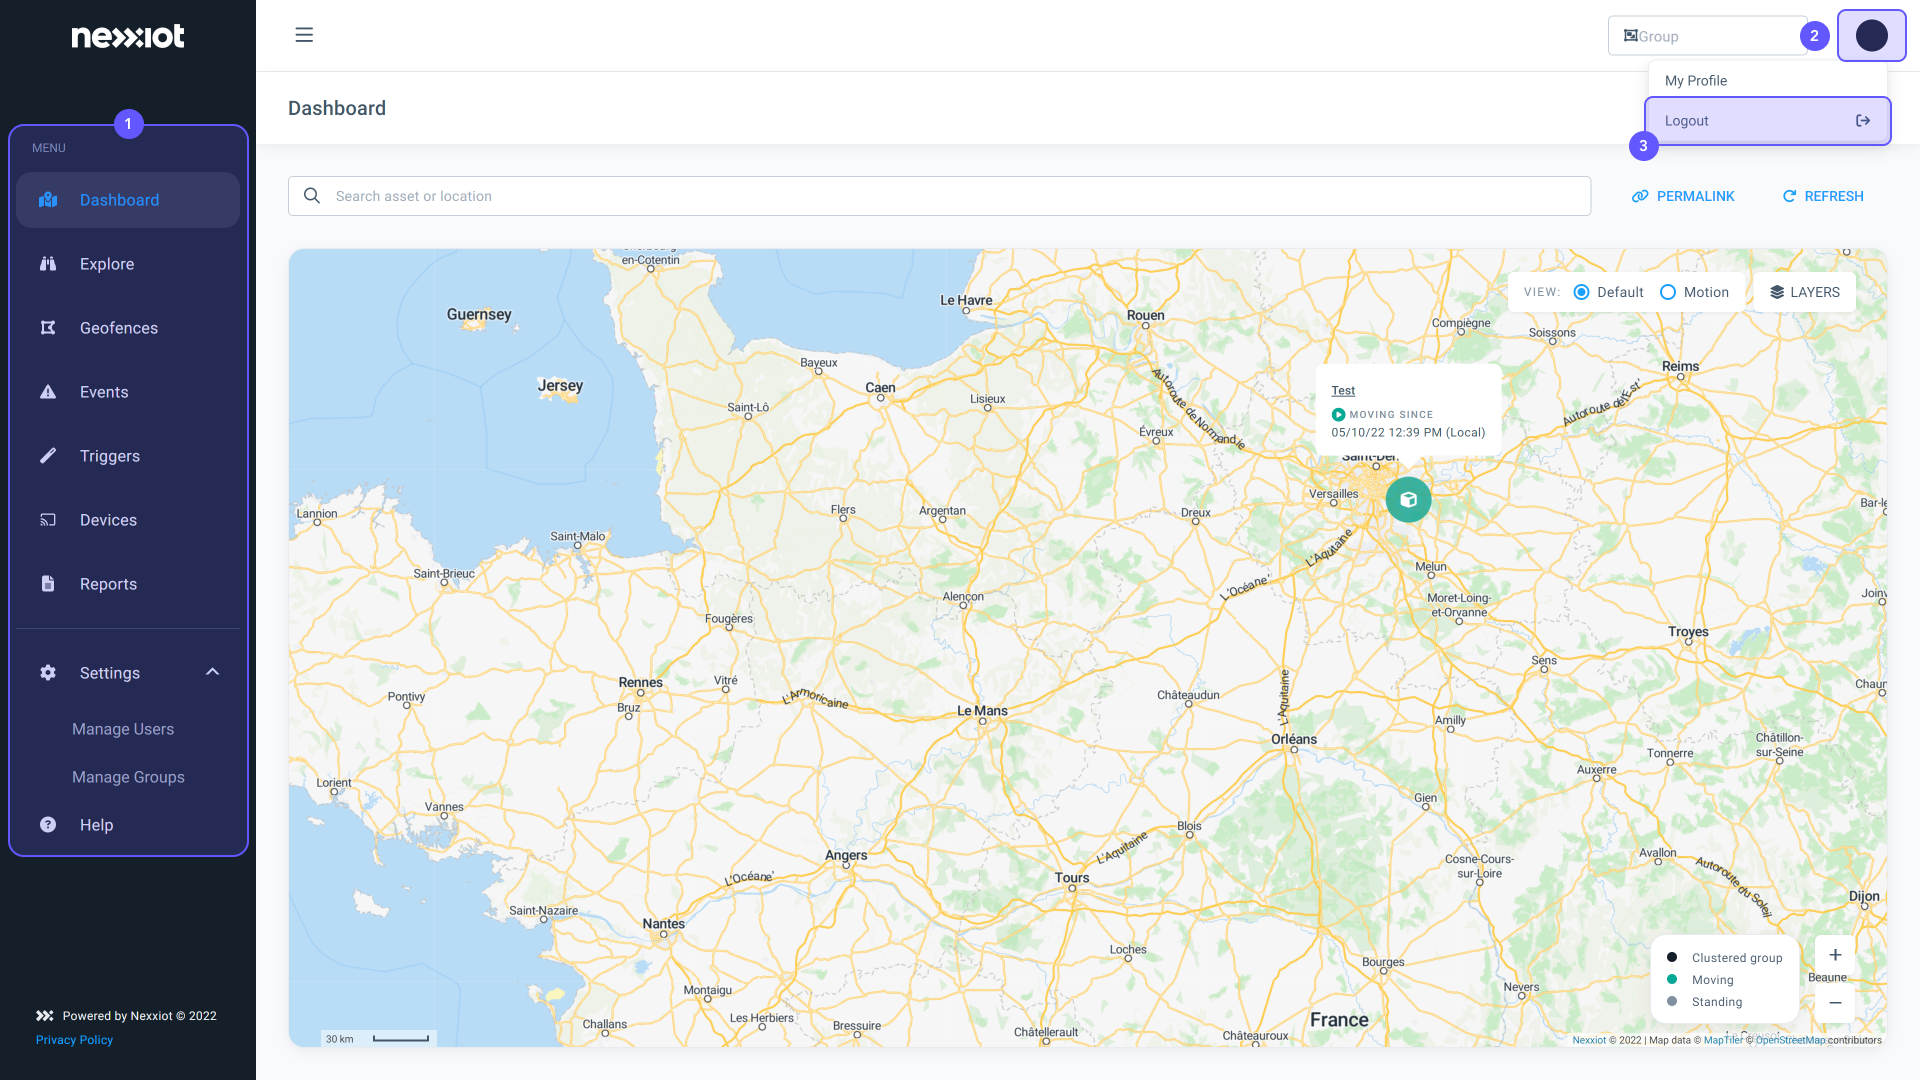
- Navigate to any main menu page (1).
- Click on the top right on your Account Letters (2).
- Click on Logout (3).
- Navigate to Settings (1).
- Click on Manage Users (2).
- In the search bar you can search for the E-mail or the name of the user (3).
- Click on DETAILS (4).

- Under User Status (1) you can see or change if the user is active or inactive
- If you have changed it, do not forget to click on save (2)
If you have additional sensors paired to your Globehopper device, you can find sensor information by following the steps described below.
Option 1:
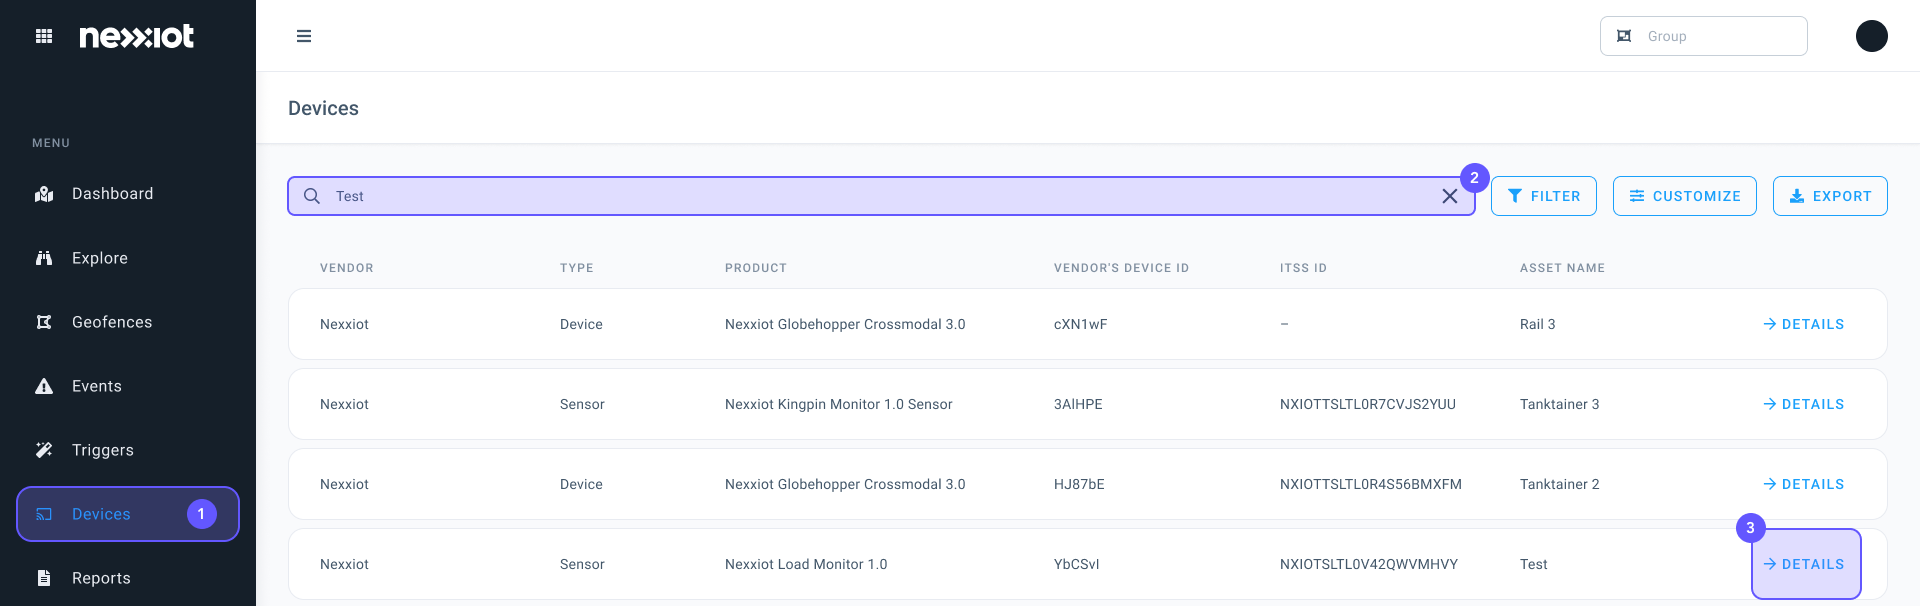
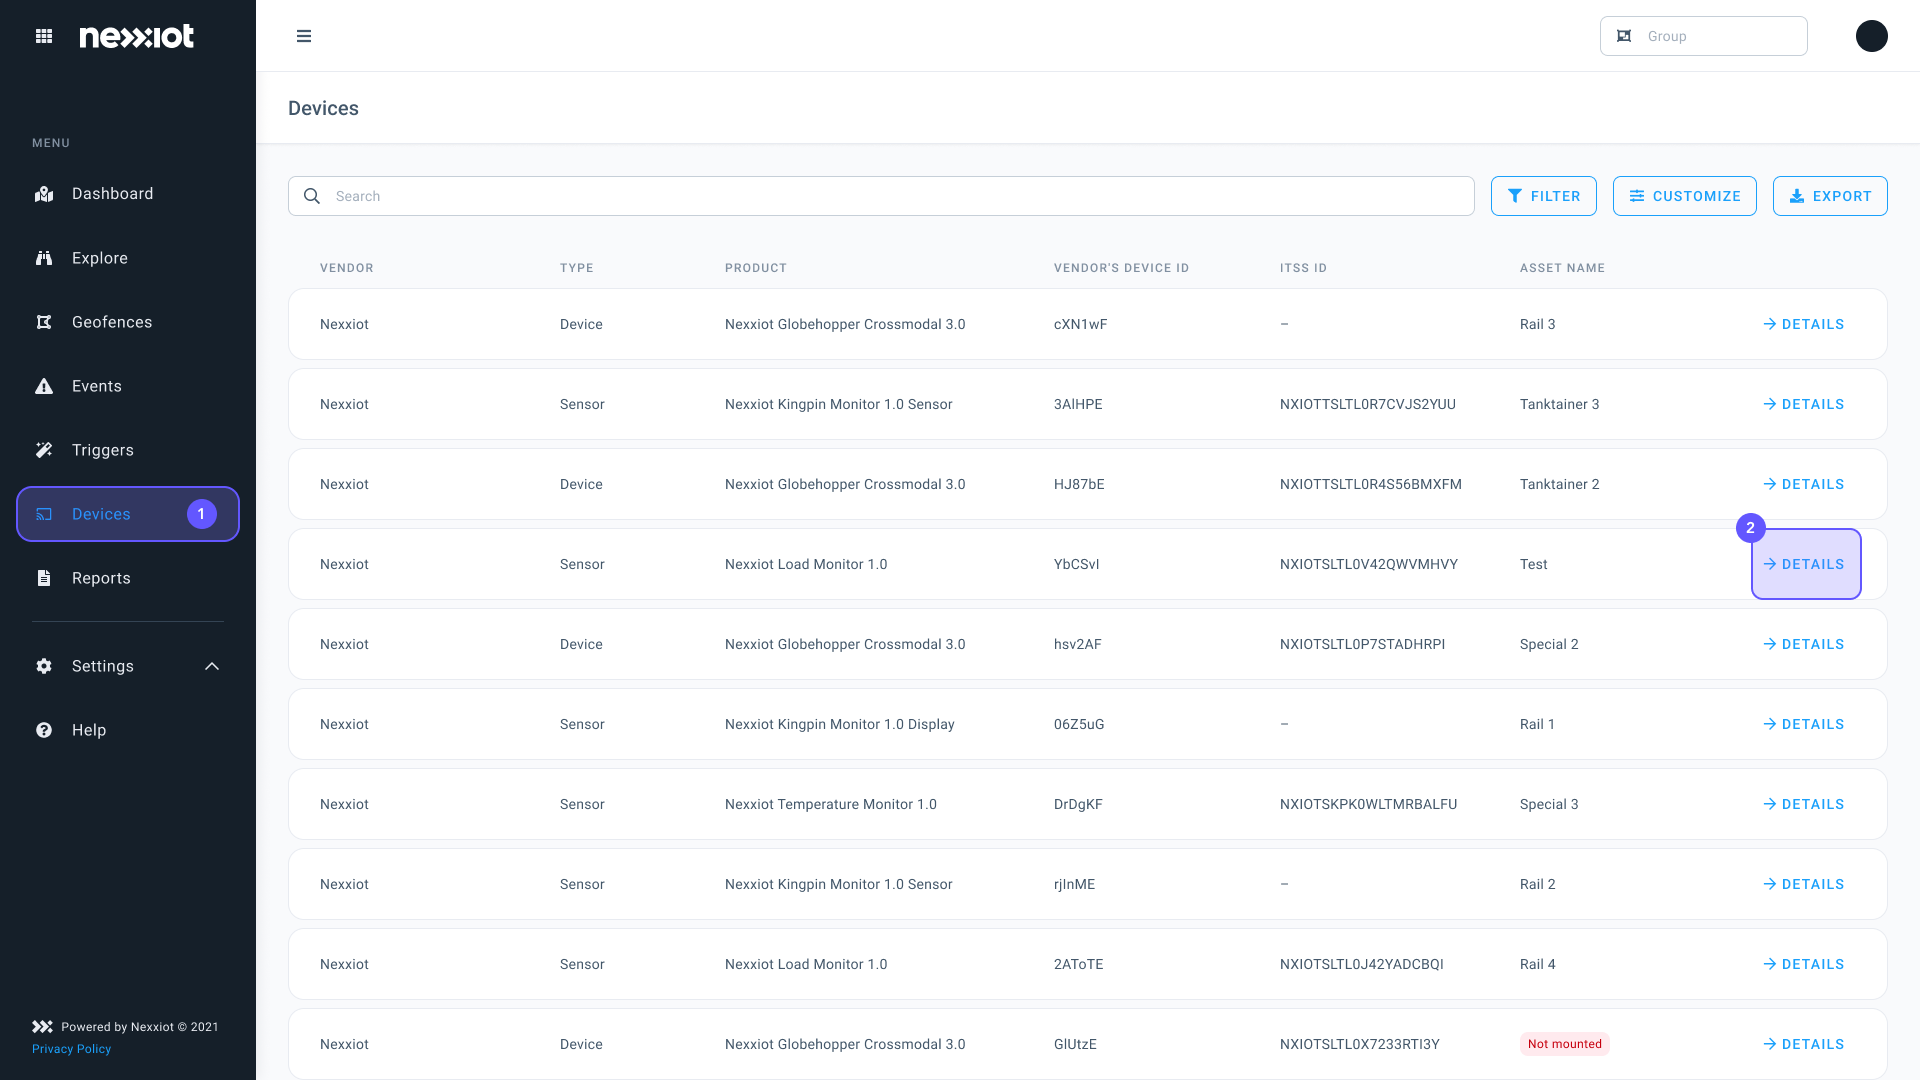
- Navigate to the Devices (1) page.
- Search for the name of the asset in the search bar (2).
- Click on DETAILS of the desired asset (3).
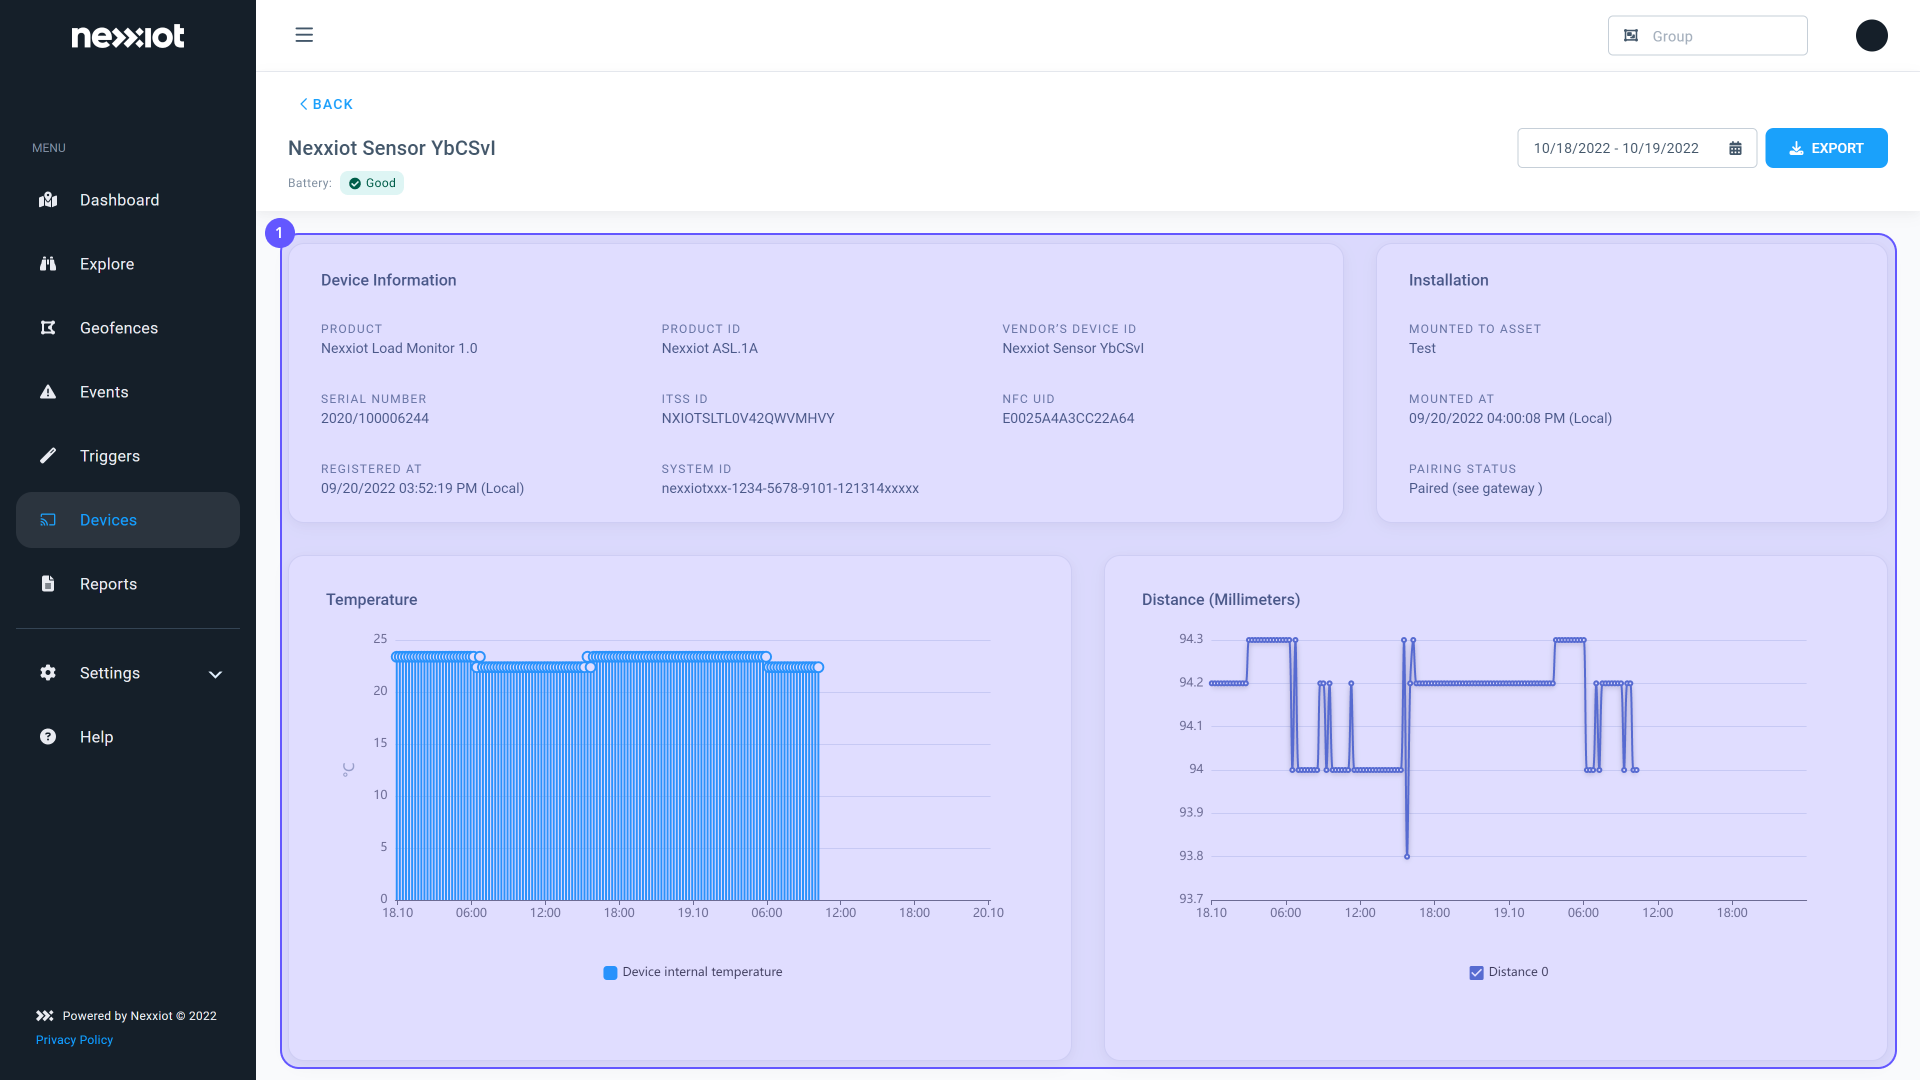
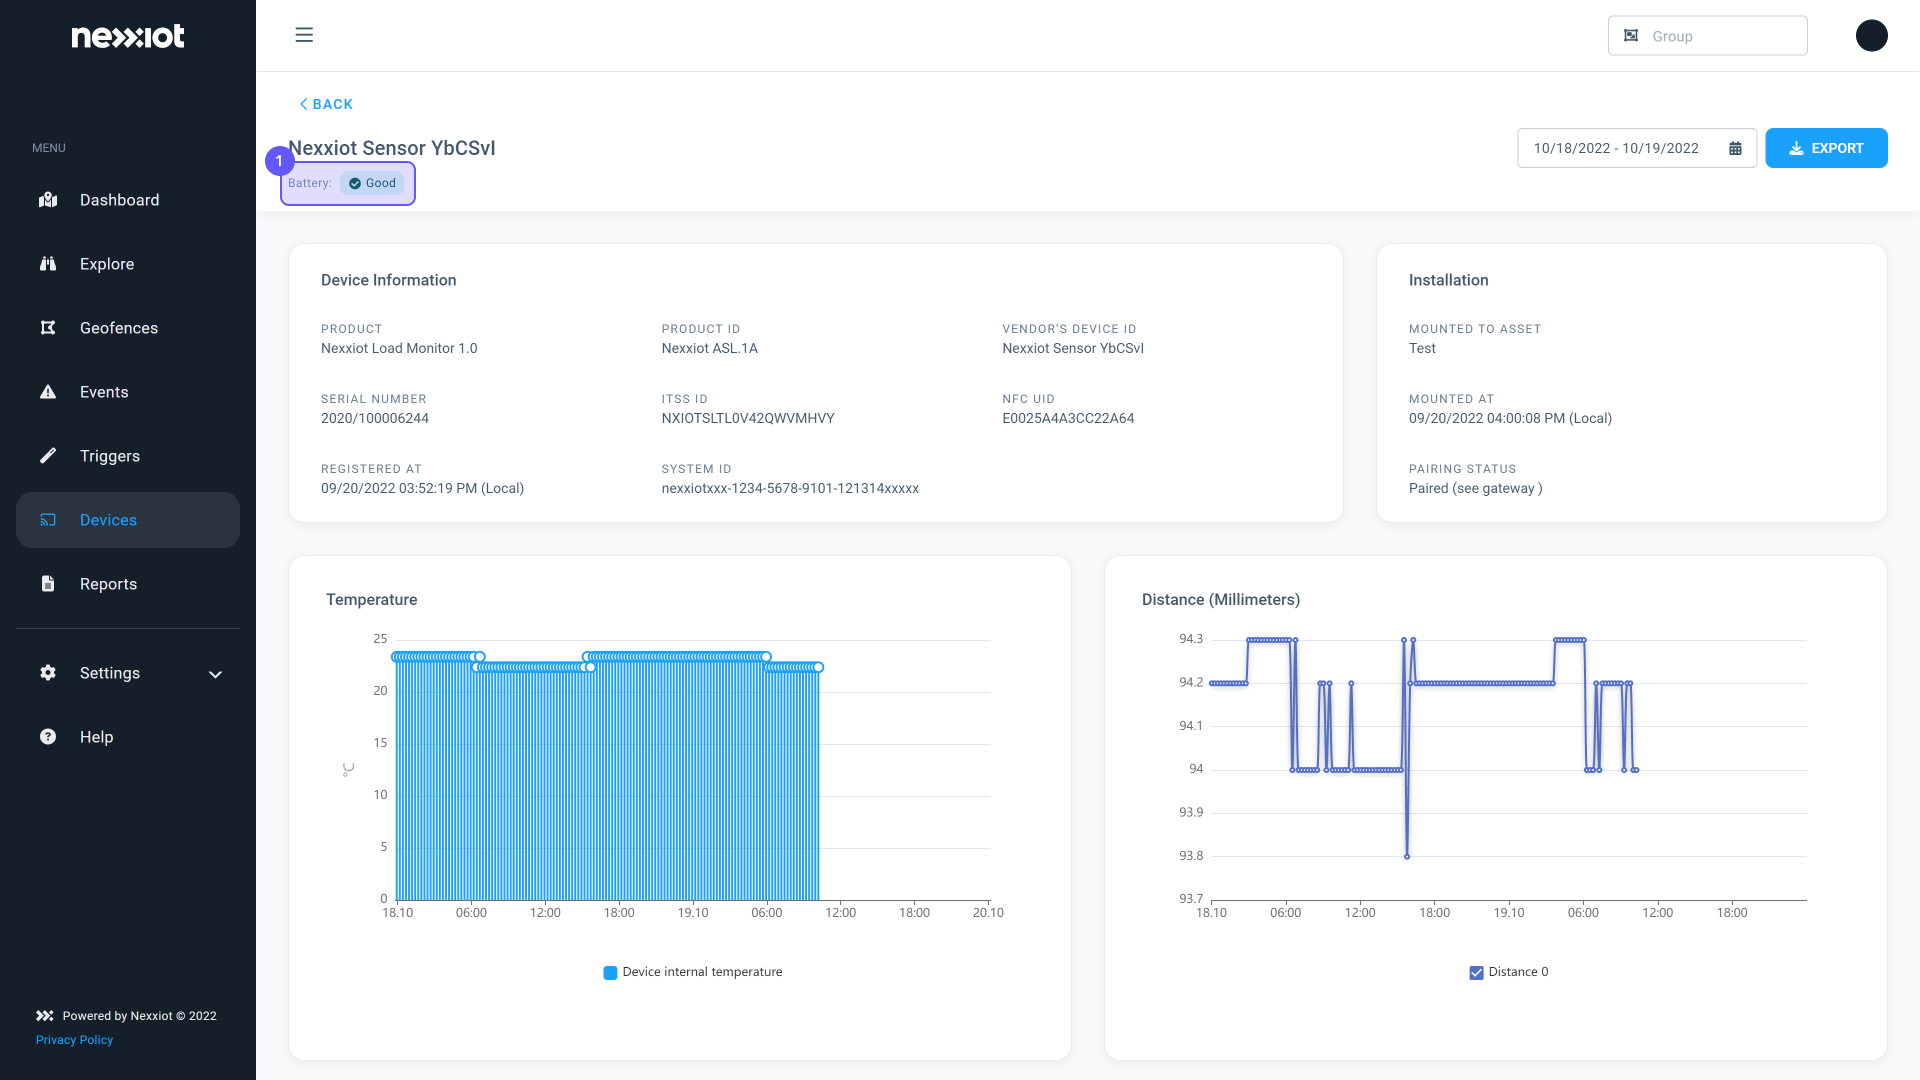
- In the new window (1) you will find the name of the product, the product ID, the Vendor’s device ID, the serial number, ITSS ID, NFC UID, Registered date, System ID, mounting time, mounted at and pairing status.
Option 2:
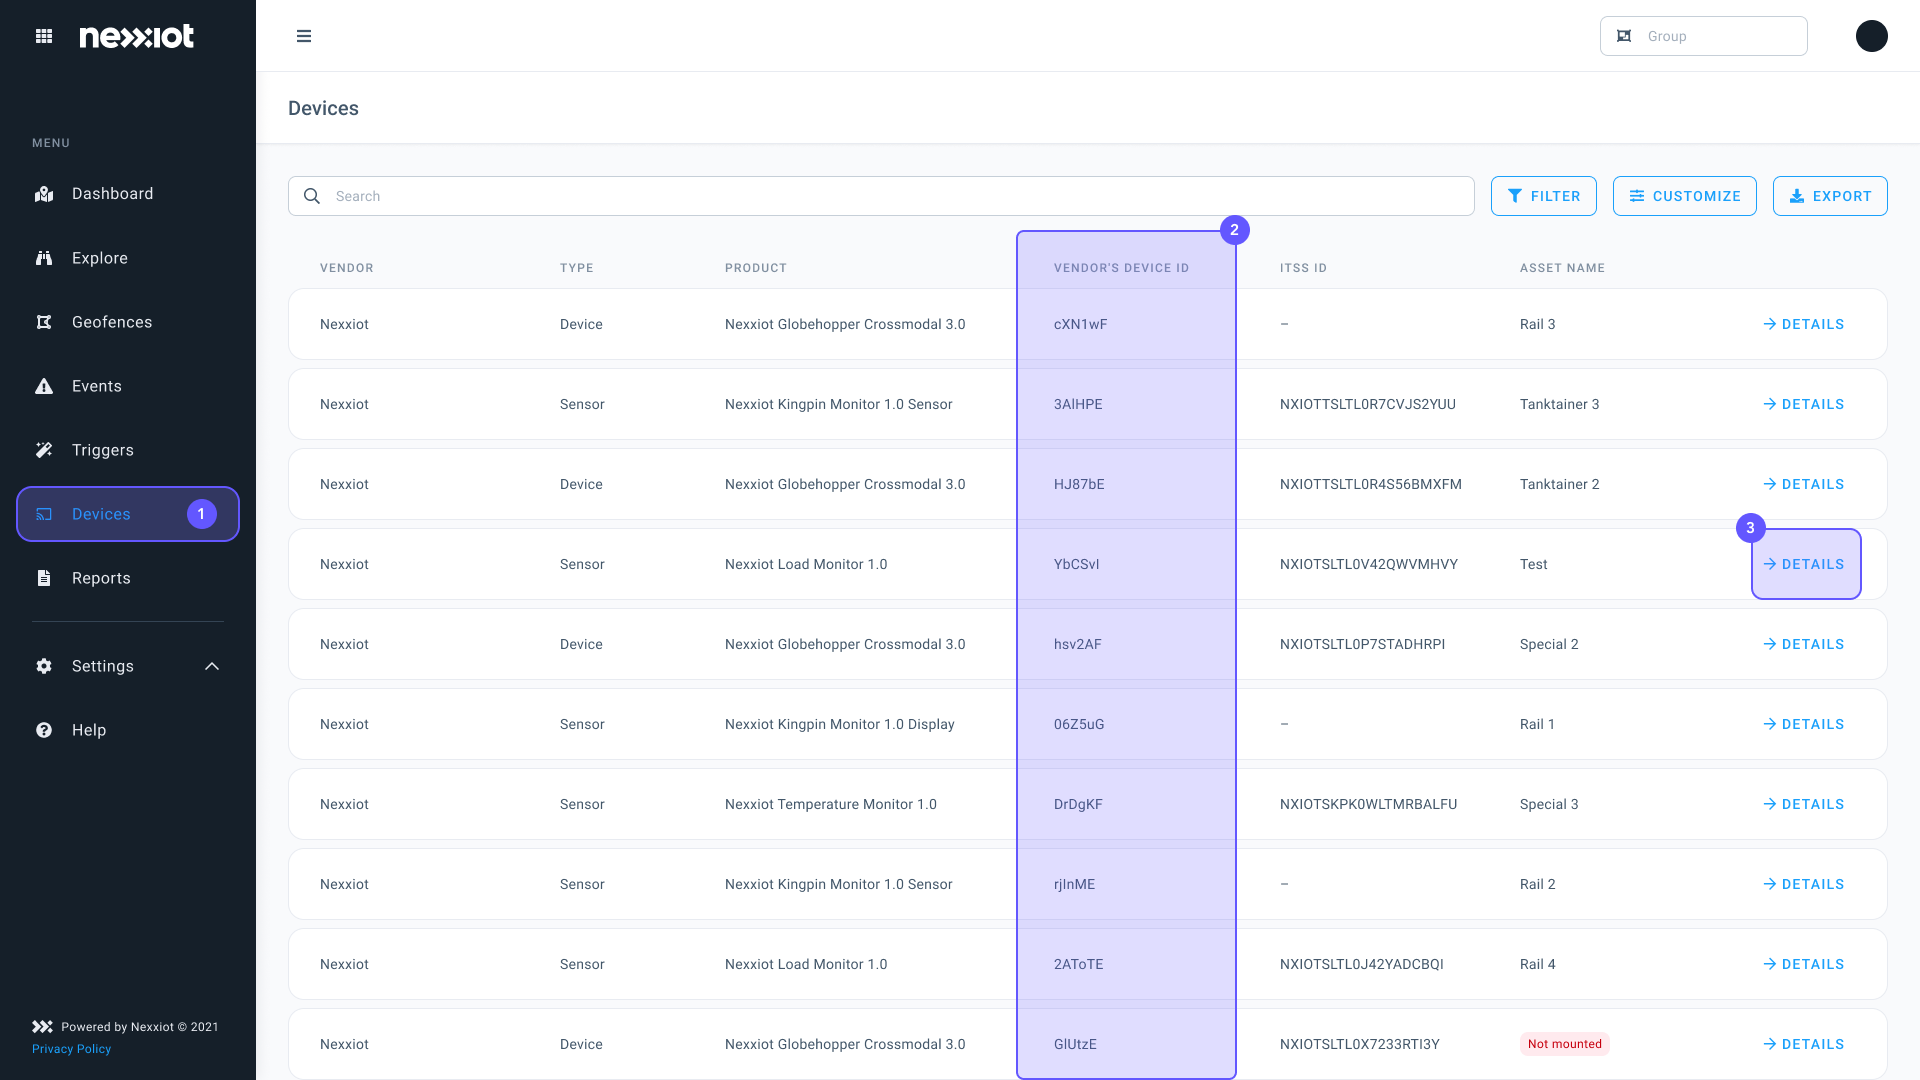
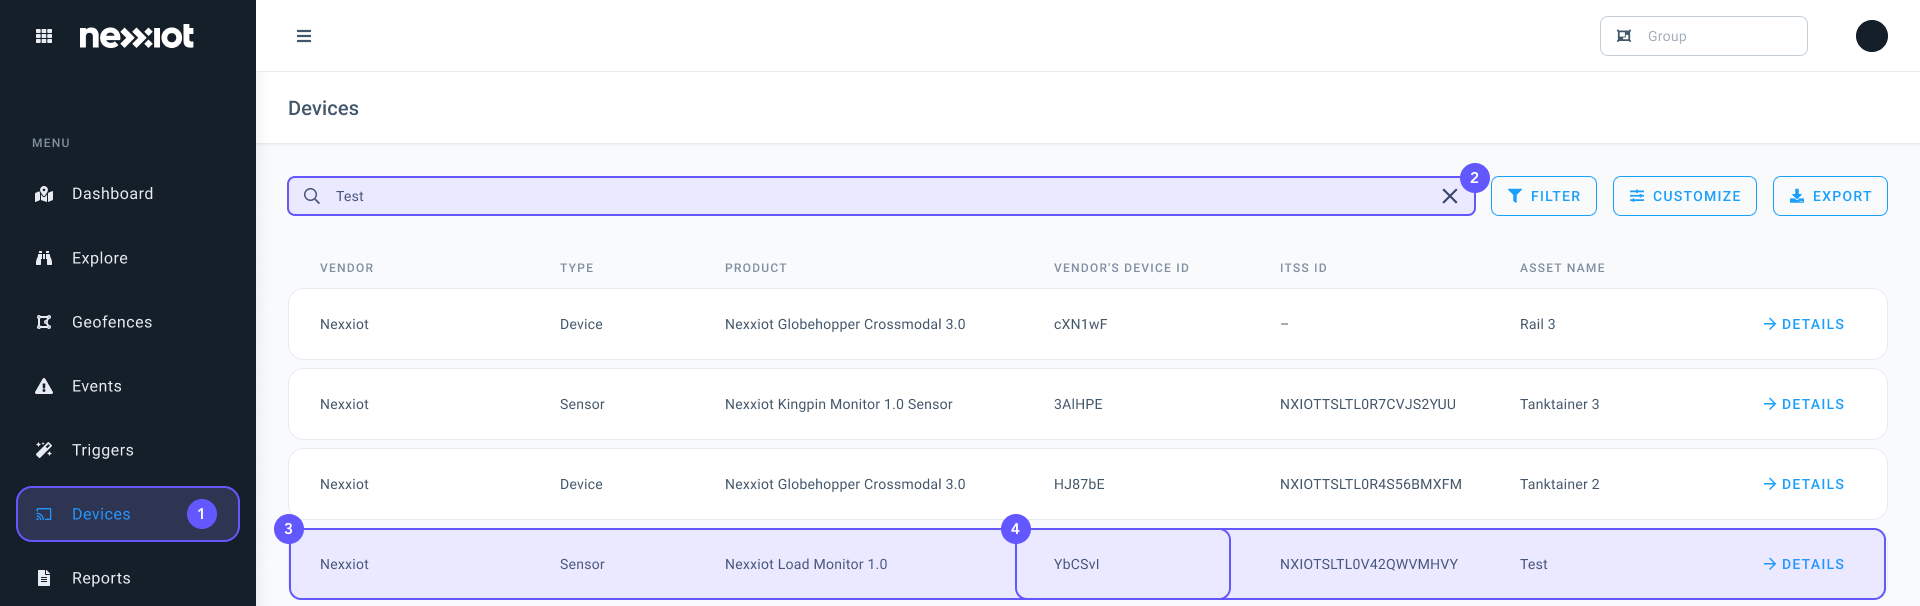
- Navigate to the Devices (1) page.
- Search your device ID in the list below the search bar (2).
- Click on DETAILS in the box of your sensor (3).
- In the new window you can see the sensor data (1).
- Navigate to the Devices (1) page.
- Search for the name of the asset in the search bar (2).
- Click on DETAILS (3).

- In the new window (1) you can see the serial number.

- Navigate to the Devices (1) page
- Search for the name of the asset, the product name, or the device ID in the search bar (2)
- The device and all connected sensors are visible in the list below
- You can find the Device ID under “Vendor’s device ID” (4)
- Navigate to the Devices (1) page.
- Click on DETAILS (2) of the Device you are interested in.
- On the top left, you see the status of the battery (1).
If you wish to change the standard sending interval of the devices, please reach out to our Customer Support Team directly via e-mail support@nullnexxiot.com.
You can open a ticket via our Nexxiot Service Desk or reach out to our Customer Support Team directly via e-mail support@nullnexxiot.com for assistance.
If your device is not sending any information, it might be that your asset may be in an area where there is poor cellular connection. When the Globehopper does not have coverage of the global navigation satellite system (GNSS) or it is outside the System for Mobile Communication (GSM) Network, the data is recorded into an internal black box. This black box stores both the Globehopper’s and the connected sensors’ data which would be otherwise transmitted to the backend of the device if the GSM network were available. As soon as connectivity is restored, the data stored in the black box is sent to the cloud.
You can find installation recommendations in our User Manuals. The optimal installation location is wherever the device can be mounted horizontally, has a clear sky view, and is not obstructed by metal frames. If you are unsure about the optimal location and would like us to give you a recommendation for installation, please contact us via support@nullnexxiot.com.
Yes, if you would like to use the device with a different asset, you can unpair and remove the device from the previous asset by following the instructions in our User Manual for Device Removal. After successful unpairing and removal, you can then install and pair the device with the new asset by following the instructions of the Nexxiot Pairing App.
Yes, the devices are IP66/IP67, IPx9k certified, and can withstand powerful water jets.
Important: The device must be mounted onto a flat surface. The back of the device must be fully covered by the structure, to make sure the back of the device is protected against jet water washing.
If the device is covered with graffiti spray, industrial graffiti removal products can be safely used to clean it without damaging the plastic enclosure and/or the solar panel of the device.